Home
| What's New |
Features |
Gallery |
Reviews |
Reference |
Forum |
Search
Home
| What's New |
Features |
Gallery |
Reviews |
Reference |
Forum |
Search
|
|
|
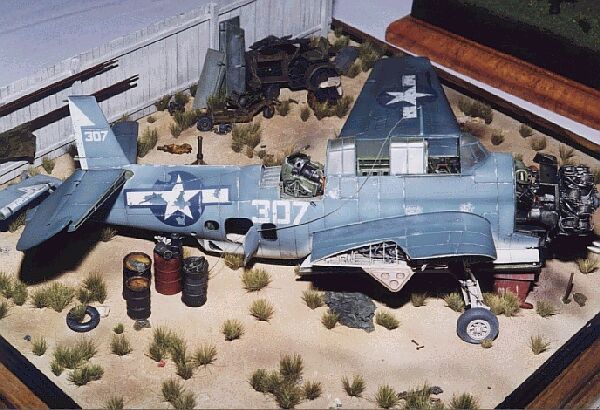
Avenger Diorama by Jimmy Cancino
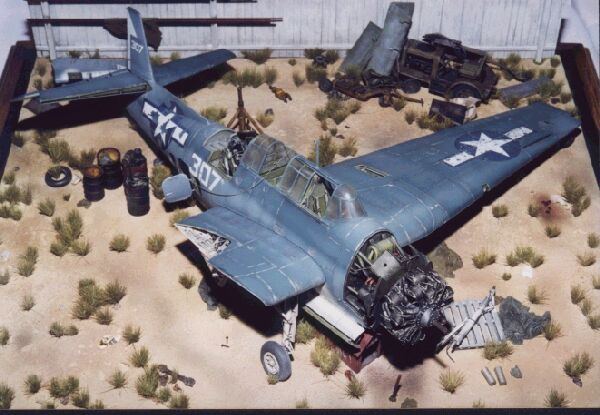
This scene depicts a TBM3 Avenger spotted in California in 1951. The aircraft had been sitting in a corner of an aircraft parts recycling company since the end of the war. It had gradually been robbed of usable parts to supply civilian firefighting Avengers with sought after spare components. Accurate Miniatures' 1/48 Grumman TBM3 Avenger formed the basis of this diorama.
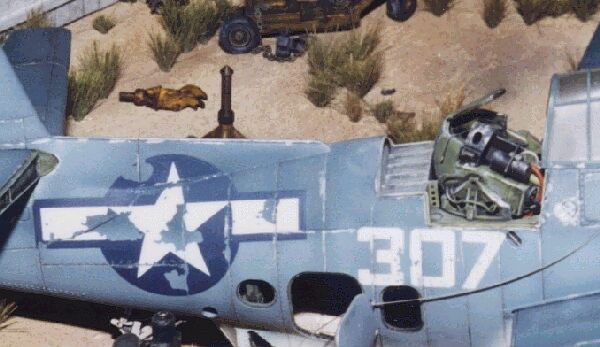
Working with photo references and a cutaway drawing along with several photographs of various types of junked aircrafts, I planned the modifications to be incorporated to the basic model. First, the cockpit. The instrument faces were drilled out of the instrument panel and the molded oxygen bottle was removed. A new empty bottle bracket was fabricated from 0.010" brass sheet and fastening clips from 0.005" brass sheet and 0.010" wire. Next up, the avionics rack behind the pilot was reconstructed to represent a rack emptied of its black boxes. I used the smallest size of Plastruct angle styrene extrusion for this task. Dangling electrical harnesses were created using 0.007" white electrical wire (Detail Master) bundled together. Assorted styrene and wire details as well as photoetched seatbelts finish off the cockpit area.
The gun turret was next. The assembly was detailed using styrene and brass wire. The gun was removed and a new surround structure was built using styrene to represent removed skin panels per cutaway and photographs. An empty machine gun bay was fabricated in the left wing from 0.010" styrene sheet. The right side received a Kendall resin wing and wing fold. Styrene and wire details were also added.
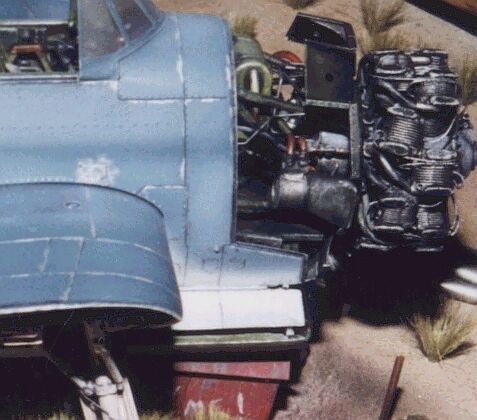
All the detail on the rearward face of the engine (oil and fuel pumps, carburetor etc) was scratchbuilt as was everything from the engine to the windshield. These additions included oil coolers from Aluminium tubing; an oil tank from resin and the firewall/engine mount from plasticard and evergreen rod. Moving on to the tail area, the elevators were cut out and the rear spars of the stabilizers were fabricated and complemented with hinge support structures from photoetched components. The right side elevator was re-installed at a downward angle after having a new leading edge of styrene strip fitted. The leading edge of the right side stabilizer was surgically removed and replaced with a scratchbuilt forward spar. The rudder well was detailed and the rudder placed on trestles. The aircraft was finished in three-tone Pacific camouflage using toned down Modelmaster Enamels.
The diorama base was covered with Sculptamold and drilled with over two hundred holes to accommodate Woodland Scenics long grass. This material was used to simulate the stubby brush found in California. The base was then airbrushed and textured using Tamiya acrylics.
Old steel drums in white metal litter the area along with a scratchbuilt wing jack. Northeastern scale lumber was used to fabricate the fence, doghouse and wood pallet supporting the removed landing gear leg. A derelict ProModeler tow tractor, bomb trolley and assorted bits and pieces complete the scene. The project took approximately 200 hours to complete. Model, Text and Photographs Copyright © 1999 by
Jimmy Cancino
|
 Next
came the engine. Verlinden's resin Wright-Cyclone WC-2600 supplied the basic
casting that was then detailed with wire, "rubber spaghetti" and
Grandt Line bolt heads.
Next
came the engine. Verlinden's resin Wright-Cyclone WC-2600 supplied the basic
casting that was then detailed with wire, "rubber spaghetti" and
Grandt Line bolt heads.