Home
| What's New |
Features |
Gallery |
Reviews |
Reference |
Forum |
Search
Home
| What's New |
Features |
Gallery |
Reviews |
Reference |
Forum |
Search
|
|
|
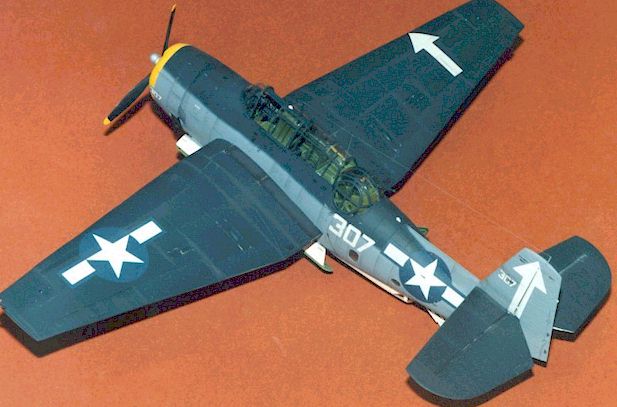
Grumman TBM-3 Avenger by
Randy Lutz
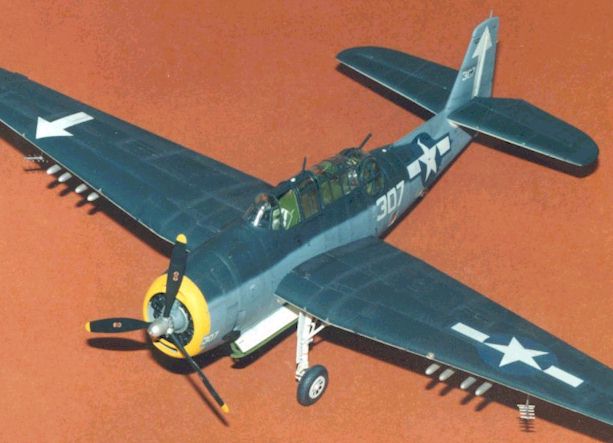
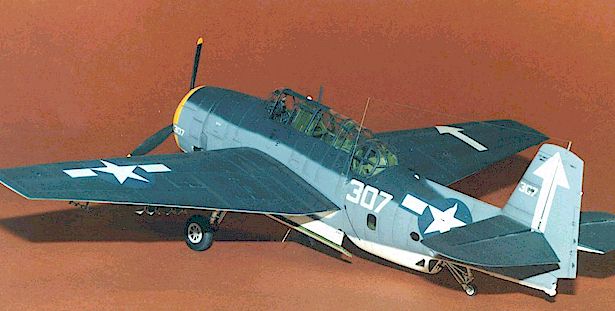
Tonight Randy reviews Accurate Miniatures' recent 1/48 Grumman TBM-3 Avenger. It is built out-of-the-box and carries a yellow cowl, and the distinctive arrow markings of VT-84, flying off the deck of the U.S.S. Bunker Hill during the Okinawa Invasion of April 1945.
This kit represents a Grumman TBM-3 Avenger. These aircraft were designed in response to a U.S. Navy request for an aircraft to replace the obsolete TBD Devastator torpedo bomber. Bearing a marked resemblance to the F4F-4 Wildcat, the TBF was capable of meeting the Navy requirements for a bomber that had a 300 mph top speed, internal bomb load of 2,000 lbs., a three-man crew and a defensive dorsal turret. With its rearward-folding wing design and prototype proven performance, the TBF was ordered for production in December of 1940. The first aircraft were delivered to the Navy on January 30, 1942, and by this time had been christened with its official name "Avenger" in response to the attack on Pearl Harbor. Grumman Aircraft was producing sixty aircraft a month by mid-1942. The Navy requirement for aircraft was more than Grumman Aircraft could produce, so production was increased by adding the Eastern Aircraft Division of General Motors to the roster. These aircraft were identical to the Grumman Aircraft and were designated "TBM". By the end of 1943 the Eastern Aircraft Division was the sole producer of Avengers, and by VJ Day had produced over 7,500 aircraft.
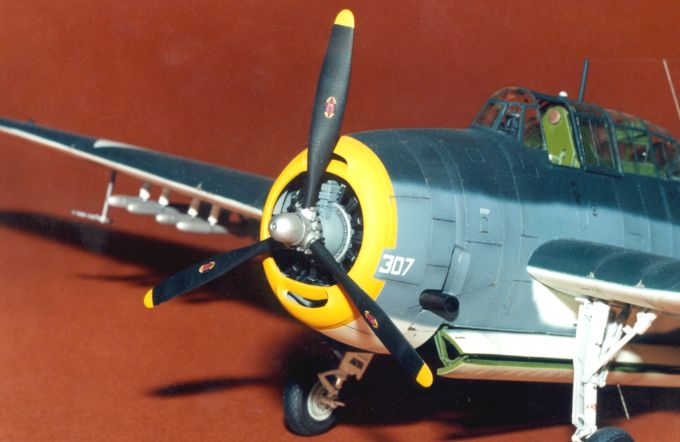
How do more than 100 exquisitely detailed, well fitting parts, with a superb decal sheet and comprehensive instructions sound to you? To me, it sounds like the model of my dreams. Accurate Miniatures new TBM-3 Avenger is just that. This kit oozes with detail. A close examination and comparison of the parts with detailed photographs of an Avenger showed that Accurate Miniatures did their homework on this one. The cockpit consists of 22 parts, of which 11 parts combine to make the detailed rear turret. All surface detailing is of the recessed variety with a few raised rivets as per the original. The canopy parts are well moulded, exceptionally thin, and very clear. The two sliding halves of the pilot's canopy can be positioned opened or closed, independently of each other. Accurate Miniatures has provided a choice of bomb bay stores consisting of four, 500lb bombs, one 2,000lb general-purpose bomb, and 1,600lb armour piercing bomb, as well as eight 5" HVAR rockets for the wings. It is regrettable that the wealth of bomb bay detail is all but obscured once the bombs are put in place. Modellers are provided with the option of cutting out the landing flaps and displaying the model with them deployed. This is a nice feature, but Accurate Miniatures did not provide any details on the underside of the top half of the wings.
Before commencing construction, I advise you to take some time and thoroughly read the instructions. These are not the usual pictograms we have become accustomed to, but are detailed assembly steps with a few technical and assembly notes. Also try to plan out your painting steps for the interior or you will end up doing a lot of backtracking. I started by gluing together parts 25 (cockpit floor), 19 (bomb bay roof), 117 (front bomb bay bulkhead), 26 (rear bomb bay bulkhead) and parts 84L and 84R through 86L and 86R (bomb racks). This completed unit was then airbrushed using Testors Model Master Interior Green (FS34151). Also finished in green were the fuselage halves, and any other interior components, except for the instrument panel. Note that on this variant of the Avenger, Bronze Green is not applied to any of the interior surfaces. Based on my available references, it would appear that only the TBM-1 and TBF-1 received this colour on interior surfaces.
After the green had dried, it was given a moderately heavy coat of Tamiya Acrylic Clear Gloss, in preparation for the dark green oil based wash that followed. Once the wash had dried, the interior parts were dry-brushed. I started with the base green to blend in the washed areas, followed by a slightly lighter shade of green, and lastly an even lighter shade applied just to the extreme edges and high points of parts. This process was then repeated for parts that were painted black and leather colour. The interior of this kit is a dry-brusher's dream. The instrument panel is moulded in clear. I guess it was an attempt to create the glass like appearance for the dials. I tried painting it while leaving the dial faces clear, but it just did not look right. As a result, it was painted with Black Chrome; dry-brushed, and then small warning areas were picked out using gloss red. For the instrument faces, I applied a few small drops of Future Floor Wax in each opening. As a note to modellers. Accurate Miniatures supplies two instrument panels, and while looking the same, there are subtle differences. Make sure you use the proper one for the variant you are building. The final steps for the interior involved the application of the seatbelt decals and some scuffing of the floor areas using ground graphite from a common pencil, and then the fuselage halves were assembled and set aside to dry. This represents the bulk of the work for the model. I spent well over a week just painting and detailing the interior. Before gluing the fuselage halves together, the rear ventral gun must be painted and installed. I used Testors Model Master Gunmetal for the gun, followed by an application of graphite to impart a slight sheen to the gun. All this was done after the ends of the gun barrels and cooling jackets were drilled out. With the fuselage halves assembled, the large greenhouse canopy and windscreen can be installed. I encountered no problems with the fit of the clear parts except for the windscreen, part #67. Really the problem lies with part #60 which is the instrument cowl. It is too wide to allow the windscreen to fit properly on the fuselage, and to remedy this, the sides of #60 must be sanded slightly. Of course, I discovered this after the part was painted, dry-brushed and glued to the fuselage. Use this to learn from my experiences. The engine assembly is comprised of 4 parts - front and rear cylinders, engine crankcase with the ignition harness and a propeller shaft. I painted the cylinders black, followed by a grey dry brushing. The crankcase was finished in dark grey, very similar to the Engine Grey colour chip found in the Official Monogram Painting Guide to U.S. Navy Aircraft, and the ignition harness is gloss black. All this is trapped within the three-piece engine cowling. Prior to gluing on part 6 (the cowl ring), the upper and lower intakes were hollowed out from behind using a Dremel tool. This looks much better than simply painting the intakes black. The next step involved the wings. I found it preferable to paint the wheel wells before gluing the top and bottom halves of the wings together. This is necessary as the wheel wells are deep, and are loaded with details that would prove too difficult to paint once the wing was assembled. As comprehensive as the painting instructions are, they do not indicate the colour to be applied to the wheel wells. Based on references, I selected underside white. Also at this point it is good time to decide if you wish to display the model with the flaps raised or lowered. I selected raised only because I was building the model out-of-the-box, and had the flaps been lowered, I would have had to add details to the underside of the top half of the wings. Call me anal, but I would not sleep at night if they were not detailed. The hard points for the eight 5" HVAR rockets and the Yagi antenna were drilled out at this time as well, and then the top and bottom halves of each wing were assembled using Testors liquid cement.
With all the major components assembled but not fastened together, it was time to paint the model. As a rule, aircraft cannot be painted prior to fastening the flying surfaces to the fuselage, but the Accurate Miniatures Avenger is the exception to the rule. The wings fit so well on this kit that absolutely no filler is required at the joints. The first colour to be applied was Xtracolor X106, Insignia Yellow, which was airbrushed on the engine cowl. Next up was Testors Model Master Insignia White (FS 17875). Usually I use Xtracolor for all my painting, but for gloss white, nothing beats the Testors paint. This was followed by a coat of Intermediate Blue, and for this I went back to my reliable Xtracolor line of paints, specifically X125, FS 15164. The final camouflage colour was Xtracolor X121 Gloss Sea Blue, FS 15042. Note how the leading edges of the wings are not Intermediate Blue as some have suggested on the Rec.models.scale news group found on the Internet. I could find no mention of this in the Monogram publication to support these assertions, so I finished my model with Sea Blue leading edges to the wings. I know someone, somewhere out there will have some form of reference, and just waiting to prove me wrong! Once the painting was completed, the flying surfaces were mated to the fuselage, and a dark wash was applied to all panel lines. The Avenger kit has more lines and panels than any other kit I have built, and suffice to say, this was a long, slow process. A medium grey wash was flowed into all panel lines, while a black wash was applied to the control surfaces and any access panels. Decals were next, and Accurate Miniatures provides a truckload of stencils. I do not know who makes their decals but they are some of the finest I have used. They responded well to Solvaset, the registration was perfect, and I did not encounter any silvering anywhere. I did find a small error in the instructions relating to the positioning of the fuselage national insignia. The profile drawings show the insignia placed too high on the fuselage. It should be lower and moved slightly to the rear. If positioned properly, the decal should not cover the fin filet. Of course, mine are wrong as I was following the instructions too closely. Sometimes I think the "Murphy's, Law" of modelling was created just for me!
The decals were followed by subtle paint chipping made up of a mixture of silver enamel paint, Windsor and Newton Raw Umber oil paint, and a little turpentine, all applied with a 000 brush. Next a flat finish was airbrushed over the model using Testors Dullcoat transferred from the aerosol can to an airbrush jar.
All the masking was removed from the canopy, oval windows and various openings, and luckily, everything looked good with no signs of paint bleeding or touch-ups required. At this time I installed the small triangular shaped ventral windows, parts 76 and 77 with a small amount of Super Scale Krystal Kleer. These windows are slightly oversize and the edges should be sanded lightly to allow them to fit properly. There has been much controversy over the turret installation, with most people it seems, having trouble fitting the completed turret into the fuselage. Rest assured, it does fit. All that is required is patience and a little trial and error, and it pops into place. I compare it to the puzzles we had as kids. You know, the type that was made of two nails linked together. It looked like it was impossible for them to come apart, but as you played around with it, you were suddenly presented with two separate nails, and you had no idea on earth how it was accomplished. Well, the turret is like that!
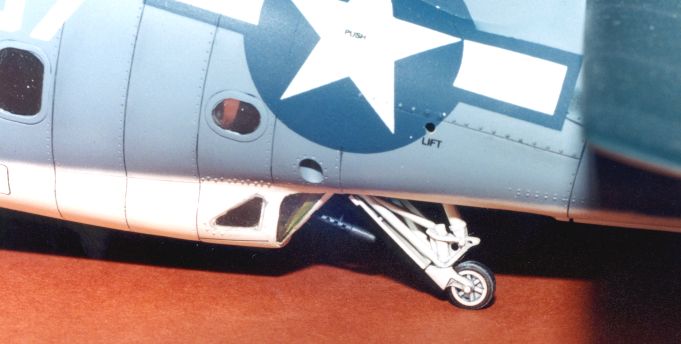
LANDING GEAR The landing gear was next up for assembly. The kit indicates on the box lid that both weighted and unweighted wheels are provided, but this is incorrect. What you get are two styles of unweighted wheels, one with diamond treads and one untreaded type. I selected the wheels with treads, only because they will look better after painting and dry-brushing. All landing gear components were finished in Insignia White, given a black wash, and dry-brushed with Windsor and Newton Titanium White oil paint. Small items like the tie down rings and torque links were drilled out as well as a tie down point on the tail wheel. The tires were first airbrushed with Testors Rubber, and then flat black was airbrushed over the treaded portion. This was followed by various shades of grey dry-brushing.
ORDNANCE As I elected to display my bomb bay in the open position, the bomb bay doors had to be cut apart. The insides were finished in Interior Green with a dark wash, and light green dry-brushing. The bomb bay hinges were glued to the inside of the bomb bay before the doors were fastened to the hinges. I had no problems with the hinges or doors. I had read in one of the British publications that the instructions showed the rear hinge backwards, but I did not find that to be the case. Maybe to them they are backwards, but then again, they drive on the other side of the road. Accurate Miniatures provides a good selection of bombs, and for my model I opted to use the four 500 pounders. Each bomb was assembled and airbrushed with Xtracolor gloss Olive Drab, X112, ANA613. The arming fuses were detailed with silver paint and then the stencils and yellow stripe decals were applied. After, a light application of Dullcoat and they were ready for installation. The eight 5" HVAR rocket bodies were fastened to the fin assemblies after the rocket engine outlets were drilled out. Testors Metalizer Steel was airbrushed on the rocket bodies and the mounting pylons were brush painted gloss white. After an application of Dullcoat they were glued to the wings.
WEATHERING Accurate Miniatures states in the instructions that: "This aircraft was fortunate to benefit from a high level of maintenance and therefore showed little weathering other than the normal streaks and exhaust stains." It was time for the application of pastels, and respecting the previous statement, I wanted a slightly weathered look, not too heavy, but heavy enough to be noticeable without being obtrusive. On the bottom I selected a light grey, while the topsides were treated to a medium grey. All panel lines running in the direction of airflow were dusted on both sides of the line, while panel lines running perpendicular to the direction of flight were dusted only on the trailing edge of the panel lines and pulled back using a soft sable brush. The trick with pastels is to start light both in terms of application and colour. You can always add more or darken the colour, but they are hard to remove entirely.
All that remained was the installation of the Yagi antennae and the stretched sprue antenna wire. The sliding canopy sections were tacked in place with Krystal Kleer and the various identification lights were painted using Humbrol gloss enamels. To summarize, when building this kit if you follow the detailed instructions, and execute sound modelling skills and patience you will be rewarded with a superb finished product.
Article, Images and Model Copyright © 1999 by Randy Lutz
|