Home
| What's New |
Features |
Gallery |
Reviews |
Reference |
Forum |
Search
Home
| What's New |
Features |
Gallery |
Reviews |
Reference |
Forum |
Search
|
|
|
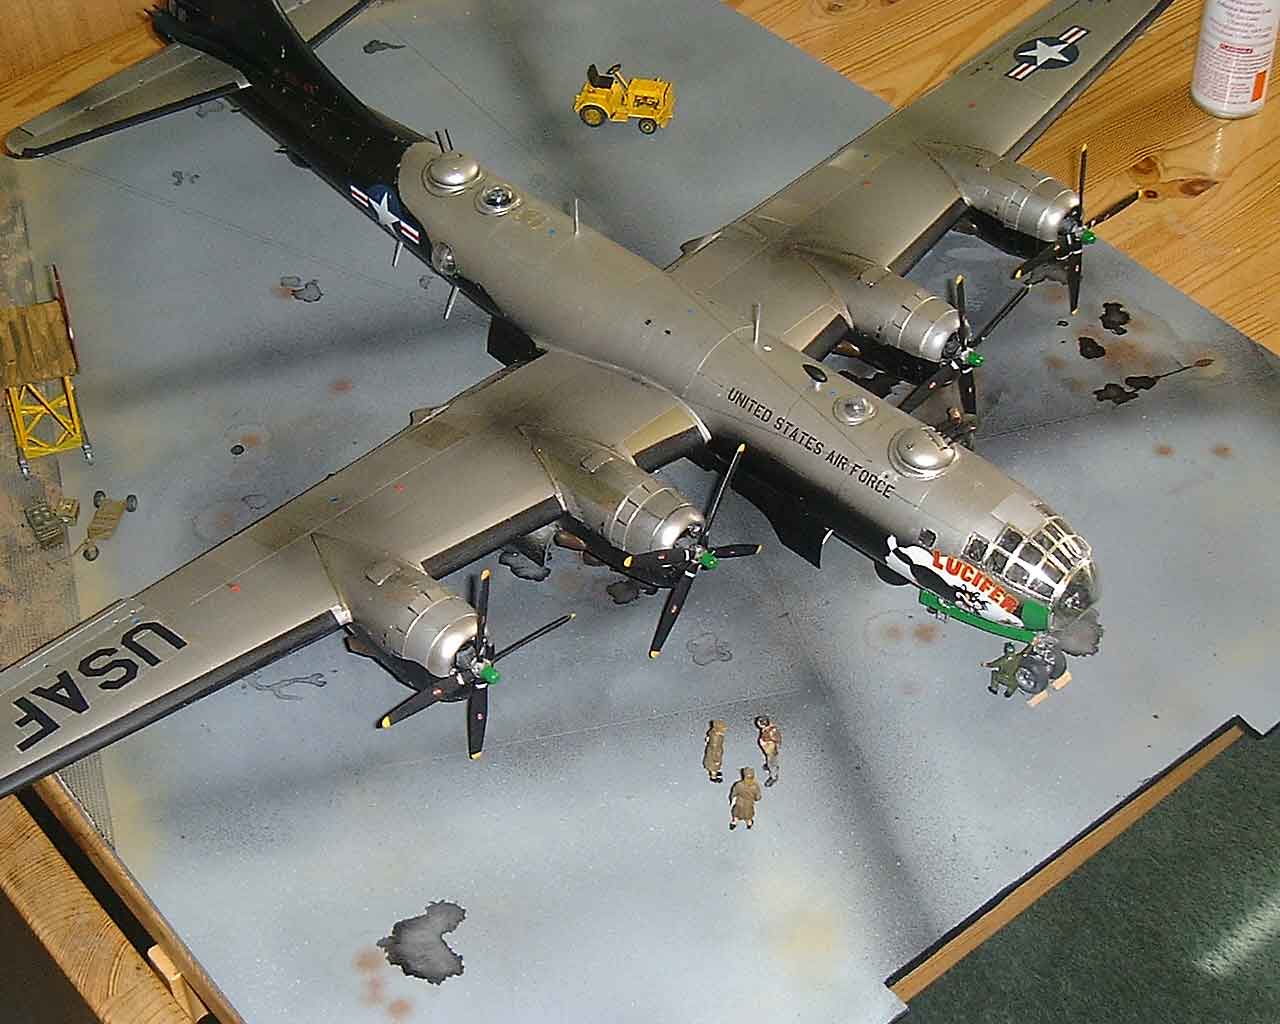
Boeing B-29 Tarzon Bomber by David Eales
Ever started a project and right from the off it seems fated never to be completed? Well this was my most recent one. Around two years ago my IPMS branch decided we would do a branch display in 2000 featuring the Korean War. Lovely idea, all those Sabres and F-84's, lots of piston engines, it's a real transition period in aviation. I made a short list of types I would like to build and included the B-29 (in 1/48th scale!). At around this time my friend Terry completed another B-29 in the markings of Enola Gay, it looked great. But, said he, beware! For the B-29 she is BIG, awkward to handle, and most importantly, where do you put it when it's finished? I just didn't care; I had to make one. So at the'98 Nationals I searched the second-hand kit sellers for a Monogram 1/48 B-29. After parting with 20 quid, off I trotted home. I opened the box, and yep, it is very big. Mmmm….close the box, quietly put it up in the loft and retire to ponder my rash decision. As the time drew closer to produce models for the display I started to search my references for a suitable scheme and for detail work. I really liked the nose art on "Lucifer", an aircraft of the 30th Bomb Squadron, 19th Bomb Group. She was also black painted on the underside, a nice contrast to the natural metal and not too big a test for my inability to reproduce a natural metal finish. The bad news was she was one of three aircraft adapted to carry the "Tarzon" bomb, an American development of the British 12,000lb Tallboy. This would mean conversion work. Assembling photos etc went ahead apace and just before the '99 Nationals I was overjoyed to see that Neil Burkill of Paragon was listing a conversion kit for the Tarzon B-29. Making my way hotfoot to Neil's stand at Donnington I was told that he wouldn't be producing this kit until the middle of 2000 at the earliest! Back to the drawing board. I did, however, purchase some B-29 dropped flaps and Neil kindly gave me a couple of B-50 nosepiece transparencies to help the conversion along. What a nice man. The Christmas holidays gave me the chance to finally start the construction process and on opening the box the size of the model hit me again, on the other hand the size of the instruction and decal sheet is tiny!
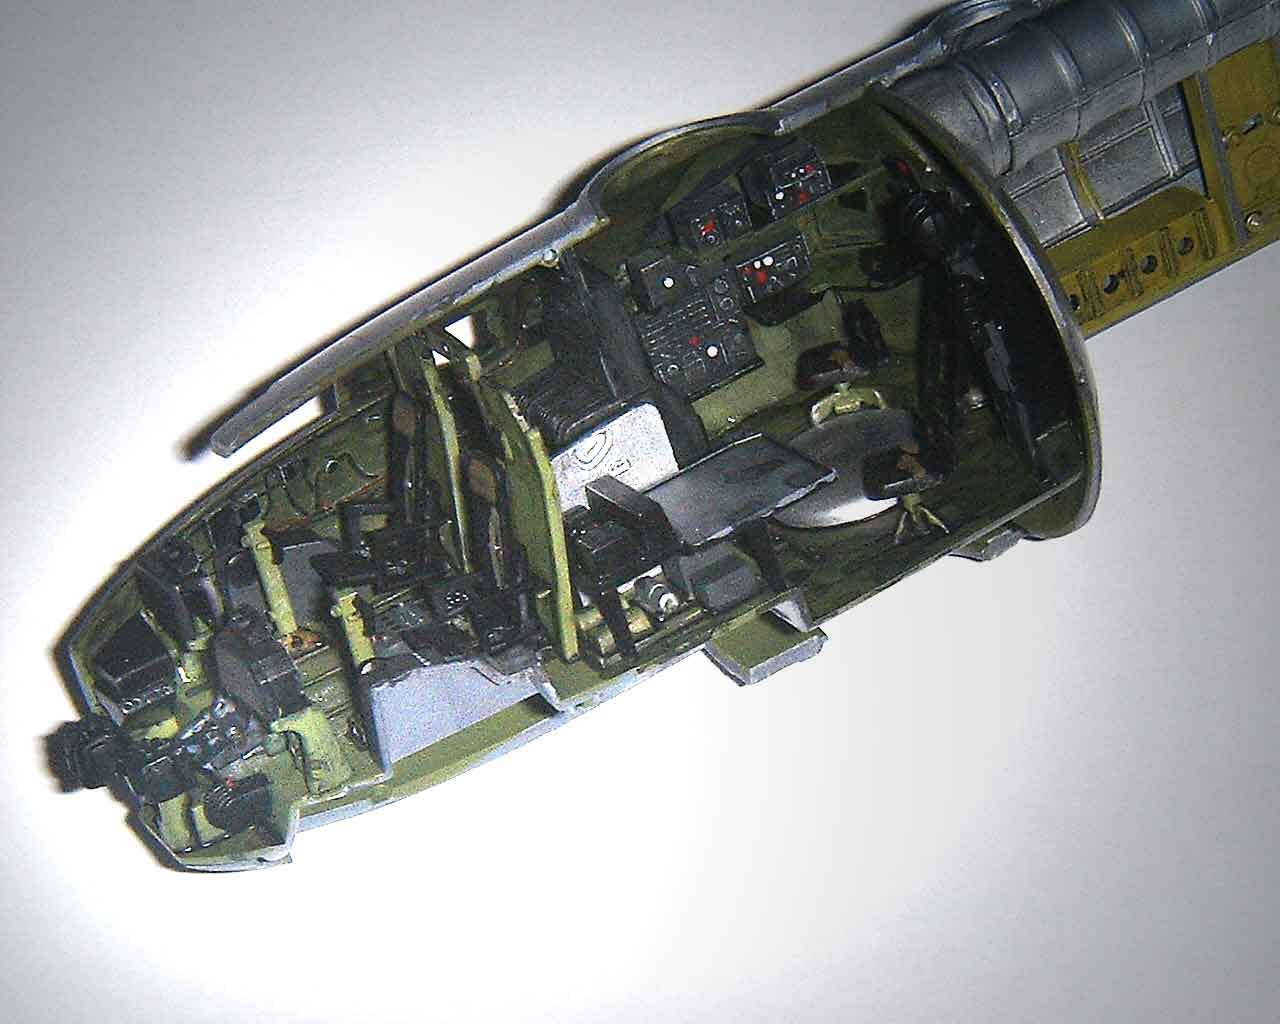
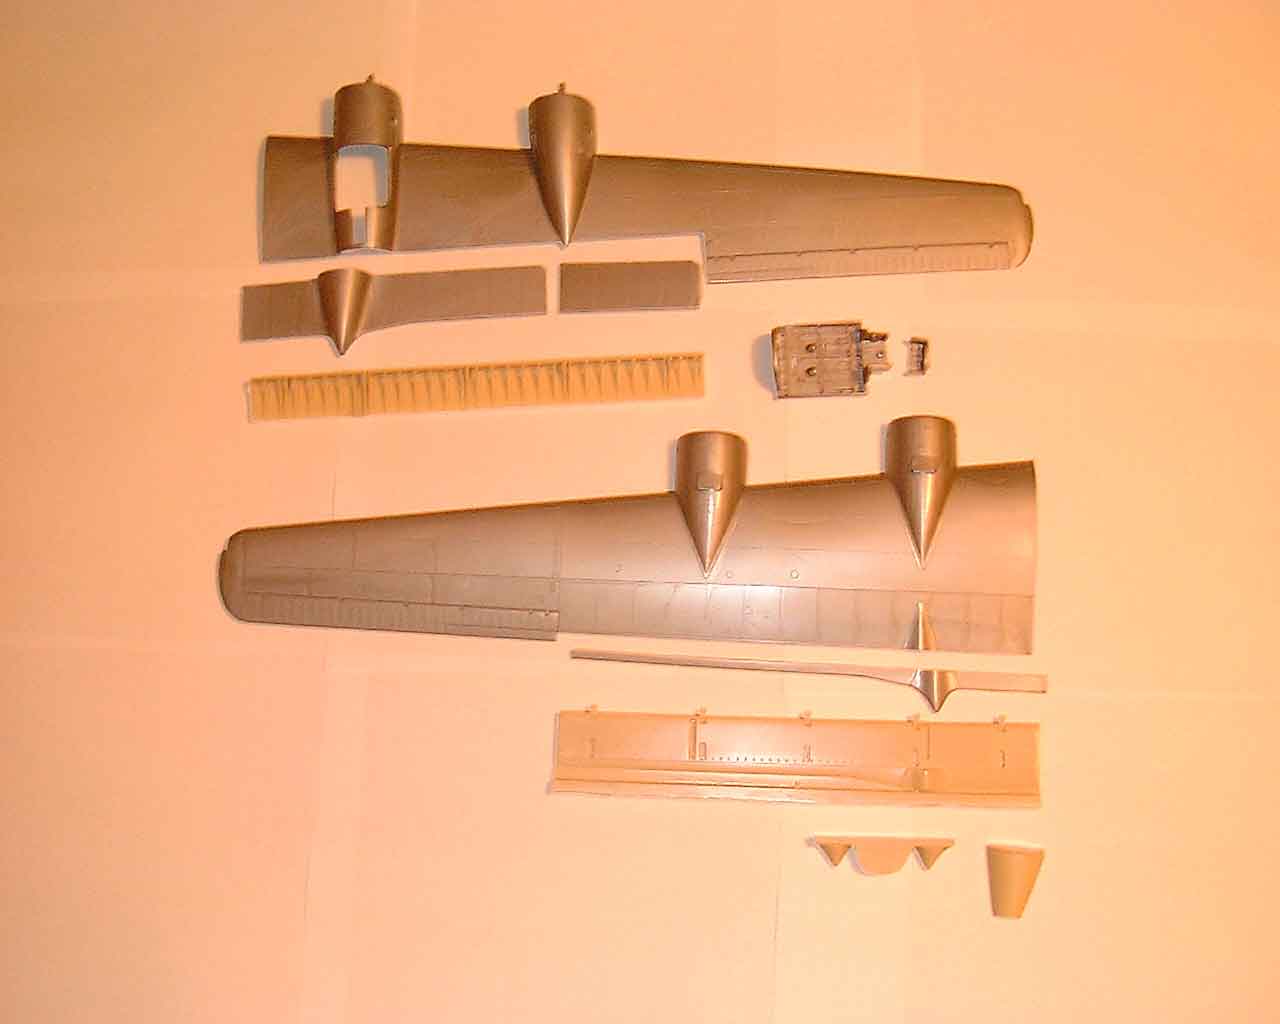
Breakdown of parts, moulded detail and the whole "feel" of the model is typically Monogram. The interior detail is exemplary and conformed to all the photos I had, particularly in Detail and Scale B-29 Superfortress Vols. 1 and 2. I couldn't find any interior views particular to the Tarzon aircraft and as I felt that a lot of the interior would not be visible once assembled I didn't worry too much. (See photo 1 below).
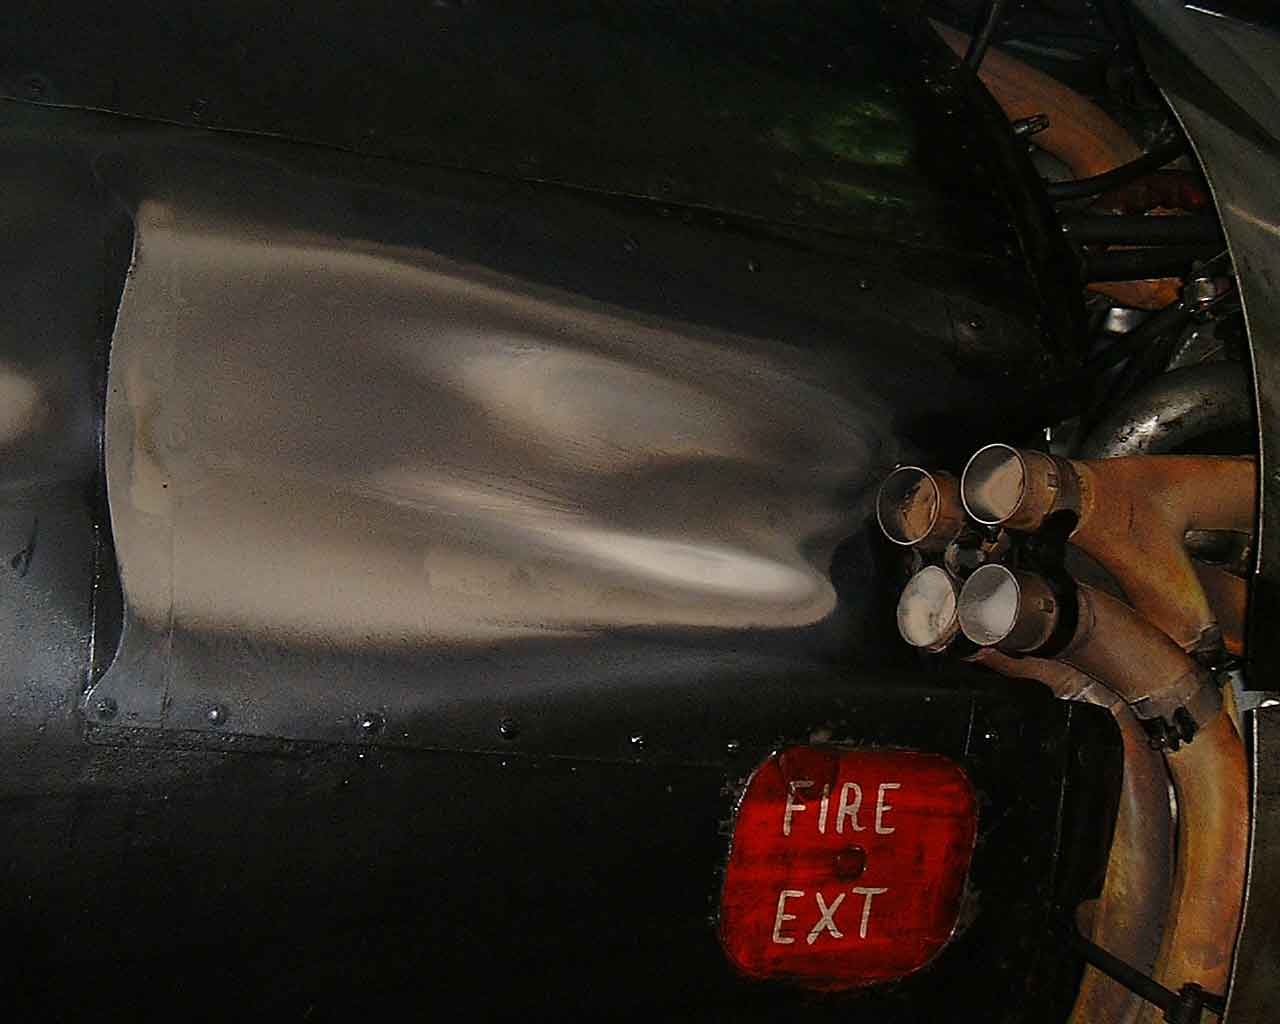
Interior was painted US Interior Green using Aeromaster acrylic, details were picked out in various colours and the whole was weathered with a wash of black ink and a light dusting of fingerprint powder. Mistake number one (after starting the model!) was not to put in enough nose weight. This is a long model and it needs a ton of weight up front, my suggestion is to omit the engineers/radio compartment and fill this with depleted uranium. (Yes Terry you were right and I'm only joking about the uranium, tyre weights will do). This omission was to cost me dear later.
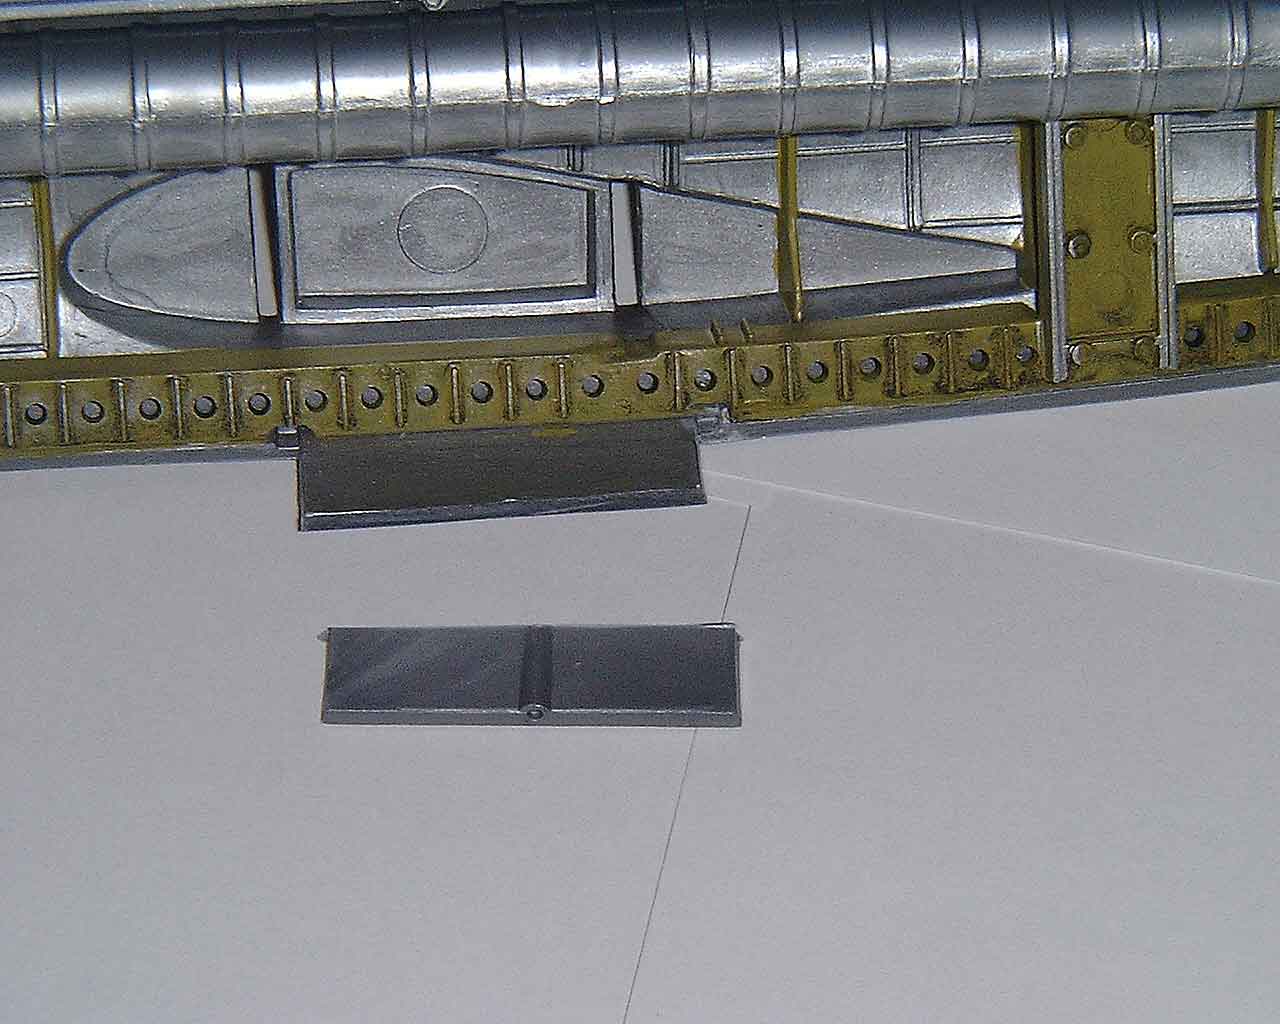
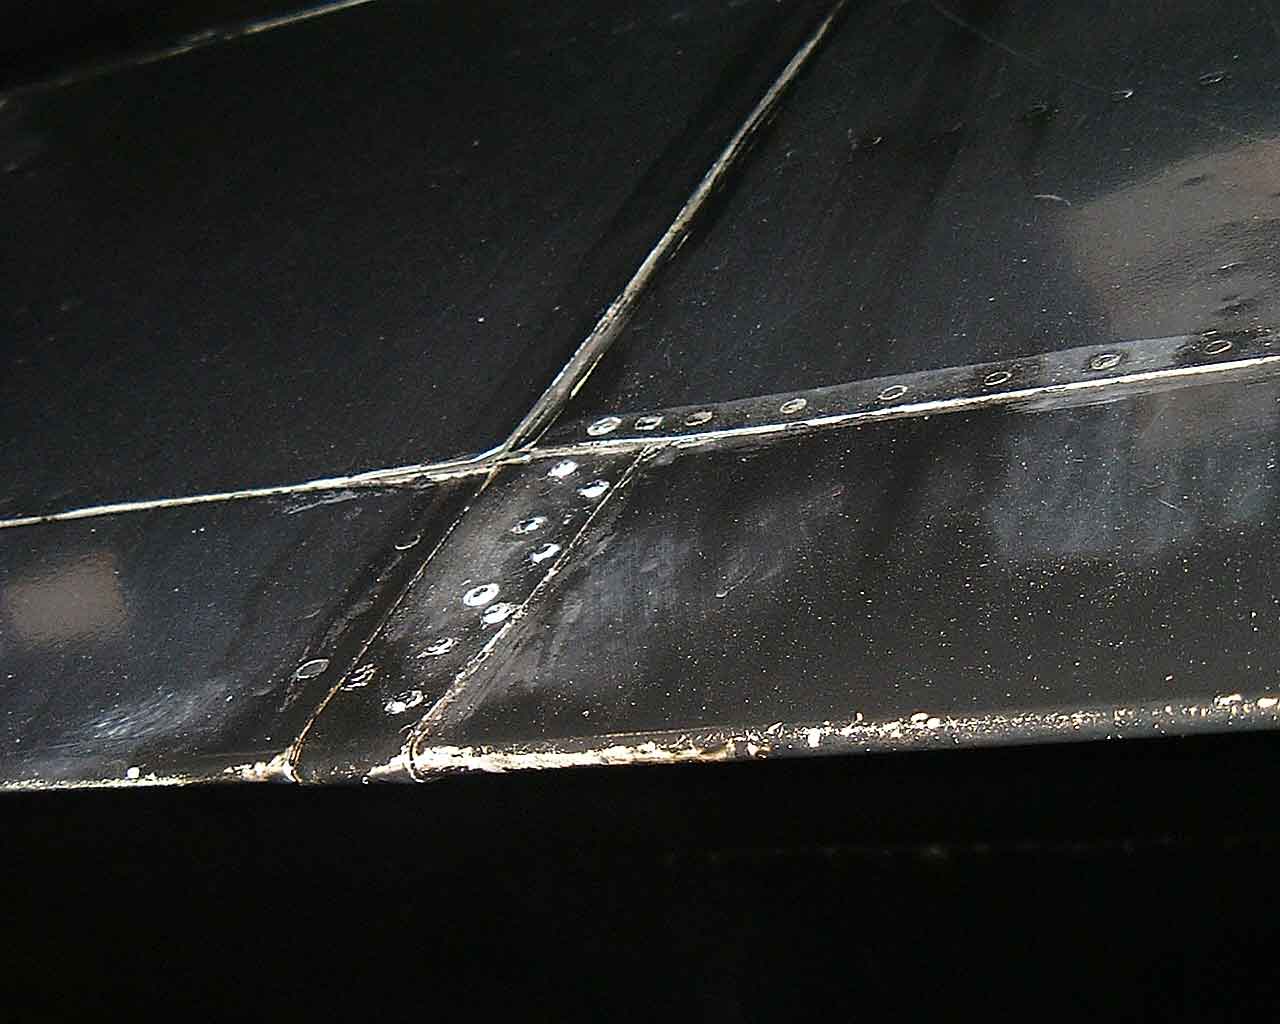
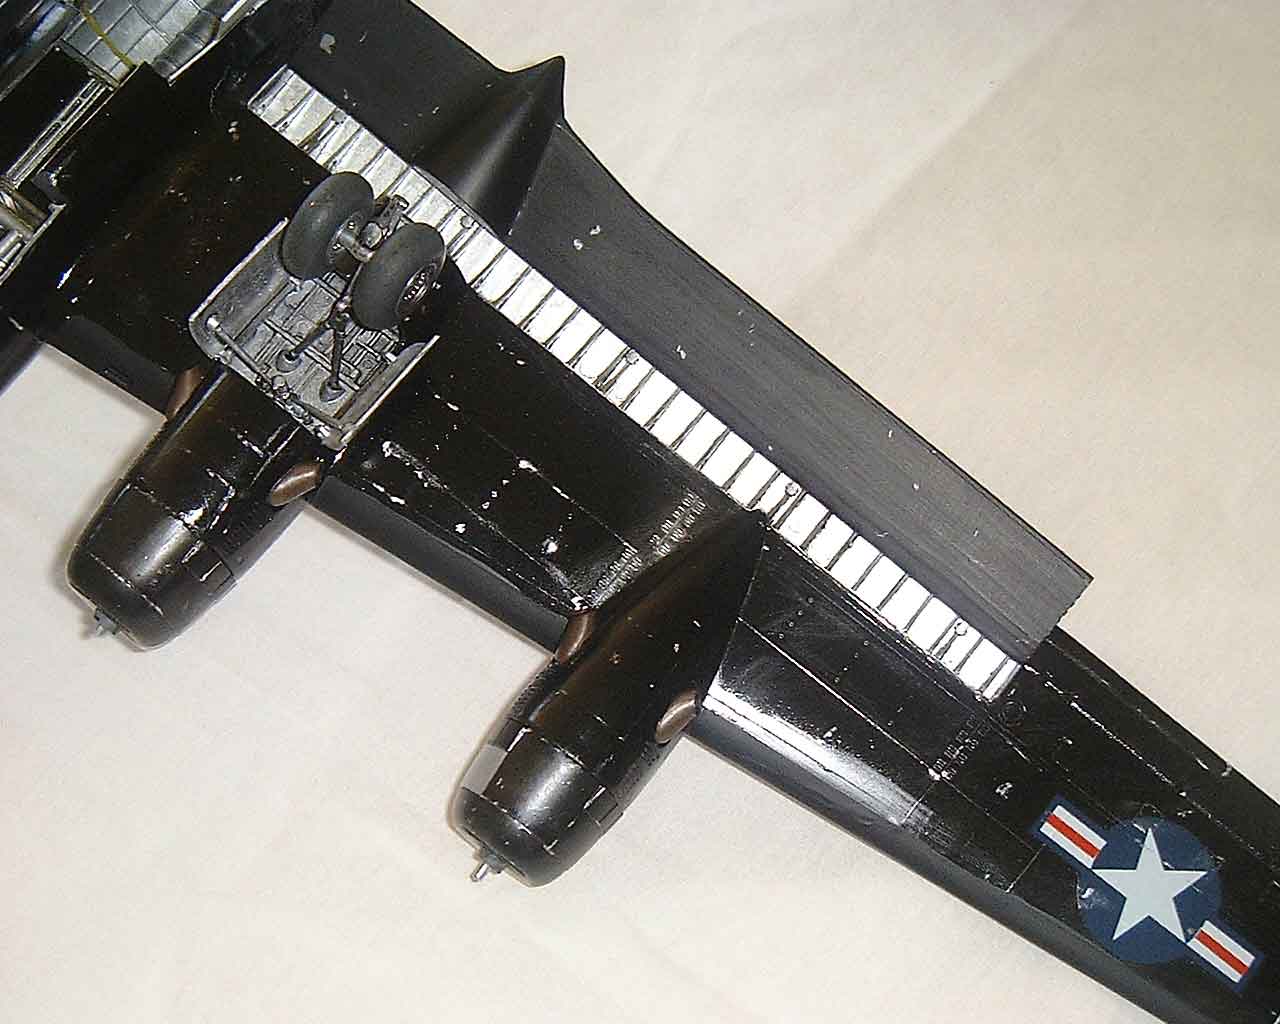
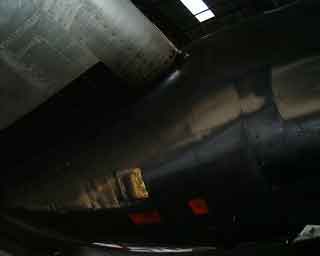
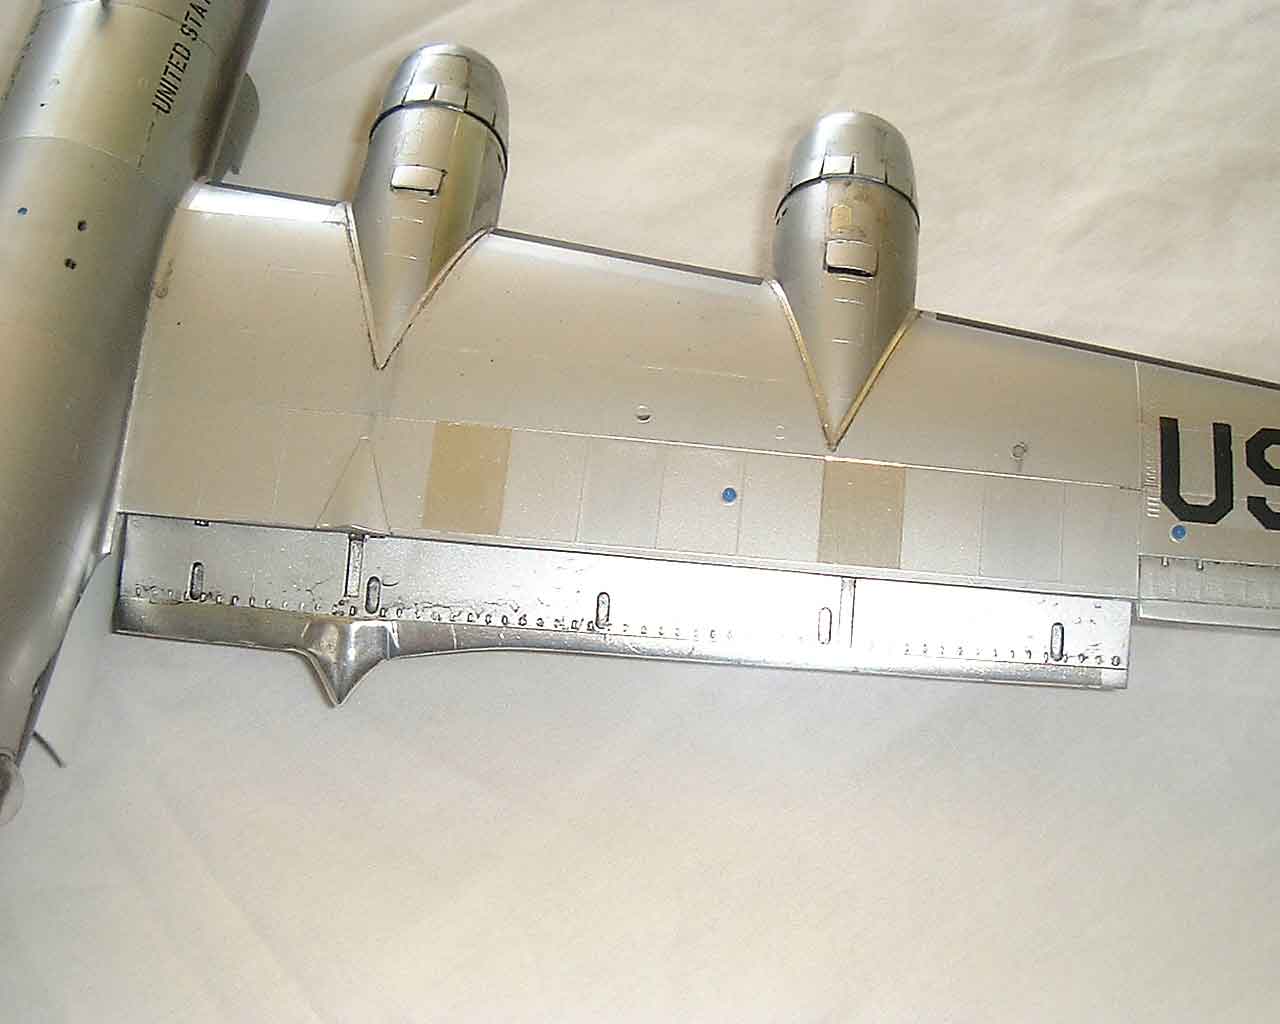
At this point many of you will be saying "it's an old Monogram kit, its got raised panel lines. Why doesn't he rescribe the lines?" Well I'm not convinced about recessed panel lines. In my day job I come into contact with many aircraft (full size). Most of them are DC3 and DC6's, similar in age and construction to the B-29. The outer skin on these aircraft is made up of OVERLAPPING panels. This leaves a raised joint line (see photo 4 below) - the skin is rippled, dented and VERY uneven, a quilted effect that's very difficult to achieve on a model. I don't say all aircraft are like this, it pays to look at the real thing, but in my opinion raised lines are just as accurate (or inaccurate) as recessed. So I gently sanded the whole to reduce the lines.
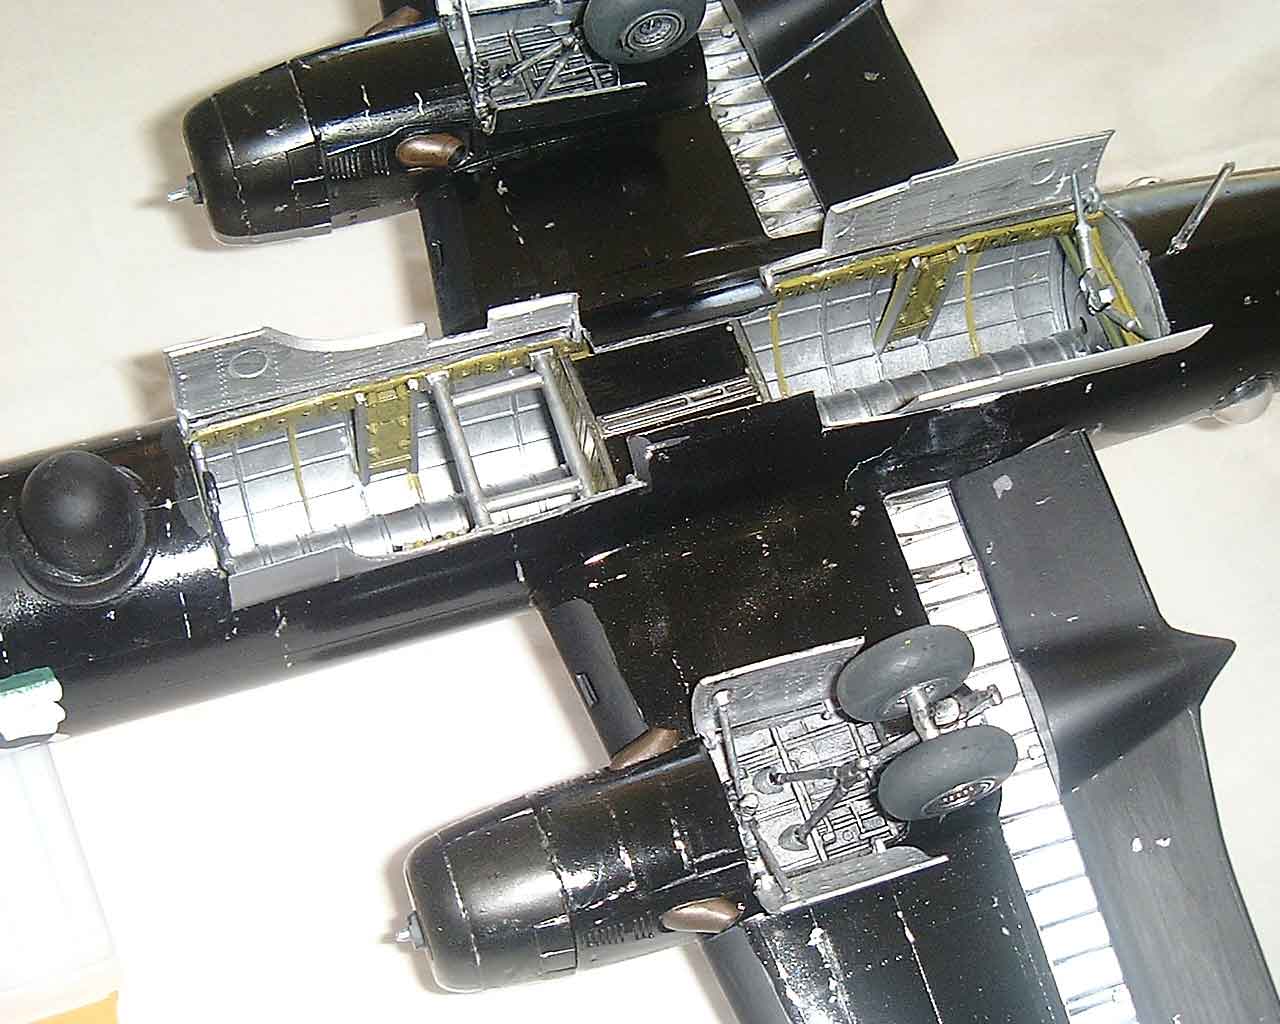
Once the fuselage was assembled I turned my attention to the wings and the Paragon dropped flaps set. Again the size of the plane is apparent 'because the flaps are a big chunk of resin. Beautifully cast resin, with lightening holes in the webbing structure and actuating screws cast separately. The only problem I had was with the inboard nacelle end caps. They did not match the nacelle moulding on the flap very well and required a bit of filling and fettling.
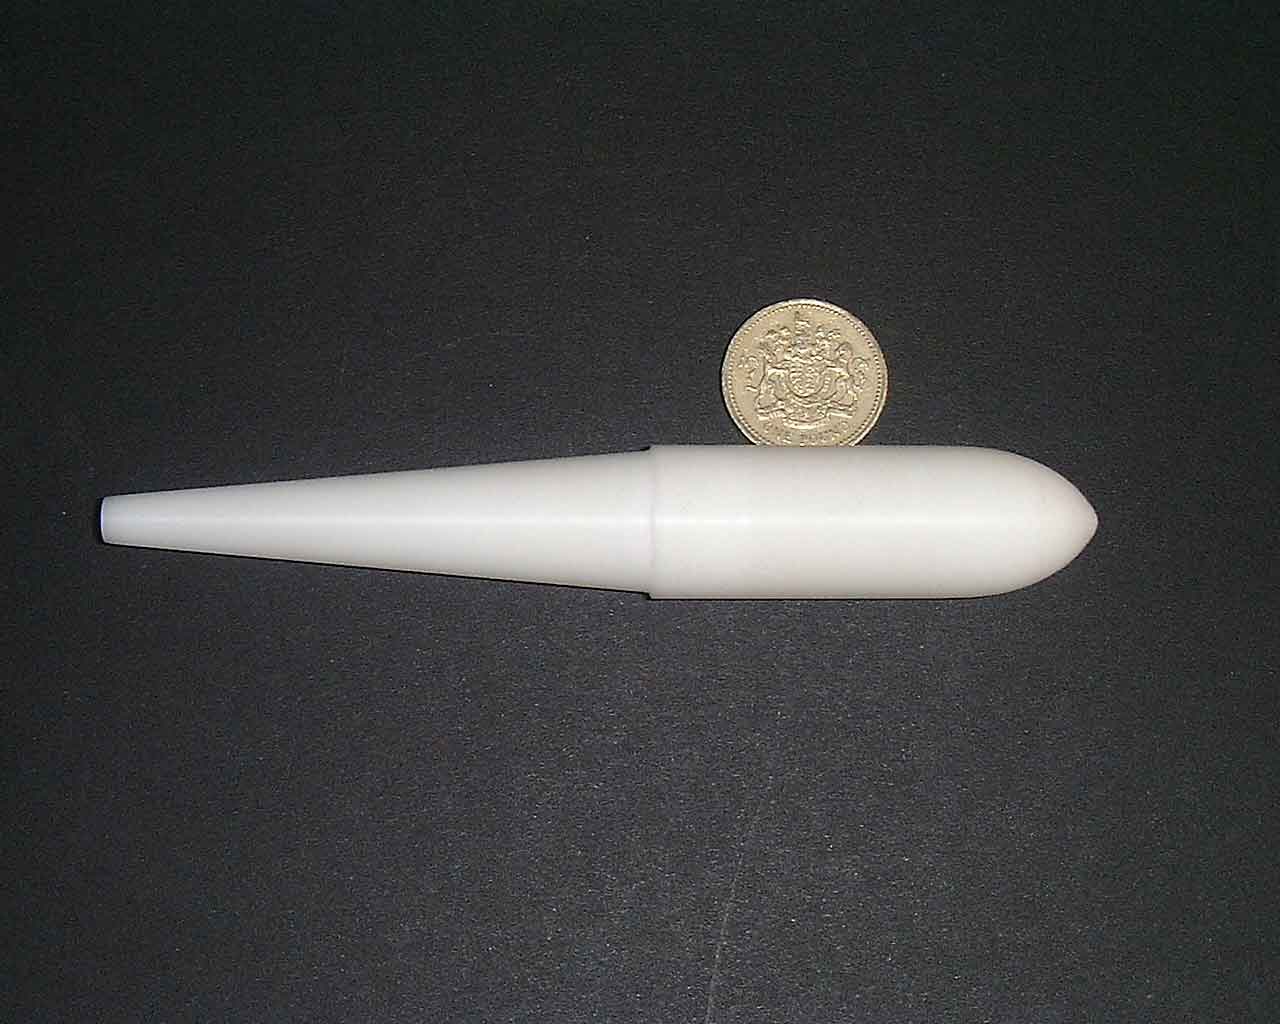
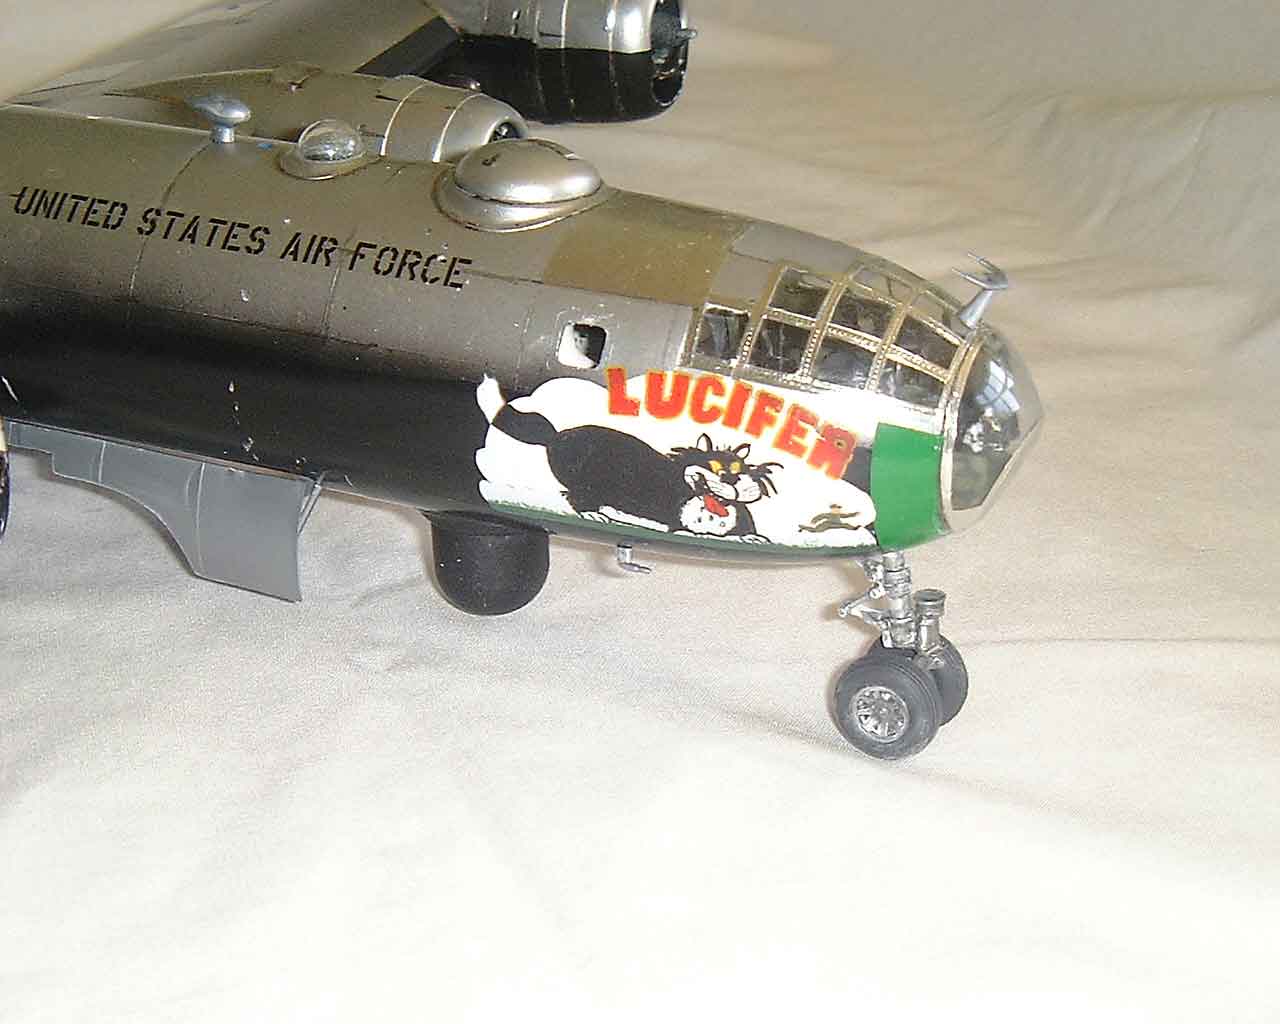
In hindsight brass or steel might have been better for balancing the model but would have needed something more substantial than my plastic carrier to hang from! Sketches in D & S show that the bomb had a forward circular shroud and an octagonal box tailfin. If you have a Grand Slam left over from the Tamiya Lancaster it seems to be almost the same size and could be utilized. I can't explain the discrepancy in casing size between the two weights of bomb, except that the Yanks always build bigger. It was at this point that I had one of those periods where nothing would go right. Years of model making were for naught as I struggled to make the shroud and tailfin assembly for the bomb. I could not form a circle of plastic card for the shroud and three attempts at the tail fin box came out all shapes. I gave up and tried to join the wings to the fuselage. Monogram give you two spar assemblies to put through the fuselage to strengthen the wing to fuselage joint. A "Good Idea", but my wings miss aligned on the starboard side giving a lopsided appearance. Unfortunately, for strength, I had used superglue and accelerator to join the wing and fuselage together. This looked like a disaster. In a fit of depression I retired to consider my options. Two weeks later after a visit to my local IPMS branch and some encouragement from fellow members I returned to the workbench. My solution was drastic, saw off the wing, realign it to the fuselage, fabricate a new short spar from card stock and reglue. It worked and with little in the way of filling and filing. Just maybe my luck had changed. I felt I didn't need to finish the bomb at this point so moved on to fitting out the exterior of the airframe. The tail turret in the kit is for the early version with two .50 cal. Machine guns and a 20mm cannon. This cannon was deleted fairly early on in the B-29's life so it had to go. The shroud in the tail ball is moulded in to include the barrel mounts so it needed carving and drilling out and a new canvas shroud adding from filler. Another noticeable feature of the Tarzon aircraft was the replacement of the lower front gun turret with the radome that was moved from between the bomb bays. The radome is shaped like the end of a metal cigar tube and originally that's what I intended to use. But with the absence of nose weight it seemed a good idea to try and introduce some, so I had the machine shop turn up a radome from brass rod. The finished item was attached with epoxy resin after having packed the turret hole with lead sheet offcuts. Another modification was the use of a blown Plexiglas nosepiece from a Boeing B-50. This increased the bombardiers' visibility as he tracked the flare in the tail of the Tarzon bomb and adjusted its trajectory by radio control. Neil had given me two transparencies to play with and I cut one out and fitted it to the nose, a perfect fit. The framework on the moulding is not well defined so be careful when masking out for painting. The engines now came in for some attention. Monogram have moulded the huge Wright R3350's in one-piece integral with the firewall. Detail is adequate for the closely cowled engines so I didn't feel I had to add any extra but I carefully painted the engines. The Pratt & Whitney R2800-CB3's on the DC6 are a very similar engine so I used them as a go by for colours and weathering. Crankcases are a semi gloss dark blue or grey, cylinders are matt aluminium with gloss black pushrod tubes. Magnetos are dark blue and the ignition loom is dark almost black copper, all bolt heads are silver and any cables are normally rubber sheathed or sometimes metal braided. The finning on the cylinders was highlighted by a thin wash of black and an oily sheen was imparted by well thinned burnt umber oil paint. Go sparing on the weathering for engines as ground crew spend more time fettling them than almost any other part of the plane, without them it goes nowhere (only down!) and any oil leaks are quickly spotted and dealt with. And believe me radial engines do leak, an R2800 grows in diameter by half an inch at full wet power so a tight joint on the ground is not so tight in the air. The condition of radial engined aircraft is considerably cleaner before a flight than after it! The very large single exhaust pipes are not very well moulded in the kit having next to no depth in the pipe, so I drilled them out using progressively larger drill bits and cleaning up with a rat tailed file the resulting hole being backed with a short length of suitable diameter plastic tubing to give depth. This improved their appearance quite considerably. The cowl flaps were thinned out on their trailing edge, as were the various outlets on the wing and nacelles. The kit propellers are the Curtiss type with large root cuffs to try and improve the flow of cooling air instead of the more common Hamilton Standard thin blade props. Check your references to see which your chosen subject had. As Lucifer had Ham. Standard props once again Paragon came to the rescue with a set of replacement resin propellers. These were assembled and put to one side but not out of reach of my Golden Retriever! He reduced two props to component parts before being discovered, destroying two blades and leaving a doggy tooth dent in one prop dome. Repair work took a couple of days making new blades from plastic card to match the blade profile and filling the dent with superglue.
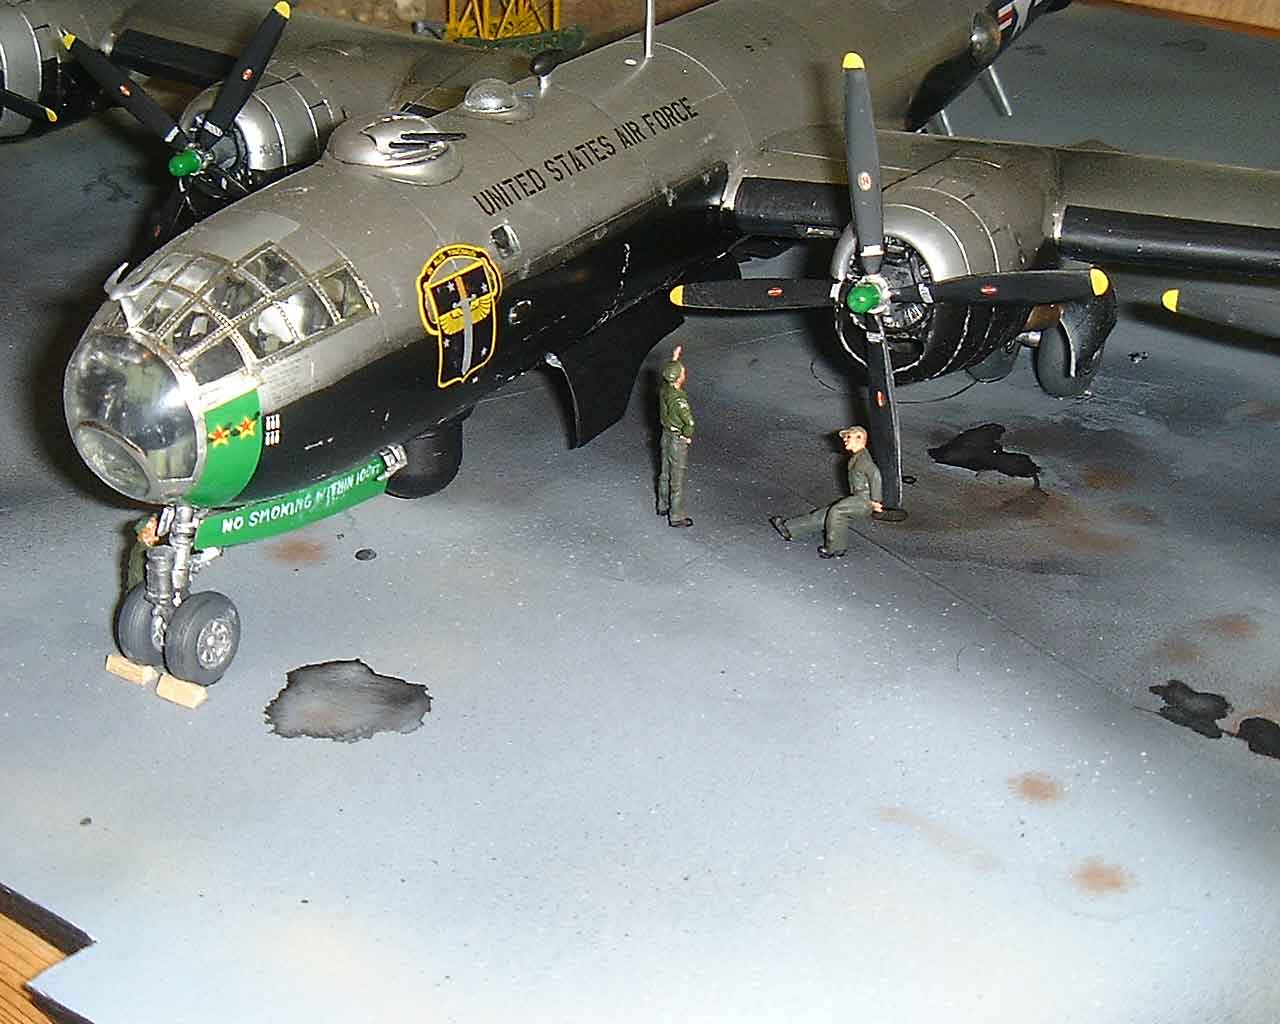
I fitted the gun turrets, without gun barrels, and all transparencies (after first dipping them in Kleer floor polish to give clarity and protect from superglue fumes) and masked out the model ready for painting. Again as the model is so big I had decided to paint using car spray cans and had bought in a can of Halfords Nissan silver as the primary colour and Vauxhall Tiffany silver for the prominent main spar area running across both wings and the fuselage. This is readily apparent in most B-29 photos. So a quick coat of Nissan silver highlighted any imperfections on the model and a couple of nights were spent refilling and sanding, then the final all over coat was applied. This was left for two days to dry thoroughly and the spar area was masked up. A couple of light coats of Tiffany silver so as not to build up a paint ridge was enough to give a subtle difference in metal tone. The masking was removed and the model set aside overnight. The black undersurface on the actual aircraft suffered quite badly from erosion so I planned to use tape to pull the paint off the silver undercoat. But fate intervened again when the Aeromaster RLM 22 acrylic I used bonded so well to the silver it wouldn't come off! I used fingerprint powder to buff various panels a different shade and to impart a more metallic finish, Bare Metal foil was also used to highlight some panels and provide cockpit canopy framing. The green flight colour on the wingtips, nose stripe and fin top were masked up and sprayed. Some aircraft of the 19th had the dinghy panels above the wings painted in the flight colour but I could not confirm whether Lucifer had them so I left them off. Using official drawings reproduced in D & S Vol. 1 and the moulded circles on the model as a guide I drilled an indentation where the position and navigation lights were. I filled this with the relevant colour paint and after it was dry put on a blob of Krystal Kleer to depict the clear lens. The wing tip navigation light lens were added after drilling a hole in the angle of the cutout and inserting a short length of clear sprue with a rounded end to simulate the bulb. This was coloured using clear red or green.
An airbrushed coat of Future sealed the finish and provided a good decalling surface. The painting of Lucifer on the starboard nose is not available as an aftermarket decal so I hand painted it onto white decal sheet using a mixture of Humbrol enamels and Aeromaster acrylics (photo 9 below). I managed this first time!
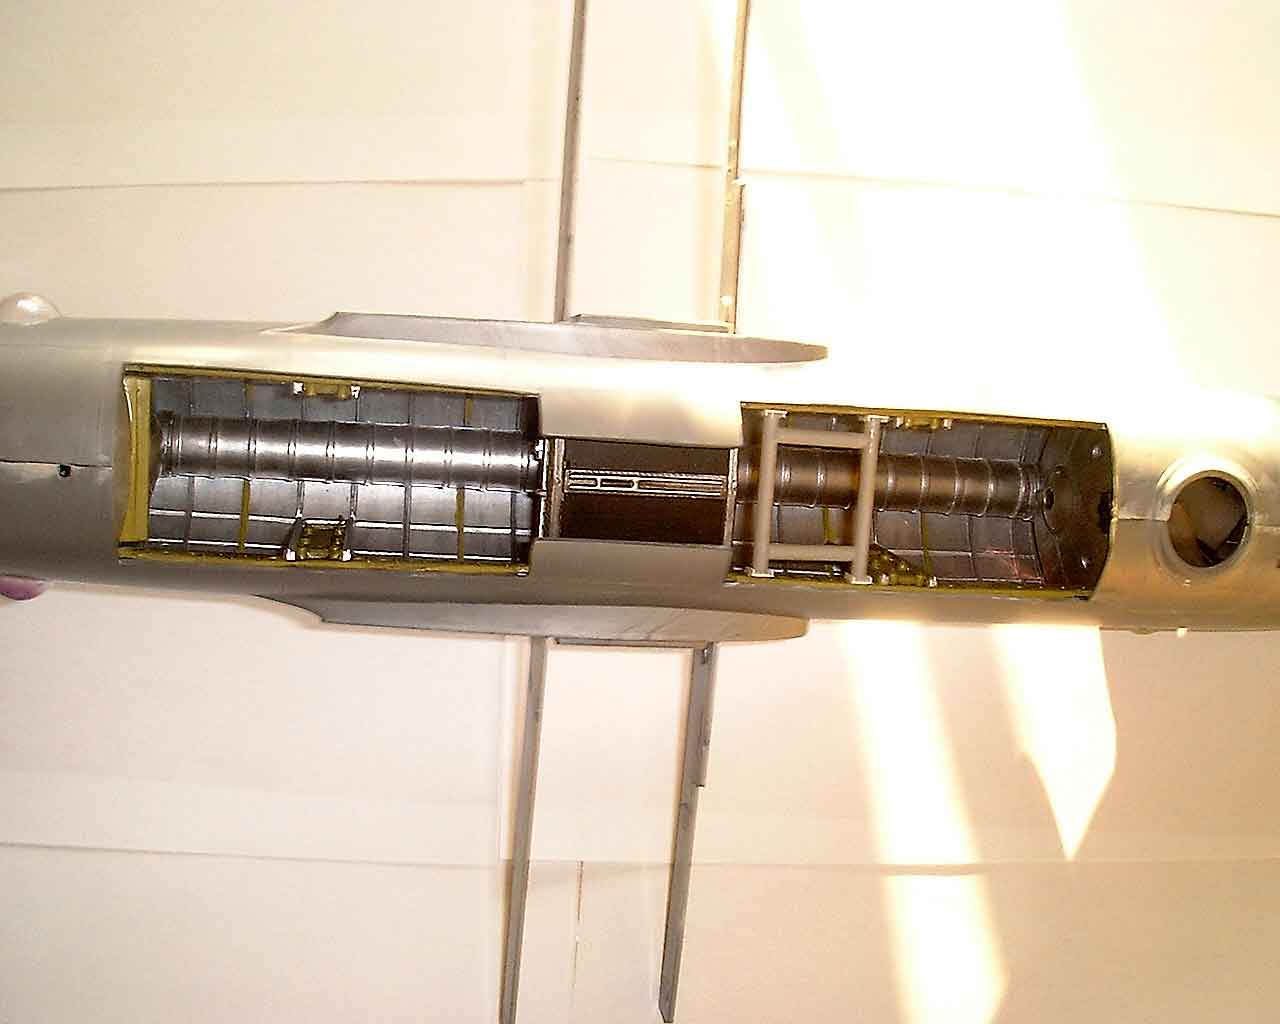
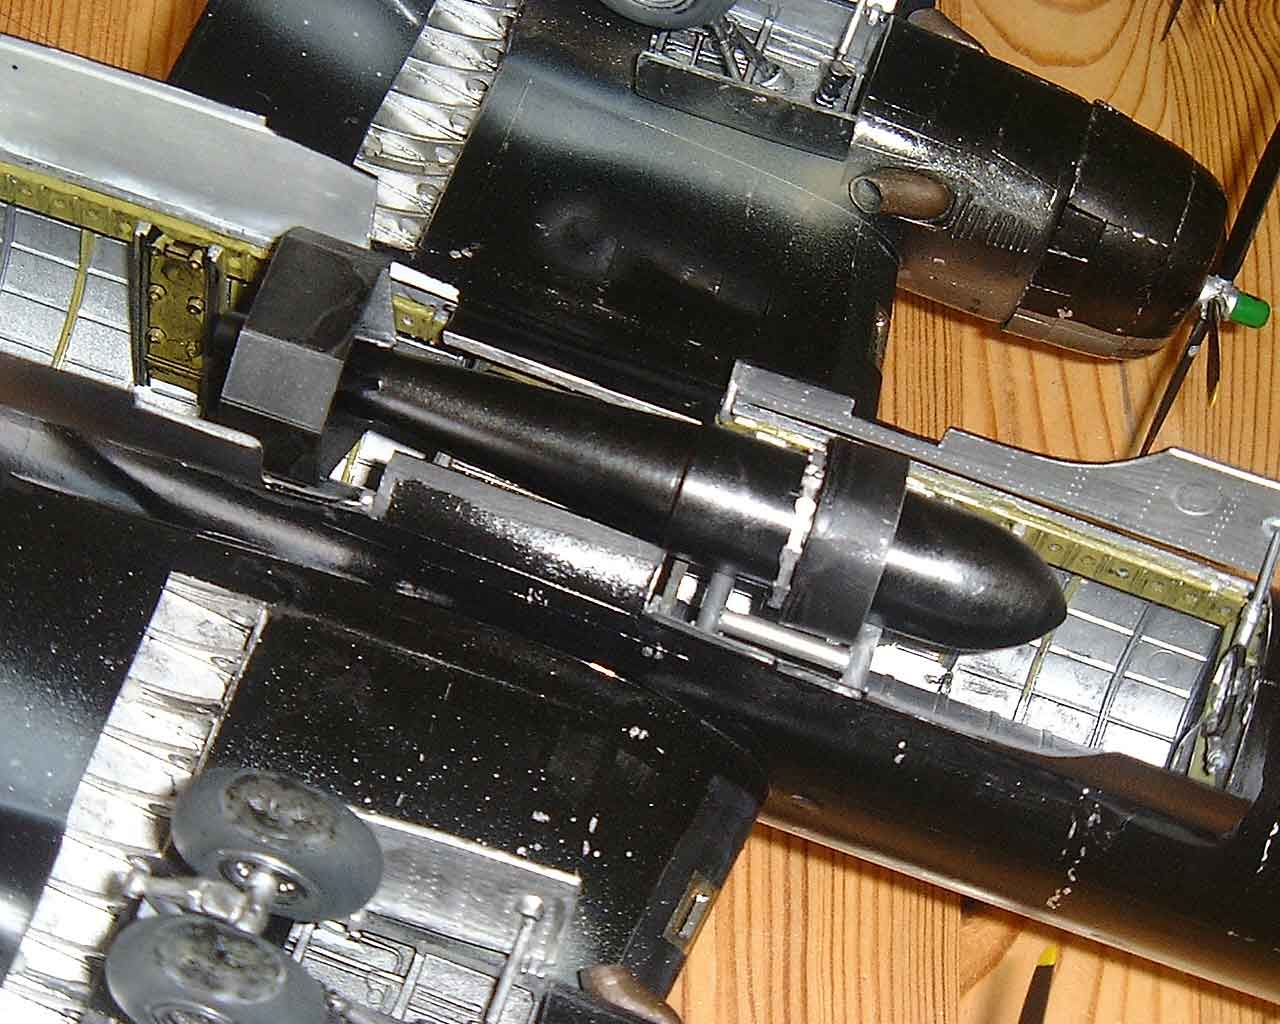
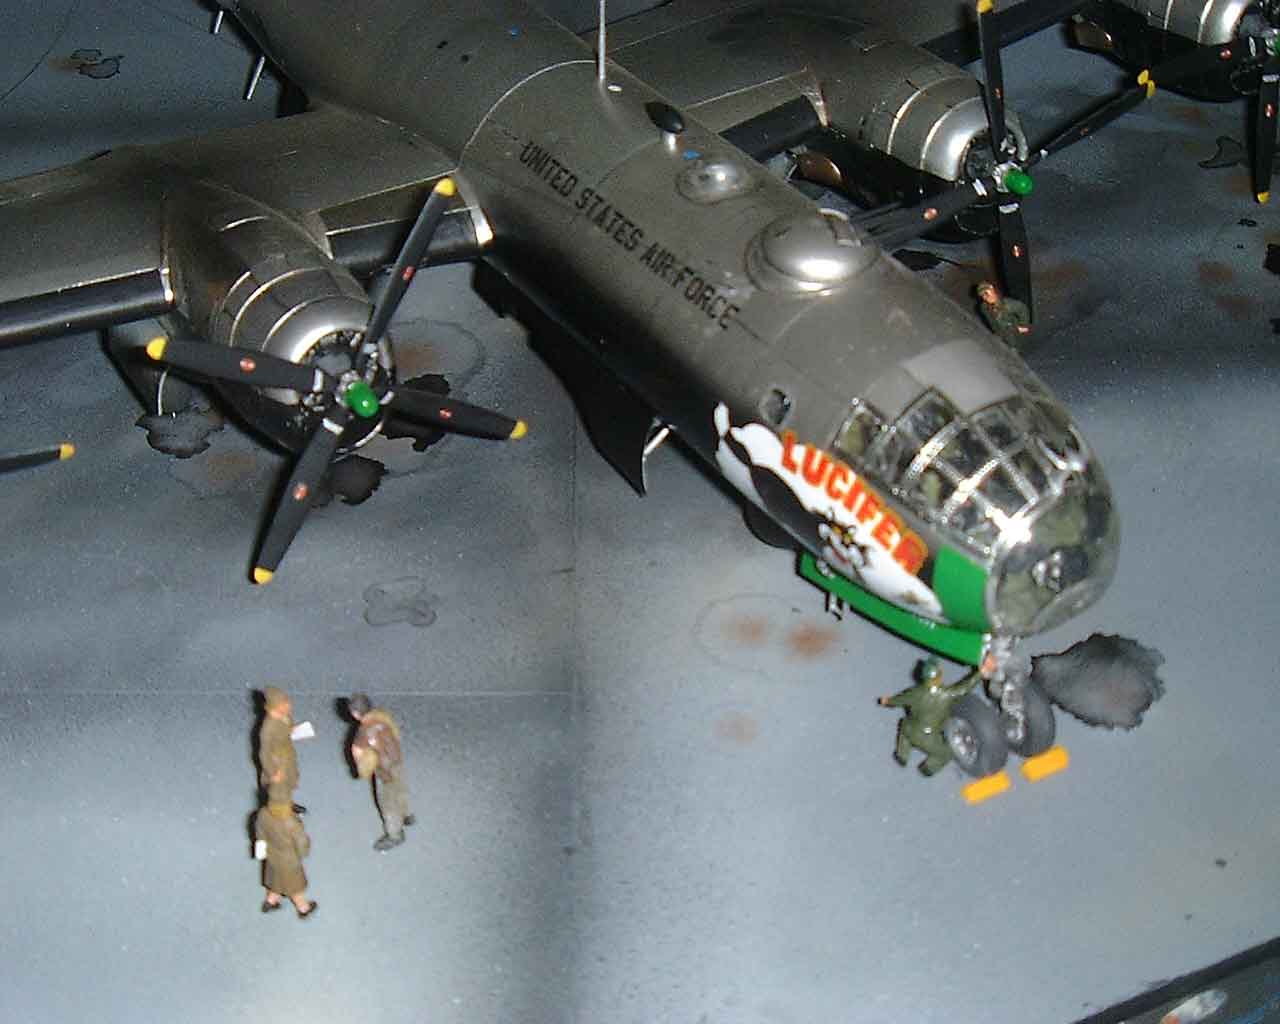
The rest of the decals came from Aeromaster sheet 48-273 B-29's over Korea part II and the spares box. The Indian head insignia on the vertical stabilizer may not have been used on Lucifer but it did brighten an otherwise dull area. I stand by my artistic license! The de-ice boots were masked up and airbrushed matt black and filler caps painted red. Before I applied any weathering to the model I had a few last details to add. The wheels were painted Aeromaster Tire black and Humbrol Metalcote matt aluminium and attached to the impressively substantial undercarriage legs. The tyres needed flattening to portray all that weight so a baking tray was heated over the gas rings of the cooker, removed when hot enough and the model positioned on it. Caution should be observed to avoid burnt fingers and distorted delicate parts but it does mean the "sit" of the aircraft can be kept. Don't overdo flattened or bulged tyres, in reality they are inflated to high pressures and even with a full load display very little bulging of the sidewalls. Nose bay doors were painted green and in the absence of decals (shame on you both Monogram and Aeromaster) the legend "No smoking within 100ft" was hand painted on in white. The artwork of Lucifer in Squadron Signal B-29 Superfortress shows a series of dipole aerials below the fuselage aft of the wing. These were added to predrilled holes using aerofoil shaped plastic rod. Bomb bay doors were next, and as these are cut to shape to clear the profile of the Tarzon bomb (photo 10 below).
I had to grit my teeth and attempt to complete the bomb in order to get a correct profile. Strange to say an evenings work with plastic card and quantities of MEK and superglue gave me a reasonable bomb, once again it just proves that standing back or taking a break can make the most seemingly difficult job easier. The bomb was positioned over the doors on the workbench and drawn round then the profile was cut with a scalpel and razorsaw. On offering the first door up to the fuselage I realised I had cut the forward profile on an aft door! It pays to check twice and cut once. Swearing to all the gods I carried on with the final three doors (in the correct order). As I now had to fabricate a rear bomb door from card stock I looked at all my photos again for any extra detail and it became clear that the rear doors might not have been fitted. Certainly during tests in the US they weren't and as the bays had been joined, where were the door actuating jacks now positioned? No photos were conclusive but I felt the model looked odd without the rear bay doors so fitted them and repositioned the jack assembly at the rear of the bay mounted on the side beams. If anyone has any further information I would be happy to receive it. The final items to fit prior to weathering were the flaps, I was worried that the weight of the flaps would be too much for the mounting lugs to take but superglue and accelerator gave a firm, positive fixing (photo 11 below).
Most pictures of B-29's show the flaps up but as I wanted to show my model being prepared for a mission it seemed natural that the ground crew would have run the engines and function tested the actuating mechanism.
Weathering could now commence. A wash of well-thinned black ink was applied around the control surfaces. Incidentally these were painted matt aluminium to look like doped fabric with the trim tabs given a more metallic finish. The engine cowlings were given special treatment, the R3350's required constant attention and the ring cowls must have come in for a real bashing from removal and handling. Also airflow and erosion by dirt, stones etc would have contributed to a battered appearance. The cowl gills were washed with black ink and a wash of burnt umber oil paint gave an oily look with emphasis to the bottom of the cowls and around the oil cooler "boats". The black finish was chipped and scored with a silver pencil and a fine brush dipped in matt aluminium Metalcote, particularly around the leading edges. The propellers were given a thin weathered matt aluminium leading edge with a slightly wider dry brushed area towards the very tip. It's not so much dust and debris that weather props as rain and ice; this forms even in seemingly warm climates and damages props and airframes. The gloss black undersurfaces were chipped and weathered using matt aluminium again looking at areas where maintenance and handling as well as airflow would have removed paint. Some B-29's photographed in Korea show large areas of aluminium showing through the black but Lucifer was being depicted in spring 1951 when the black scheme was a fairly recent introduction so I was quite restrained. Exhaust stains were airbrushed on using first a matt black, widening out and getting fainter the further away from the exhaust pipe it gets. Then a darkish earth colour from the pipe to about half way to the trailing edge feathering into the black followed by a small area of sandy brown really close to the pipe. A faint overspray of light grey pulls it all together and gives a good impression of a well used and well maintained engine.
The finished Tarzon bomb was sprayed satin black and given a light dusting with fingerprint powder to give it a metallic sheen. There are pictures of Tarzons painted like Easter eggs but I didn't want to get away from the sinister, business-like look of a plain black bomb. It was glued into the mounting frame using epoxy resin and a chain sling added from the Tamiya Lancaster kit, this was painted silver (photo 13 below).
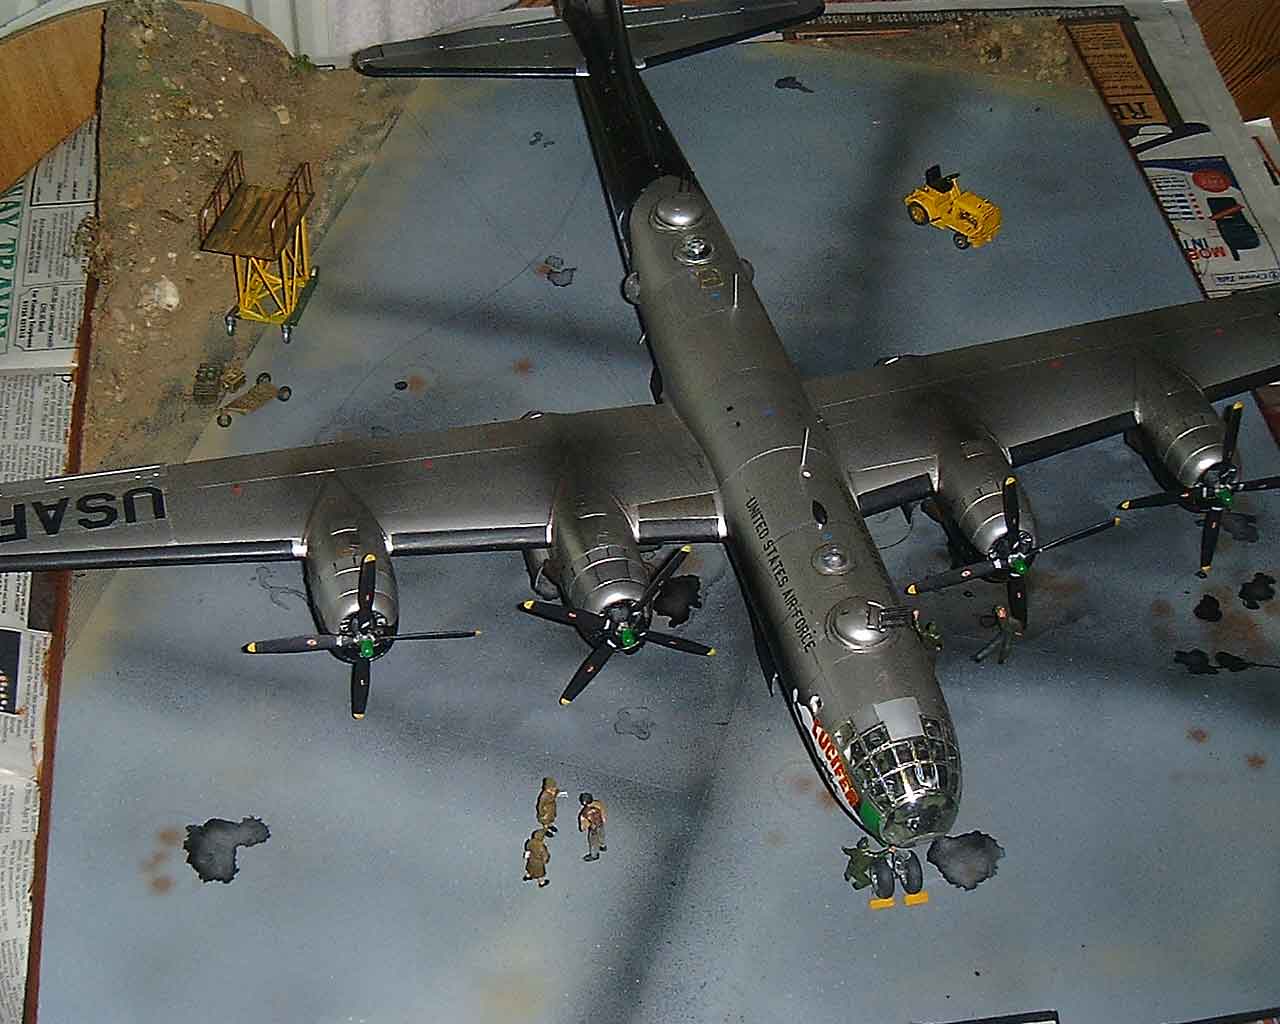
Final jobs were to add resin gun barrels from Paragon to the turrets and drill holes for the HF aerial wires running from the starboard horizontal and the vertical stabilizers to a point below the forward upper gun turret. 2lb breaking strain fishing line was used for the wires, painted black to make it slightly more visible. Finally the propellers were added to the engines. All of the above was done at my work table in a corner of the dining room, all the time wrestling with this huge model. Eventually it took over the dining room table, much to my wife's disgust. I was told NEVER to build a model as big as this again! One thing was still wrong and it was to be my final piece of bad luck/ill judgement, the damn thing would still not sit three square on its undercarriage so I tried to introduce more weight up front. No detail of the navigator/flight engineer compartment could be seen so I removed one of the small side widows and introduced plaster of Paris. This seemed like a good idea. It wasn't. I gently used a syringe but the plaster managed to find its way into the flight deck, out into the bomb bay, into the nose wheel bay, everywhere. Disaster! What an idiot. I took to cleaning up straight away but plaster continued to seep out overnight. I had to remove the nosepiece to clean out the cockpit as best I could but you can still see white areas if you look hard. I did succeed in getting most of the plaster off and out but it was almost the last straw. I was intending to put the model on a diorama to feature as a centre piece for our Group display. For ease of storage and transportation, (a relative term when talking of a 1/48 B-29), I was going to keep them separate but I really did not want to use a tail stand. It seemed unavoidable but I was going to have to fix the model to the baseboard. That decision made I moved on to constructing the diorama.
I had in my minds eye a picture of the bomber being made ready for a mission surrounded by ground crew, access equipment and with some groundwork to give scale to the aircraft. Korean War B-29's were based in Japan and pictures show wide concrete hard stands with earth strips between, some of these strips being piled up earth and topped with scrubby vegetation. Iwakuni in particular looks to be a little less than flat. The sides of these hard stands were home to all the ground crew access steps, platforms, toolboxes, ground power units and the hundred and one things needed to work on the aircraft. With the model on the dining table a suitable sized area was marked out with paper strips to give me an idea of the baseboard size. It needed to be large enough to depict the surrounding area but not too big to make storage and handling overly difficult or too swamp the main subject. A size of 70cms by 62cms seemed about right. A piece of 5mm marine ply was measured and cut then sealed with yacht varnish to prevent warping. When the varnish was dry I positioned the model on it and arranged the various figures and pieces of equipment around it. The diorama must be balanced and have areas of interest but not be overcrowded, airfields are big places with lots of empty space. Too many modellers seem intent on filling every corner of a diorama with a consequent loss of the main subject and a feeling of overcrowding. One must always position the subject at an angle on the base to create interest and to emphasis some detail, in this case the noseart. When I was happy with the composition I removed the aircraft and prepared the groundwork. First grey mounting card was cut to simulate the concrete hardstand, again angled across the base. This was lightly scored to represent the joints and glued to the board with contact adhesive. The back edge of the hardstand into the corner of the board would have an area of PSP, home to the access equipment etc, backed by a rise of bulldozed earth. The PSP was made from an American product sold as porch screening; it is flexible plastic and comes in one-foot squares, two to a pack for around 2.50. Cheap PSP, my thanks to Terry Campion for that one! Before the PSP was fixed down the rise was made from expanded polystyrene block cut with a carving knife and roughly shaped. This was glued down with white glue and the earth covering prepared. I use Polyfilla for this mixed with a very matt earth colour emulsion paint, this pre colours the mix and prevents any white showing later from damage etc. The mix is applied with a palette knife and before it dried the PSP was pushed into it and positioned and the whole lot was sprinkled with sand and fine model railway ballast. Some people add the sand etc into the mix but I think this gives a monochrome effect, sprinkling on after gives tonal variations. Small pebbles and stones were pushed into the "earth" to simulate rocks and pieces of moss and vegetation added where required and the whole left to dry. My source of vegetation and pebbles is stream beds, my wife and I visit the New Forest and York Moors quite often and a wander into streams reveals water washed grit, pebbles etc and the surrounding trees are home to lichens and ferns that are scale models of larger species. I don't suggest denuding our countryside but a small bag of these items, dried out at home, goes a long way. Of course model railway shops are another good source of scenic materials but these can look rather artificial without some doctoring.
Once I was happy with the base board the aircraft was repositioned and the main wheel spots marked, then a small hole was drilled through the board and another hole drilled into one tyre on each undercarriage leg. Small self-tapping screws were then inserted from underneath the board and tightened up. As an extra precaution epoxy resin was also applied to the tyre flats. Now securely attached the model will not move and was no longer a tail sitter! The figures were a mixture of Tarmac (the two WAC's), Parabellum, Airwaves, Verlinden and Monogram with some help from Preiser for new heads and arms. The Preiser Luftwaffe figure set is wonderful for basic figures and provides a good basis for figures of most air forces with a bit of surgery, above all its terrific value for money. Ground equipment came from the kit, the Revell equipment set or was scratchbuilt. So there we have it, finally finished after all the trials and tribulations. It won't win any prizes but it does show a slightly unusual version of the B-29 and adds presence to our Korean display. My thanks go to Neil Burkill of Paragon for his kindness and some great resin that took some of the hardship out of the conversion, Parabellum and ED Models in Birmingham for keeping the flag flying for 1/48 figures and vehicles. Keep 'em coming. Lastly thanks to Jo my wife for suffering The Brute for three months and the members of IPMS Mercia for helping me keep the faith when my enthusiasm lapsed! P.S. The model is too big to live at home so it's hangared at work along with the DC-6's!
Click
on the thumbnail images below to view full sized.
Model, Text and Images Copyright © 2000 by David
Eales
|