|
Bristol
Beaufighter VIF
by
Alex Bernardo
|
|
|
Beaufighter VIF
|
Kit:
Matchbox 1/72 Scale Beaufighter X
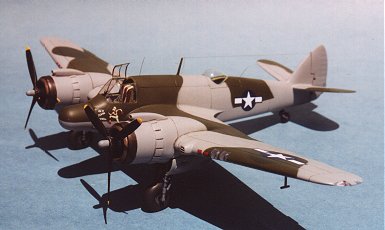
The subject Beaufighter was attached to the 416th NFS (Night Fighter
Squadron) stationed in Algiers on August 1943. The Squadron was equipped with
Beaufighter Mk VIF, until mid 1945 when they received Mosquitos.
416 Squadron's Beaufighters were fitted with either Mk I (arrow-head) or Mk
VII/VIII (thimble-nose) AI radar sets. The Squadron claimed four confirmed
victories by the end of the war.
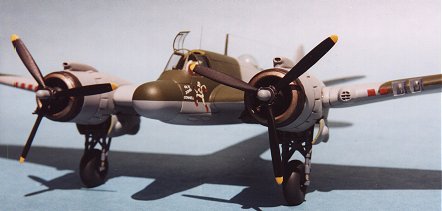
Cockpit
The kit cockpit simply consisted of a seat, rear bulkhead, and floorboard. I
therefore decided to beef up this area.
The following scratchbuilt built items were added to the cockpit:
-
 Main
instrument panel was made from two styrene sheets with different thickness
and various generic control bezels; Main
instrument panel was made from two styrene sheets with different thickness
and various generic control bezels;
-
Added pilot's side consoles;
-
Various gauge panels on both sides of the
cockpit;
-
Modified a control yoke from Italeri's
B-25;
-
Gun sight was made from different diameter
discs cut from styrene rods;
-
Painted thin strips of masking tape for
seatbelts;
-
Generic brass rudder pedals;
-
Main instrument panel shroud was made from
three styrene panels glued and sanded to round off the joints.
All these cockpit modifications may sound pretty standard. What made this
phase of the project difficult was that I decided to detail the cockpit after
the fuselage halves were glued together and other external details were applied!
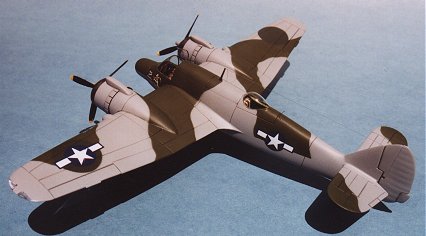
External
Modifications
External modifications included:
-
 Removal
of the Mk X's "Dorsal fillet" and filling the gaps on the fuselage
and vertical stab with styrene pieces and super glue. Removal
of the Mk X's "Dorsal fillet" and filling the gaps on the fuselage
and vertical stab with styrene pieces and super glue.
-
All small holes were eliminated by applying
primer and sanding until a smooth surface was achieved.
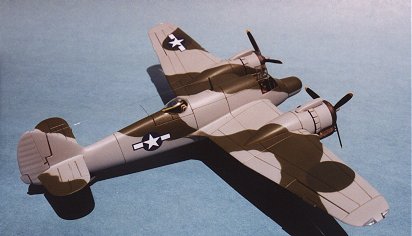
-
Navigation and landing lights were made from
pieces of clear styrene cut and shaped from clear sprue trees.
-
Landing light lenses and navigation light bulbs
were acheived by drilling a small hole and painting the appropriate colors.
Crew entry hatches were scribed on to the bottom of the fuselage.
-
Oil cooler intake grills were made with a piece
of wire placed vertically and two small horizontal styrene strips on top of
the wire.
-
Tropical air filters were formed from small
styrene blocks.
-
Intake nozzles were added on to the exhaust
dampers. They were made from small drilled out styrene rods.
-
Drilled out shell ejection chutes.
-
New canopy and observer's dome were made using
the "Heat-n-Smash" technique. After polishing the kit's original
clear parts, they were used as male molds for creating
"Heat-n-Smash" canopies.
 The
model was painted overall with Aeromaster's "Medium Sea Gray" acrylic
paint followed by Testors' "Dark Green" acrylic paint. I sprayed on
Tamiya's "Clear Gloss" acrylic paint before applying decals. The panel
lines were highlighted with a thinned mixture of Tamiya's "Smoke"
acrylic paint. The
model was painted overall with Aeromaster's "Medium Sea Gray" acrylic
paint followed by Testors' "Dark Green" acrylic paint. I sprayed on
Tamiya's "Clear Gloss" acrylic paint before applying decals. The panel
lines were highlighted with a thinned mixture of Tamiya's "Smoke"
acrylic paint.
Decals were custom made and were printed on an Alps printer.
I sprayed a coat of Polly Scale "Clear Flat" acrylic paint after
the decals had set.
Exhaust collector rings were painted using Testors' enamel paint mixture of
steel, brass, and flat black. Landing gear was painted with Testors' "Flat
Gray" enamel. Tires were painted with Polly Scale's "Grimy Black"
acrylic paint.
Models, Description and Images Copyright ©
2000 by Alex Bernardo
Page Created 17 June, 2000
Last Updated 26 July, 2007
Back to HyperScale
Main Page
Back to HyperScale Features
Index
|  Home
| What's New |
Features |
Gallery |
Reviews |
Reference |
Forum |
Search
Home
| What's New |
Features |
Gallery |
Reviews |
Reference |
Forum |
Search