 Home
| What's New |
Features |
Gallery |
Reviews |
Reference |
Forum |
Search
Home
| What's New |
Features |
Gallery |
Reviews |
Reference |
Forum |
Search
|
|
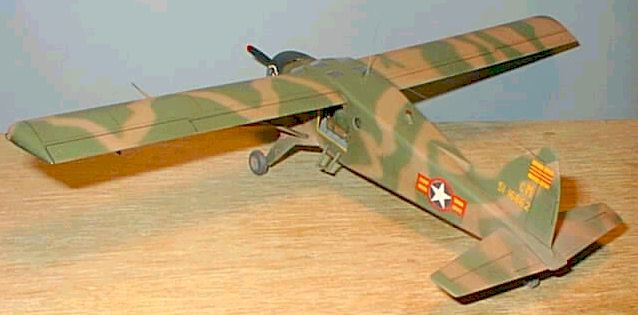
DeHavilland U-6A / L-20 Beaver by Peter Nebelung
the DeHavilland Beaver was designed after consultation with some of the best bush pilots in Canada, and first flew in August 194. Interest in this aircraft by the United States Army was sparked by the need for a short field liason/cargo/ambulance type aircraft. Six YL-20s were acquired and after being rigorously tested, the type was accepted and entered service. Some 966 were acquired for all services. Beavers continue to serve in pretty much any locale around the world. Later developments included changing over to the Pratt and Whitney PT-6A gas turbine.
Eagerly awaited in 1/48 scale, the Beaver was released in the summer of 1999 by Hobbycraft of Canada, in both wheeled and float versions. This kit falls into the mid range for quality of Hobbycraft kits, and was somewhat of a let down by those who did the first reviews. One interesting aspect was that the fuselage was supplied in clear plastic, allowing the modeler to mask out any combination of windows required. Not a bad idea, but it does lead to certain problems.
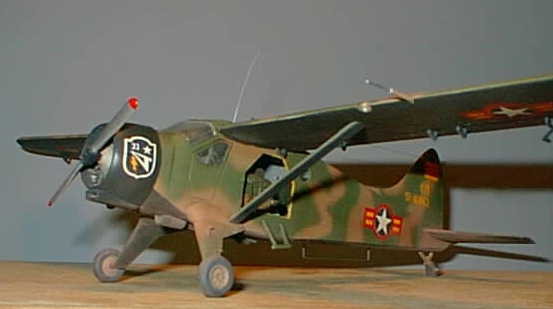
Being a rather methodical type of person, the first thing I did was gather reference materials on this aircraft. I found the most useful source was an old article in the winter 1974 issue of Replica. From this I determined that there are an amazing number of paint schemes available for military birds. I also found the the combination of windows and various antennas was just about as varied. Bottom line here was to have a picture of the particular plane you want to do. Based on the kit decals, I decided to do a VNAF aircraft. Construction commenced with the assembly of various components. The wings were straight forward, needing only the addition of scribed panel lines as the kit is devoid of such detail. The same process was applied to the taiplanes, and the elevators were cut away. The landing gear is simple and effective, but entry steps should be added on both sides for the crew. The engine is one piece, and was painted and washed/drybrushed to bring out the detail. Ditto for the prop. Again, make sure you have a good picture as the prop colors vary greatly. So far, so good.
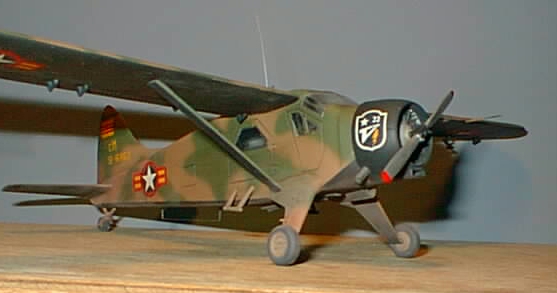
It comes in the usual 2 halves with minimal detail inside. Interior comprises floor, aft bulkhead, instrument panel and control column and 2 seats for pilot/copilot. Basic windows and doors are scribed in on the outside, meaning you just have to mask them off on the outside and away you go. This is ok if you want a so/so model, but, having an interesting drawing of the cargo dropping version, I decided to open the port main door, and add the tracks and crates for this version. Note: Being of clear plastic, very hard and brittle, care must be used when cutting open the doors. It is very easy to crack the plastic, and get spider webs on the windows. The interior was modified by adding a new aft bulkhead to improve the fit. The kit floor was widened with the addition of two 010 x 020 strips on either edge, again to improve the fit. I scribed all the door openings on the inside and added door handles and map cases. The cargo rails were cut from Plastruct channel and angle and glued to the floor. I also decided to make up the canvas web seat along the aft bulkhead so added the brackets at this stage. Each window as then masked from the inside, and the interior was sprayed with Pollyscale Dark Gull Gray. The seating supplied consists of two seats more suitable for a tank, which sit on two pairs of frames. First task was to sand the seats down to more normal thickness' and paint them. After that, I added the hand grip on the seat back, and harness made from masking tape. I made up the web seat in the rear using plastic rod for the frame rails and painted tissue for the seat itself. Seat belts are anchored to the flooring and come up through the seat canvas, so these were added from stiff paper and bent into shape after the interior was in place in the right fuselage shell. The kit instrument panel is vague and needed to be deepened and detailed with the proper instrument spacing and sizing, addition of the engine controls and other knobs and levers. The panel will sit too far forward and too low if done as per instructions, so I built up the pedestal. The control stick supplied also looks more suitable for a tank, but can be fixed with some care. The wheel is too tightly curved and too thick. I just cleaned it up and re-bent the arms a little. One thing needed which I didn't do was the glare shield. This is noticeable by its absence. To add a little more detail, I made up a large fire extinguisher and placed it between the two seats.
Now comes the moment of truth. All the guts are inside, and it's time to glue the halves together. I used Tenax for this, not wanting to risk fogging the interior windows. Worked well, but what I forgot to do was make sure that there was no dust or dirt left inside the fuselage before I closed the unit. Now, I have dust bunnies stuck to the windows and no way to get them clean. A point to watch for.
The first thing you will find when you attempt the final assembly is that nothing fits. Period. I had one wing slanting up and forward, the other slanting down and rearward. One wing was too thick as well, needing some sanding to bring it down to the thickness of the mating stub on the fuselage. Having fixed that, I trued up the wings with a Delta belt sander and built a jig from balsa wood. I took the dihedral from the drawings in the Replica article and this worked out well. The wings were then drilled and pinned, and secured with gap filling CA. After final assembly, I am happy to say, this one sits level and all angles match. I then took the struts and checked them for fit, sanding until the bevel at the upper end was correct. Leave them off until you finish painting. Saves lots of aggravation. The landing gear struts need to be sanded to get a better fit, best done by putting sand paper on the fuselage and sanding until the gaps decrease to an decent level. Even so, you will require a fair bit of filler to blend them in. Watch out for the locations, as you will sand off the locator pins. Test fitting to the fuselage reveals that the top of the strut will cover over the bottom of the doors, so rescribe them about 1/16 shorter and fill the old line. While you are doing this, you will also see that the door frame and windshield frame is about a foot wide. Hobbycraft didn't pull the windscreen around far enough and you will have to rescribe here as well. Question here is, how do you correct the left over scribing on the windscreen. Any type of filler here will show up anyway, so I left the scribing alone. If you look closely you will see it in the pictures. The rest of the assembly is straight forward, make up whatever antenna you need, as well as the rotating beacon. Scratch build the strap on belly tank if you want it. I gave up on the exhaust heat exchanger and ditched it. Couldn't get it to fit properly so I just put in a stub of exhaust.
Decal options supplied for this kit are
Hobbycraft gives marking info for two VNAF aircraft, Mm (51-16862) and Mc (51-16862). As far as I can tell, Mc was not a tail code assigned to U-6As.
Oddly enough, the side views show the proper door framing, not the foot wide version given in the kit. Duh! As for the rest of the markings, the USAF bird is well documented in Replica and the markings are accurate. I don't know about the French or Laotian schemes. I painted the model with Gunze Sangyo acrylics, Dark Green (H303) and Tan (H310) over Testors Aircraft Interior Black (2040) in the usual light to dark process, added the yellow door frame. At this point, painting complete, I added the struts, and then gloss coated with 1 coat of future, cut 30% with Isopropyl alcohol. Decals were applied with Microscale set and sol, snuggled down very nicely. These are a vast improvement over the original HC decals. I used a bit of license here, not having found the VNAF site yet, and applied the squadron badge to the black bottomed scheme. After 24hrs, I gloss coated again, and then weathered with Burnt Sienna oil cut with turpentine as a wash, and sealed with Gunze Dullcoat. Final weathering was a dusting of the wheels, belly and stabilizers with Tempera Brown water color. This duplicates the red clay soil found in some regions of Viet Nam very nicely.
1. Vietnam: The War in the Air, Rene Francillon, 1987, ISDN 0-517-62976-3 If you have comments or suggestions, please email me at nebelung@idirect.com
Model, Images and Article Copyright
© 2000 by Peter Nebelung Back to HyperScale Main Page Back to Features Page |
 The
fuselage presents much more of a challenge.
The
fuselage presents much more of a challenge.
 The
cargo consisted of two munitions cases from my armor days, and a couple of
parachute packs from the Monogram C-47, with all strapping made from painted
masking tape. This was then glued down on the cargo rails and the static lines
were secured to a ring bolt behind the copilots seat.
The
cargo consisted of two munitions cases from my armor days, and a couple of
parachute packs from the Monogram C-47, with all strapping made from painted
masking tape. This was then glued down on the cargo rails and the static lines
were secured to a ring bolt behind the copilots seat.
 I
found a color picture of two VNAF Beavers in Vietnam: The War in the Air, by
Rene Francillon, which show the schemes Hobbycraft tried to duplicate. The
upper wing camouflage is true to the picture, but the fuselage is different.
Also, the tail markings don't agree with what I found two months later at a web
site devoted to the VNAF at
I
found a color picture of two VNAF Beavers in Vietnam: The War in the Air, by
Rene Francillon, which show the schemes Hobbycraft tried to duplicate. The
upper wing camouflage is true to the picture, but the fuselage is different.
Also, the tail markings don't agree with what I found two months later at a web
site devoted to the VNAF at