Home
| What's New |
Features |
Gallery |
Reviews |
Reference |
Forum |
Search
Home
| What's New |
Features |
Gallery |
Reviews |
Reference |
Forum |
Search
|
|
|
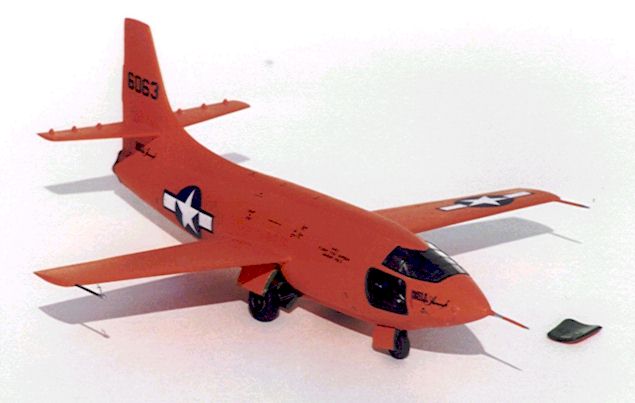
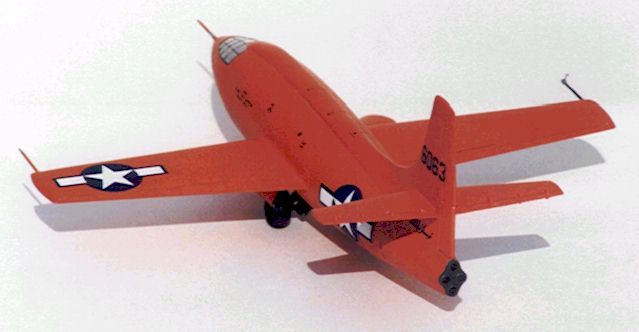
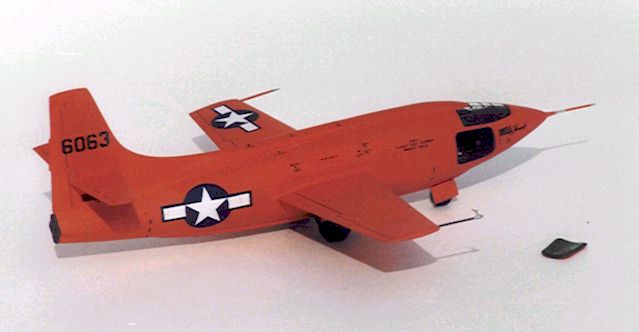
Bell X-1 by John Trueblood
This is Eduard's 1/48th scale Bell X-1. I chose to model X-1 No. 6063. This was one of three X-1s built by Bell at their Niagara Falls, New York production facility in 1946. Although 6063 was the second of the rocket planes to be completed it was in fact the first to fly. Numerous glide tests were conducted with both 6062 and 6063. On April 11, 1947 after being modified with thinner wings and horizontal tails, 6063 achieved the first powered test flight. After the initial "sound barrier" tests were completed 6063 was modified to a later X-1 variant and like her sister ship 6062 "Glamorous Glennis" survived the rigors of the flight test program at Muroc Dry Lake. Today 6063 is a gate guard at Edwards AFB. (6064 did not survive).
Eduard's Profipack contains resin tires and parts for the cockpit interior to supplement the main plastic parts. A nice complement of photo-etched parts is also included. The fret provides wheel well details, a choice of 3 different control panels with film instruments, seat belts, the rocket nozzles, and various interior "do-dads" even down to the tiny Bell logo, which was mounted on the center of the control yoke.
After a cursory review of detail drawings I concluded that the kit was accurate in outline and size. The plastic parts were well molded with only a small amount of flash. My only criticism of the Eduard kit is that some of the engineering is not state of the art (i.e. no locators for the landing gear, pitot tubes must be butt jointed to the wing leading edge). Some reviewers have complained about the diameter of the landing gear and the thickness of the gear doors. However, after studying the photos and drawings in "Bell X-1Variants" Ben Guenther and Jay Miller, Aerofax Datagraph 3, I decided that they would be OK. The gear doors were of a double pan construction and the gear itself had to be beefy to survive the jolt of numerous dead stick landings. The resin and photo-etch really added a lot of nice detail and in the spirit of the moment I added even more stuff like hydraulic and brake lines, gear bay equipment, instrument and radio wiring and the very small weather vane on the instrument pitot probe.
The Aerofax book was invaluable when it came to colors. I painted the cockpit, gear door interiors and wheel wells a dark shade of U.S. Interior Green. I struggled a bit with my decision about the exterior orange color. Numerous references indicated that it was FS 12243, but when I mixed up this shade and sprayed a test panel it seemed too bright and too red. The color photos of #6063 in the Aerofax book showed it to be much lighter and more yellow than FS 12243, sort of like the "Great Pumpkin." Perhaps the orange had faded in the intense high desert sun? It's always risky to rely too much on old color photos but the red in the Bell logo looked dead on so I proceeded to lighten up my orange mixture.
The orange paint I used was a mixture of orange and yellow gloss Humbrol enamels. I did not prime the model. I applied 3 coats with the airbrush and let the paint dry for one week before the next step. Once the paint had cured I used very fine sandpaper to remove any imperfections. Next I filled my utility sink with warm soapy water and used a large soft paintbrush (1.5"wide) along with liberal amounts of scouring powder, Ajax or Comet brand with bleach to thoroughly scrub and lighten the paint. When I don't want to fade the paint I use cleanser without bleach; toothpaste can also be used for this technique. You have to be careful not to remove the paint down to the bare plastic. If its done right you wind up with a perfectly smooth paint finish. I then used Modelers Wax to polish the orange paint to a mirror finish. No need of a gloss coat for decal application. I used a set of Scale-Master decals, which came with the old Eagles Talon X-1 vacuform kit. In my opinion they looked better and more accurate than the kit supplied decals. Panel lines were delicately highlighted with a soft lead drafting pencil. A light coat of acrylic flat was over sprayed to protect the decals and knock down the high gloss orange finish to a more realistic semi-gloss appearance. I hand painted the canopy with Poly Scale flat black. Using a small brush, I just sort of sloped it on the framework and after about 5 minutes and before the paint was completely dry I shaped a toothpick to a chisel point and ran it down the edge of the canopy frame to remove any black which I had gotten on the clear panels.
Text and Images Copyright © 2000 by John
Trueblood
|