 Home
| What's New |
Features |
Gallery |
Reviews |
Reference |
Forum |
Search
Home
| What's New |
Features |
Gallery |
Reviews |
Reference |
Forum |
Search
|
|
|
Messerschmitt
Bf 109D by
Scott Van Aken
Early-marque Bf-109s saw quite a bit of service during the Spanish Civil War of 1936-39. Hitler offered his support to his friend General Franco in repulsing Republican forces and their Russian allies and "Legion Condor", which included JG 88, played a large part in helping to maintain air superiority. The Bf-109 was brought into the battle when the Russian I-16 monoplane fighters proved to be more than a matc for German He-51 and Italian CR.32 biplane fighters. A number of German pilots gained valuable combat experience in Spain and that
experience also translated itself into improved versions of many German aircraft that took
part in the conflict, including the Ju-87 and He-111. After the For modelers, the external difference between the various early 109s is not very great. All were Junkers Jumo 210 powered. The main differences were armament and the depth of the chin radiator. The C and D had a slightly deeper chin radiator than the B. All had two MG 17 machine guns in the engine cowling. The C and D had two more in the wings. The wing guns didn't protrude from the wings as did the cannon in the Bf-109E. The D was visually the same as the C, but had a engine with a conventional carburetor that offered lower performance than the C. This visual similarity makes it difficult for modelers and historians alike when it comes to unit markings as often a unit would have both. Training units would often have all three early models on the flight line.
The canopy is a single piece so those wishing to display their 'Dora' with the canopy open are going to have to go the aftermarket route, cut the kit one open, or dig one up in their spares box. For this kit, I decided to use the Hawkeye Designs Bf-109E interior. Though designed for the Hasegawa 109E, it is supposed to fit the Hobbycraft 109 kit. As with other Hawkeye Designs kits, it is beautifully molded and comes with all you need (except seat belts) to make a great looking interior. Since this is an older version of the 109, all interior bits were painted RLM 02 grey. The Hawkeye designs interior is very well done and fit into the Hobbycraft interior without too much trauma. Dry fitting showed that some work needed to be done on the inside of the fuselage. Basically, what was needed was to remove the rather prominent posts left on the inside by the injector pins and to take out the built in guides.
The wings were glued together after the wing gun holes were opened. Then the resin interior bits were removed from their mold blocks. The rudder pedals and trim wheels also had to have their backing thinned down a great deal. The Hawkeye Designs instructions are very clear on how to do this.
While all that was being painted and prepped, I decided to start on the fuselage. The kit is designed so that the interior can be installed in an already assembled fuselage by bringing it in from below. First step was to install the exhaust. These are rather formless bits than can fit in either way. If someone does a dedicated early 109 resin set, it would be nice to have these done in resin. After they were glued in, the fuselage was glued together. Since it was slightly warped, it was glued in sections starting and the rear. It was clamped in place until dry and then another bit was glued and so on until the fuselage was together. Then it was time for the (for me) typical round of filler and sanding to take care of imperfections.
Next the chin fairing was installed and filled, then the wings were installed. This was a rather sloppy fit that needed quite a bit of work. The upper wings were also a sloppy fit. I found this rather odd as the Hobbycraft 109E kit fit very well. I can only really blame the fuselage for all the fit troubles. The exhaust stacks were also drilled out at this time. Once the wing was properly smoothed out, a radiator grille was cut from Gunze grill material and installed in the rather large radiator opening. The wing to fuselage fit was less than sparkling. There was a gap in the front and the back that needed filling. Gaps also appeared at the upper wing root, but those went away after the join was glued and the dihedral supported by tape while the glue dried. Flaps were fit in the down position and glued in place as was the small oil cooler. The aileron mass-balances were held off until near the final stages. Tailplanes were fit into place but it took a bit of tweaking to get them to line up. Supports were not installed at this time, to be fitted instead during the final stages. Next the canopy was masked with tape. A bit of a warning on this, as there are a few canopy frames missing at the rear and the upper clear part of the windscreen are not marked at all. You need to do this. Then on to painting!
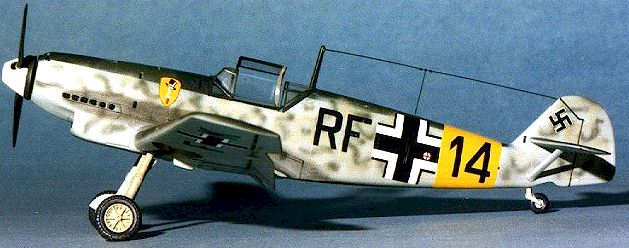
Initial painting was the underside and sides in RLM 65 blue. A bit of final touchup on the interior and landing gear legs was done in RLM 02 and then the canopy was tacked into place for upper surface painting. Next the upper nose intake was glued in place. This took a bit of research, as the instructions are generally poor in this respect. It fits into a small indentation near the guns, not back near the windscreen as the instructions show. The uppersurfaces were painted RLM 70 and RLM 71 using Aeromaster's great Warbird enamels. The spinner was painted white as I had decided to do the JFS 1 version from the Aeromaster sheet. This scheme is almost the same as one in the Hobbycraft kit, though the decals are MUCH more useable. It was at this time that I noticed I had made a goof. Big surprise, you say. I had forgotten the wide yellow fuselage band. Out came the tape to mask it off and then the area was painted Modelmaster white, and when dry, Xtracolor RLM 04 yellow. When that was dry, it was masked and the fuselage was mottled with RLM 71 and RLM 02. A rather nice pattern, if I do say so myself. Once that was dry (does it seem like things are drying a lot?), all the masking was removed and the airframe overcoated with clear gloss. Then it was off to the hobby shop for some intense browsing.
The codes RF+FK were applied at the factory under the wings and on the fuselage as radio call letters. When the aircraft reached an active unit, it was usually sprayed out, however training units generally left them in place. Now when you look at the fuselage, it should read, left to right, RF+FK. On this plane a yellow tail band was painted over the two aft letters and a unit number '14' painted on the band. On the left side, this would read 'RF+14', however, on the right side, it should read 14+FK and Aeromaster just gave us another RF+14 decal. The F for 14+FK came from the original sheet, but the K had to be gleaned from Modeldecal sheet #34. Though designed for British Postwar aircraft, the style is exactly the same. It is because of glitches like this that Aeromaster gained an early reputation as 'Errormaster'. Fortunately that is behind them, but must be considered when using early sheet. Other than these glitches, the decals were just superb, as always. Once on and dry, the residue from the Champ decal setting solution was removed and the aircraft sprayed with matte. Then the resin wheels were installed along with the gear doors. Then the vac canopy was cut out, masked and painted. After the paint had dried, the moveable part of the canopy was cut away and the fore and aft piece glued onto the fuselage with superglue. A bit of touch up was required after which the kit antenna was installed and painted. Then the antenna wire was made from stretched sprue and painted black. The prop was then installed and the aircraft given a bit of exhaust stain with pastels. A final coat of matte was applied to seal the pastels, then the masking taken off the canopy. Finally the armor plate was glued into the moveable section of canopy and the canopy glued in place.
Overall, not a bad kit. Since it is an Early Hobbycraft, it isn't as well engineered as later kits and the decals and instructions are poor. But with some references and an aftermarket set, it can be made into a very nice model.
Kit #: 1568 MSRP: $12.00 Decals: two versions. one JFS 1, 1940, one Swiss AF, 1940 Date of Review: 11 March 1999
Article, Model and Images Copyright © 1999 by Scott Van Aken
|
 Spanish War, the early versions
of the 109 were relegated to training schools. Though some Bf-109Ds did partake in the
invasion of Poland, they were quickly replaced by the more potent Bf-109E with its
Daimler-Benz DB 601 engine in place of the earlier model's Jumo 210. Of all the early
109s, the D model was built more than any other, with well over 600 units delivered
compared to less than 100 B and about 60 C models.
Spanish War, the early versions
of the 109 were relegated to training schools. Though some Bf-109Ds did partake in the
invasion of Poland, they were quickly replaced by the more potent Bf-109E with its
Daimler-Benz DB 601 engine in place of the earlier model's Jumo 210. Of all the early
109s, the D model was built more than any other, with well over 600 units delivered
compared to less than 100 B and about 60 C models. 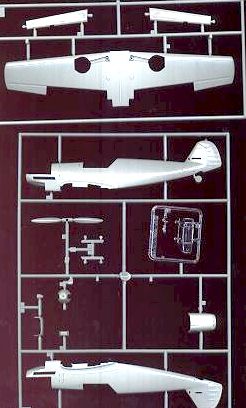 Hobbycraft released all
three early 109s back in the early 1990s. This means that the quality of the kits
are good, but not up to current standards. It also means that the decals are
basically not useable. The white is way too transparent to be useable on dark
backgrounds. It also means that there was a lot of commonality in the sprues. I would
doubt if the difference between the chin radiators were accounted for between the B
and C/D. The instructions for this kit of the D makes no mention of opening up the
holes for the wing guns. Two of the kit sprue are identical to the 109E kits as the wings
and interior are virtually the same on all 109s until the 109F came into production.
Hobbycraft released all
three early 109s back in the early 1990s. This means that the quality of the kits
are good, but not up to current standards. It also means that the decals are
basically not useable. The white is way too transparent to be useable on dark
backgrounds. It also means that there was a lot of commonality in the sprues. I would
doubt if the difference between the chin radiators were accounted for between the B
and C/D. The instructions for this kit of the D makes no mention of opening up the
holes for the wing guns. Two of the kit sprue are identical to the 109E kits as the wings
and interior are virtually the same on all 109s until the 109F came into production. 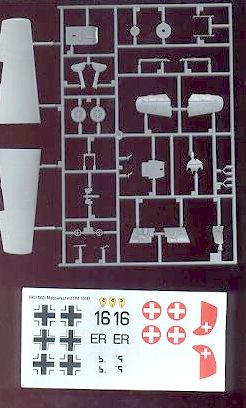 What you get are finely
scribed panel lines, a really good interior with super sidewall detail, the ability to
drop the flaps, and good fabric detail on the flaps and other control surfaces.
What you get are finely
scribed panel lines, a really good interior with super sidewall detail, the ability to
drop the flaps, and good fabric detail on the flaps and other control surfaces. 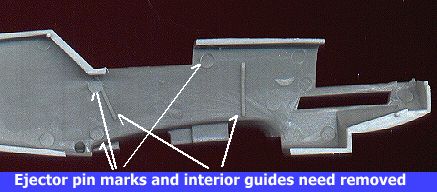 The interior bits were
then attached to the subassemblies (floor and side panels) in preparation for painting.
A piece of copper wire is given to simulate the oxygen hose and brake wires.
It is a bear to smoothly bend but can be done. It also looks a bit thick for
the brake lines. A note for the purists. The 109D rudder pedals were solid and
not drilled out like on the 109E. If it bothers you, you can make new ones out of card. If
you are wondering if the resin interior bits are really that much better than what is
offered in the kit, look at the accompanying image and make up your own mind on the
subject.
The interior bits were
then attached to the subassemblies (floor and side panels) in preparation for painting.
A piece of copper wire is given to simulate the oxygen hose and brake wires.
It is a bear to smoothly bend but can be done. It also looks a bit thick for
the brake lines. A note for the purists. The 109D rudder pedals were solid and
not drilled out like on the 109E. If it bothers you, you can make new ones out of card. If
you are wondering if the resin interior bits are really that much better than what is
offered in the kit, look at the accompanying image and make up your own mind on the
subject. 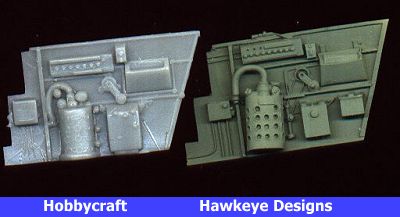 Once the fuselage was
glued, the interior was installed. Now this isn't as simple as it sounds. The
interior is designed for the Hasegawa kit and while the Hobbycraft interior looks very
much the same, it did not fit well. The instrument panel needed to be narrowed and the
opening in the cockpit thinned to get a decent fit. The interior sides needed some
carving at the top front and a bit at the top rear to properly fit into the Hobbycraft
fuselage. Frankly, when one uses aftermarket parts not specifically designed for a certain
kit, one can expect to have some fit problems. Fortunately, it looks great when
finally in there.
Once the fuselage was
glued, the interior was installed. Now this isn't as simple as it sounds. The
interior is designed for the Hasegawa kit and while the Hobbycraft interior looks very
much the same, it did not fit well. The instrument panel needed to be narrowed and the
opening in the cockpit thinned to get a decent fit. The interior sides needed some
carving at the top front and a bit at the top rear to properly fit into the Hobbycraft
fuselage. Frankly, when one uses aftermarket parts not specifically designed for a certain
kit, one can expect to have some fit problems. Fortunately, it looks great when
finally in there. 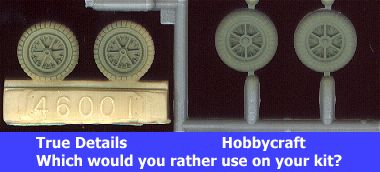 Several dollars later, I
returned with a Squadron vacuformed canopy and True Details wheels for the early 109. The
wheels had their centers painted and were cut off the block. Then the centers were drilled
out to fit the Hobbycraft struts. It is a HUGE center hole and took a lot of work!
Then the tread was painted with my secret tire paint. While this was drying
(again?), attention was turned to the vac canopy. It was carefully cut out and test
fitted. When satisfied, it was masked with tape and the moveable part of the canopy cut
out. Non-fogging superglue was used to attach the front and rear bits. The moveable
part got an Airwaves armor plate installed. This was all set aside and it was
time for the decals. But wait a minute. Aren't the horizontal stabilizers supposed to have
braces? Where are they? Well after much hunting around for them, I found the
well-chewed remnants of one of them in the paint room. CATS!! There was no recourse
but to make new ones out of scrap plastic. A length of sprue was carefully shaped and cut
to fit. Then cleaned up, painted RLM 65 and superglued into place.
Several dollars later, I
returned with a Squadron vacuformed canopy and True Details wheels for the early 109. The
wheels had their centers painted and were cut off the block. Then the centers were drilled
out to fit the Hobbycraft struts. It is a HUGE center hole and took a lot of work!
Then the tread was painted with my secret tire paint. While this was drying
(again?), attention was turned to the vac canopy. It was carefully cut out and test
fitted. When satisfied, it was masked with tape and the moveable part of the canopy cut
out. Non-fogging superglue was used to attach the front and rear bits. The moveable
part got an Airwaves armor plate installed. This was all set aside and it was
time for the decals. But wait a minute. Aren't the horizontal stabilizers supposed to have
braces? Where are they? Well after much hunting around for them, I found the
well-chewed remnants of one of them in the paint room. CATS!! There was no recourse
but to make new ones out of scrap plastic. A length of sprue was carefully shaped and cut
to fit. Then cleaned up, painted RLM 65 and superglued into place. 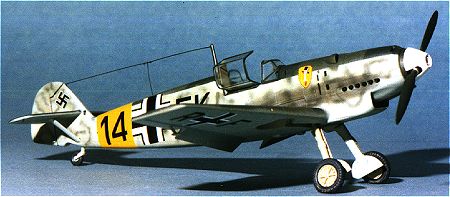 I used an early
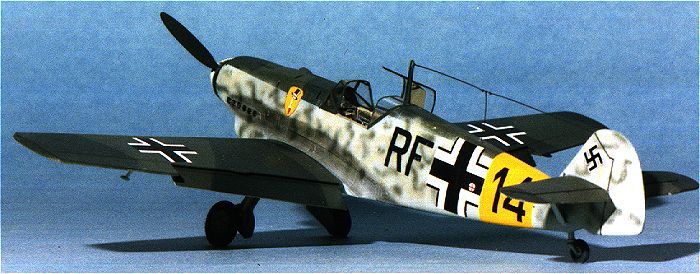
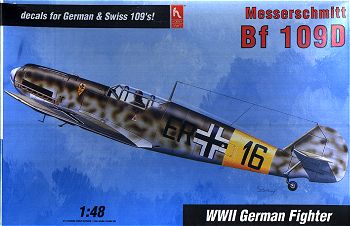 Kit: Hobbycraft
1/48 Bf-109D
Kit: Hobbycraft
1/48 Bf-109D