Home
| What's New |
Features |
Gallery |
Reviews |
Reference |
Forum |
Search
Home
| What's New |
Features |
Gallery |
Reviews |
Reference |
Forum |
Search
|
|
|
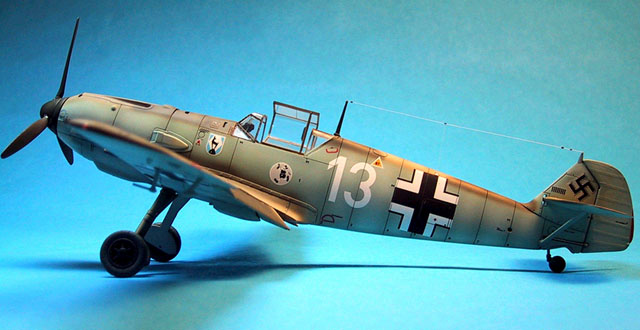
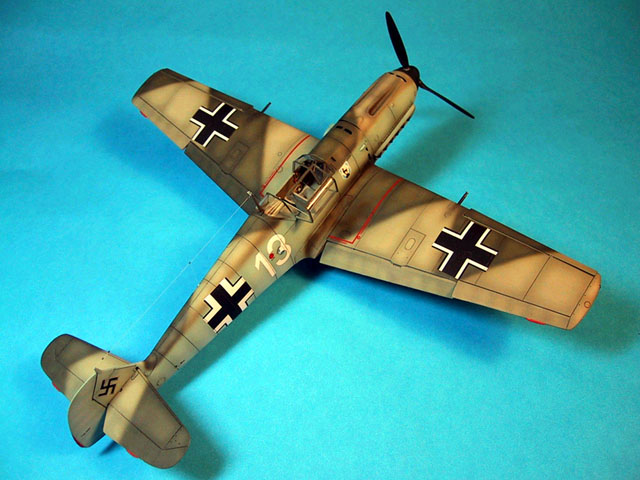
Messerschmitt Bf 109E-3 by Gregg Cooper
I originally intended to build this model "out of the box" as a quick fix to a bad case of Advanced Modelers Syndrome. As usual though with such aggressive diseases, the symptoms could not be contained and some aspects of this simple build-up stretch the limits of the rules for "out of the box". Oh well.
To begin with, the kit I started with is not even a Bf 109E-3, but is in fact the Bf 109E-4/Trop. Tamiya re-worked the tooling on the E-3 kit to have a more accurate nose contour and a more accurate shape to the oil cooler housing. I tried to confirm whether or not the newer editions of the E-3 kit had the revised parts in them, but was not successful. I had intended to do an E-3 from the start, so I merely swapped canopies with the two kits, and carried on. Some people have told me that it can't be done - the two kits are COMPLETELY different and the canopies are not interchangeable. I discovered that they are, in fact, interchangeable.
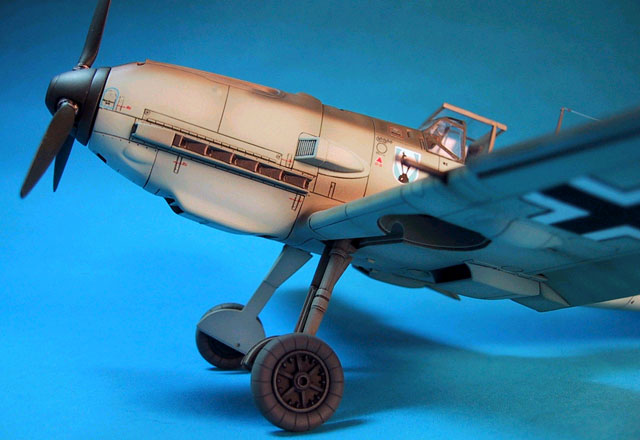
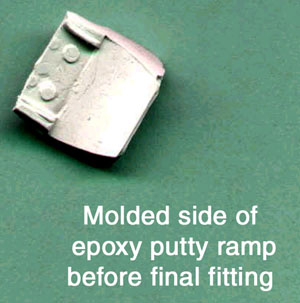
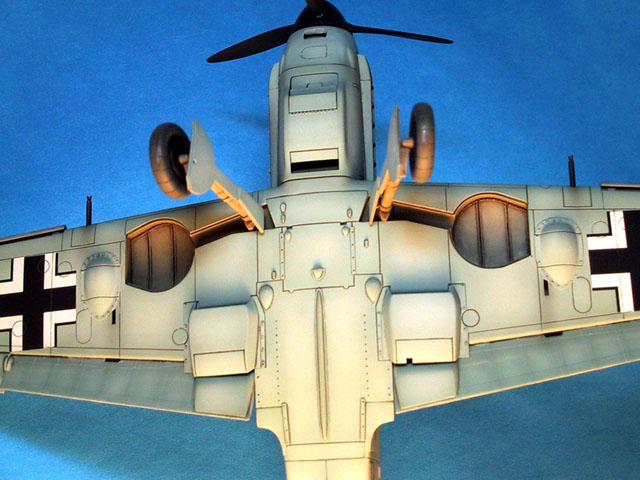
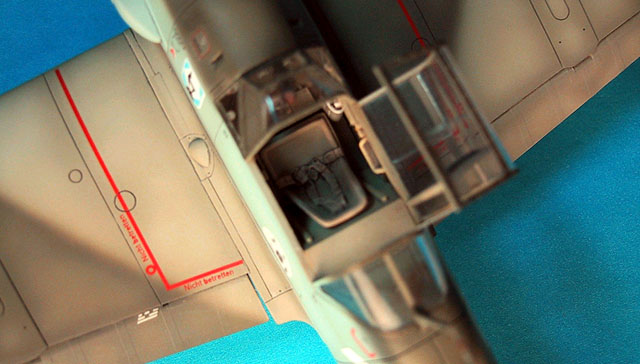
The interior of the fuselage received a good deal of attention. I was not satisfied with the gaping hole that Tamiya left as the airflow exit to the oil cooler. You can see all the way into the bare plastic interior of the model. The real thing is a ducted flow channel that directs the air through, and out of, the oil cooler. I could have simply painted the interior black, but I couldn't live with that. I also wanted to stay within the boundaries of the IPMS "out of the box" rules, which state that no scratch building or adding additional parts other than what comes in the kit is allowed. There are some things allowed such as thinning parts down to a scale thickness, drilling out or opening holes and vents, USING PUTTY OR FILLER, USING METAL FOIL, adding seat belts made from tape or paper or decal, and using after-market decals. So keeping these rules in mind, I used a great big glob of epoxy putty in the aft end of the oil cooler to "fill a hole." The epoxy putty blob was shaped into a curved duct using a styrene former before it set-up completely. The former was removed after an hour, and the puttied "hole" was primed and painted with the underside color.
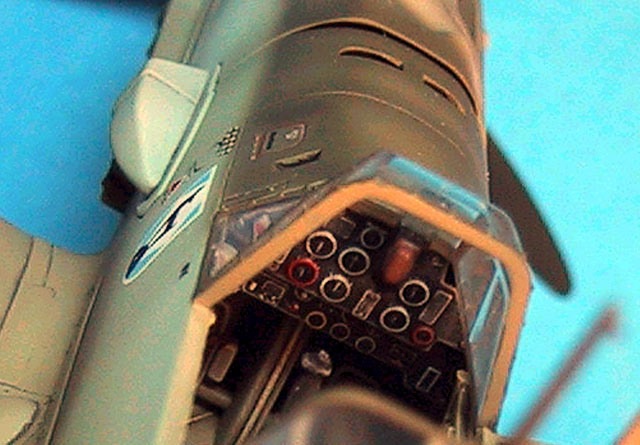
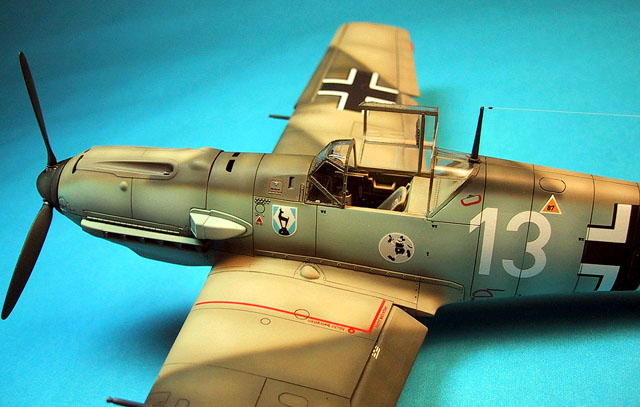
The lower nose of the model features a rectangular cutout that is also wide open to the interior. It also was "filled" with epoxy putty from the inside, with a blob that looks like an oil reservoir tank. I drilled out the hole for the hand-starter crank lug on the starboard side of the nose, and then filled it back in with a thin "hot dog" of cured epoxy putty, leaving it just beneath the exterior skin of the model. Then I drilled a tiny hole in the center of the new crank lug. Other holes and vents were opened up after thinning the plastic with a Dremel tool from the inside to a "scale" thickness. Many 109E's have a marked step in the aft part of the engine cowling that may (or may not) contribute to gun/engine ventilation. As is, the Tamiya 109E cowling replicates this step, but I thinned the edge to scale thickness, and the result looks nice. I made a few improvements in the cockpit. The seat was thinned down considerably all around, and a slot opened up for the belts to pass through. The belts were made from artists tape, but do not include buckles, as this is beyond the "out of the box" rules. They look good enough, and by overlapping them several times in the seat pan, it looks interesting enough as well. Tamiya has included little mounting tabs on the hinge-edge of the canopy to permit an open pose. To accommodate these tabs, there are two unrealistic square slots in the right hand sidewall that I filled in with CA. All of the cockpit parts were painted with a custom mix of Tamiya RLM 02, drybrushed with a lighter shade of Polly Scale, and then washed with a darker shade of oil paint thinned with lighter fluid. The sidewalls were embellished with some wiring details that I painted on. The instrument panel was painted dark gray, drybrushed and washed. The details were picked out, bezels painted, and each instrument received a level dab of epoxy to simulate the glass covers.
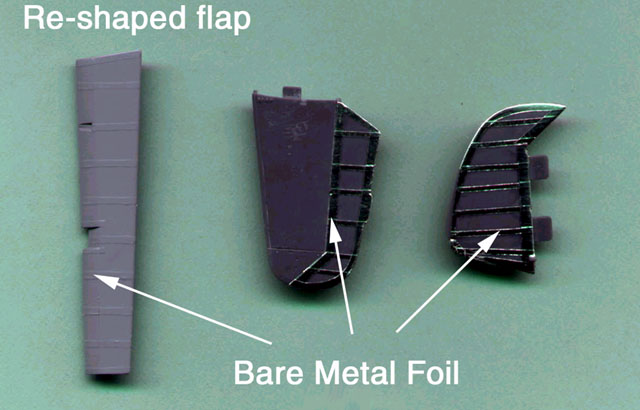
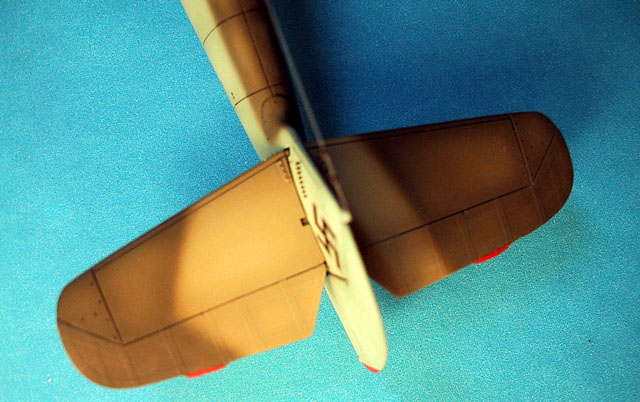
The airframe received a little help in a few places. The wings needed some basic fit improvement where they meet the fuselage at the roots and the aft joint. The horizontal stabs fit fine, but I had a problem with the strut being too short. The easiest way to fix this annoying problem is to enlarge the mounting slot of the stabilizer by dropping the lower edge of the slot about 1mm. The stab will sit slightly lower on the fin, but the struts will line up, and the new position is ever so slightly changed, and unnoticeable. The control surfaces of the Tamiya kit feature some exaggerated rib and fabric details. The flaps also have a completely inaccurate "step" molded into them to facilitate mounting in the up or retracted position. When mounted in the down position, however, the step is very noticeable. I elected to fill the step with epoxy putty, and fair it in with a wet finger while the epoxy putty was curing. Next, in order to fill in the large depressions that represent sagging fabric, all of the control surfaces received a liberal coating of Mr. Surfacer 500, applied with a brush. Wet sanding the parts after the Mr. Surfacer was dry resulted in smooth control surfaces, ready for the next step. To replicate rib tapes, I used very thin strips of Bare Metal Foil applied in the appropriate spots for each rib, along with the leading and trailing edges. I airbrushed a nice protective coating of Mr. Surfacer 1000 over the modified control surfaces, and the result is nice tight fabric with rib tapes in place.
I have in the past used an X-acto knife to emboss stitches into the plastic before applying the rib tapes. It works beautifully. I shortened the mounting rails of the leading edge slats to give them a partially opened look, and drilled a tiny hole through the molded on tie down loops on the lower wings. After a good coating of Mr. Surfacer 1000 to check everything out, the model was ready for paint.
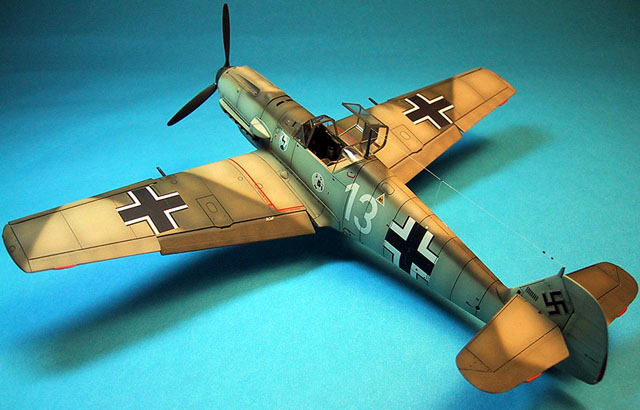
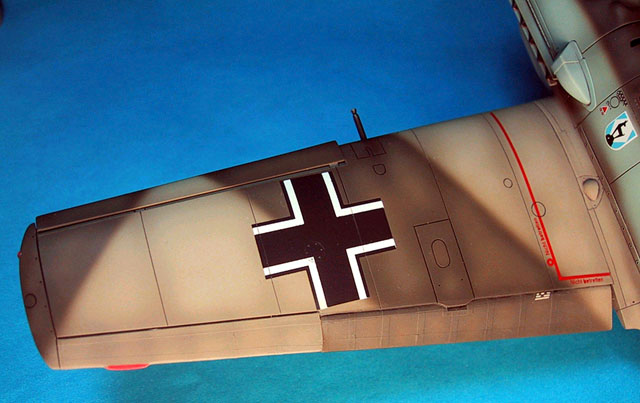
I have been using Tamiya paints since they were first introduced, and I have not felt the need to use anything else. The colors were mixed using Eagle Editions' Luftwaffe Color Chart as a guide. I use 91% isopropyl alcohol as a basic thinner, with a 1:1 ratio, and the results are smooth flow-out, the finest lines possible from any paint that I have used, and extremely quick drying time. I like to use a multi-shaded paint job on my models to lend interest, and add a little something extra. I admit that it is a technique that is either loved or hated, but I have spent a lot of time developing my technique and it pleases me. To accomplish the multi-shaded job, I use a post shading method. Each color is mixed and applied in a "factory fresh" condition - not lightened for scale effect. I treat each color one at a time, as it is applied to the model, usually starting with the lightest color first. After the factory color is laid down, I add white to the mixture to lighten it up, and then spray the centers of each panel line to bring out a faded look. Nothing new about this method so far, but here is where it gets interesting. At this point, the area being worked looks somewhat overdone, and heavy-handed. For the next step, I switch thinners to Gunze's Mr. Color Thinner developed for Gunze's line of acrylic lacquer paints. The Gunze thinner has the amazing quality of transforming the Tamiya paints into a very wet, retarded, and translucent coating. Using a mixture of about 80 -90% Gunze thinner, and 10-20% of the original Tamiya "factory" color mix, the entire color zone is oversprayed.
Magically, the lighter "fade" color is brought into the tonal range of the original color, but the fade effect is still pronounced. Another coat, and the finish is less faded. Other coats may be applied until the desired level of fade, or multi-tonal look is achieved. This method is very simple, and the retarded, translucent qualities of the Gunze thinner, makes any overspray unnoticeable unless the modeler wants it to be noticeable. Try this out on Luftwaffe mottled paint jobs, and you will be amazed at how easy it becomes. The color builds up gradually, so that the effect can be varied to the modeler's taste. I find that this method has a great advantage over the pre-shading method. If overpainted too much, the pre-shade is lost. With this post-shade method, you are toning the effect down until you like it. It is very hard to lose the effect, and would in fact take many coats of overpainting with the Gunze mix to do it.
I use Testors Gloss Coat to prepare the model for decals and the surface wash. I use a medium-temperature lacquer thinner to reduce the Gloss Coat about 50%. I spray it on in two or three thin wet coats, and it is ready to decal within two hours. I really like using methods that yield great results for minimum time. After the decals were applied, I used Poly Scale paint thinned with water to roughly "paint" all of the panel lines. Water based paints do not really "wash" and must be painted in the recessed panel lines. After two or three minutes, the panel lines are given a wipe with a soft cloth or a cotton-tipped applicator soaked in window cleaner. The Poly Scale paint stays neatly in the lines, and the whole aircraft is done in under an hour.
Again I rely on the old Testors standby, Dull Coat to provide a good, durable flat finish. Thinned 50% with the medium-temp lacquer thinner, the Dull Coat sprays beautifully, and is dry within the hour. Next came the small stuff. Attach the gear, doors, check for measurements, make sure everything is square, attach canopies, rig antenna, mass balances, pitot, and it's done. Silver painted wing tip lights, followed by clear red and blue-green, and the whole topped with a drop of epoxy puts the final touch in place.
I spent a lot more time on this project than I had anticipated, and can only chuckle at the comments in magazines about how "20 hours is average for me on a project like this…" All told, I am somewhere in the range of 100 hours or so, over the period of a month. This is the first model that I accurately measured for time. This includes little research breaks as well. It might sound incredible that an "out of the box" project can take that long, but six or eight hours can whiz by when cleaning seams, researching the right answer, and adjusting inaccuracies is important to a modeler. I like to build OOB models as a change of pace to the intricate details I put into other works, including resin patterns. It is refreshing to finish something every once in a while.
Click the
thumbnails below to view images full-sized.
Model, Text and Images Copyright © 2000 by Gregg
Cooper
|