Home
| What's New |
Features |
Gallery |
Reviews |
Reference |
Forum |
Search
Home
| What's New |
Features |
Gallery |
Reviews |
Reference |
Forum |
Search
|
|
|
Messerschmitt Bf 109E-1 Part One - Improving the Tamiya Bf 109E by Frank C. Crenshaw
A few years ago I read the Robert Frost poem "The Road Not Taken" in an English Literature class. This project kind of reminds me of that old piece by Robert Frost. I had been very interested in building a "phony war" Bf 109E-1 for some time. I was planning on converting the Hasegawa Bf 109E-3 kit. Having both the Hobbycraft Bf 109B and a Hasegawa Bf 109E-4, the quality of the Hasegawa kit made it my first choice over the Hobbycraft Bf 109E-1 even though I would need to do some minor work to convert it. I had been gathering reference and decals for this project for some time, and was one day going to get around to buying the Hasegawa kit. Well, I bought the Tamiya Bf 109E-3 kit when it was first released on sight with high expectations. Once I started examining the kit closely, I noticed there were some fairly basic problems with it. I was determined to build a 109E-1 but I already had a pretty nice 109E-3 kit. Faced with the choice of either buying the more accurate Hasegawa kit, or just accepting the minor problems with the Tamiya kit - I decided "to take the road less traveled" and try to fix the Tamiya kit. Even though it may sound like I am being very critical of the Tamiya kit, let me say that this is very nice with many fantastic features. Its problems are really not serious. I just wanted to see if I could improve the Tamiya kit and stretch my building skills on a simple project and this conversion seemed within my ability.
The Bf 109E-1 was visually identical to a Bf 109E-3 except in armament. The 109E-1 had
wing mounted MG-17 machine guns in its wings instead of the 20mm FF cannon of the 109E-3
series. There were no bulges for the wing guns and they fired through a large hole in the
wing leading edge. Converting a 109E-3 to a 109E-1 is as simple as
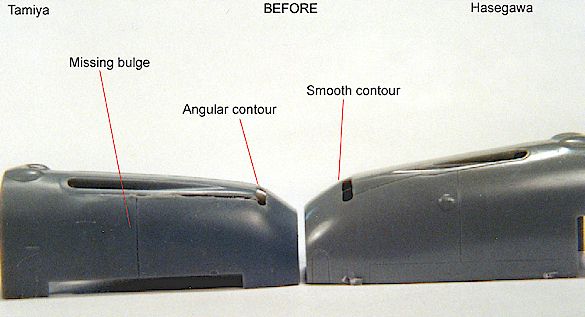
Improving the Tamiya Engine Cowling For me the easiest thing to fix was the shape of the engine cowling. As you can see in the picture, the area just in front of the gun troughs suddenly angles down to the spinner with hardly any curve. Pictures from the Aerodetails book on the 109E series clearly show this to be a gentle curve, not the abrupt and steep change represented on the Tamiya kit. The Hasegawa 109 has captured this curvature correctly. Also missing on the Tamiya kit is the bulge just below the gun troughs.
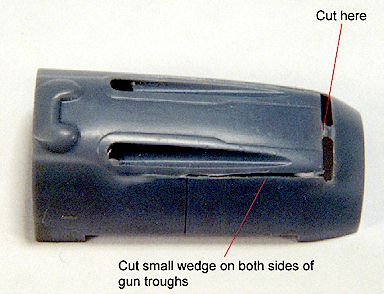
The first thing I did was cut small wedges on both sides of the cowling, just under the gun troughs. I then cut the troughs from the cooling slots. The wedges will allow you to depress the front of the gun troughs just enough to allow you to make the angle from the cooling slots to the spinner shallower.
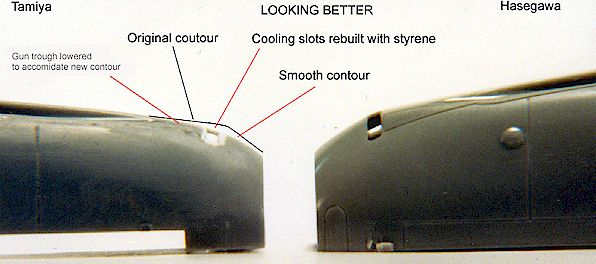
Once the glue has dried, you can sand the correct curve into the nose. Once you get the correct curvature, you will need to rebuild the gun cooling slots using strip styrene (very easy to do actually).
The only thing left to do is add the raised fairings behind the gun cooling slots using epoxy putty and add the cowling bulge. The easiest way to make the two bulges identical is to drill a hole where the bulge is located and insert styrene rod that has the end sanded into the round shape of this blister.
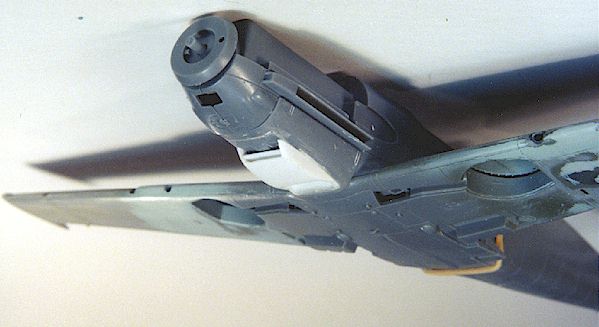
Oil Cooler and Wing Gun Ports The hardest thing to fix on the Tamiya kit is the oil cooler. Its housing is much too large. Pictures show the fairing to be much smaller than it is on the kit. I decided that the easiest solution was to scratchbuild a new fairing. I built a "shape" using epoxy putty and vacuformed a new housing. It took me several tries to fine-tune the shape of this fairing so that it fit exactly like the real one. I also added ducting at the rear and front, making this the hardest part of the project. Even though this radiator fairing is a simple shape, it consists of about 8 parts and took me quite some time to get right! But I also enjoyed doing it more than any other part.
Since the gun tubes are so large, simply drilling a hole In the wings would not look right. My solution was to find some plastic tubing that had an inside diameter that closely matched the size of the hole I needed. I then drilled a hole that would fit the outside diameter of this tubing and faired it in using gap filling super glue. The final results are hard to appreciate because of my lack of photographic skills, but look convincing on the model.
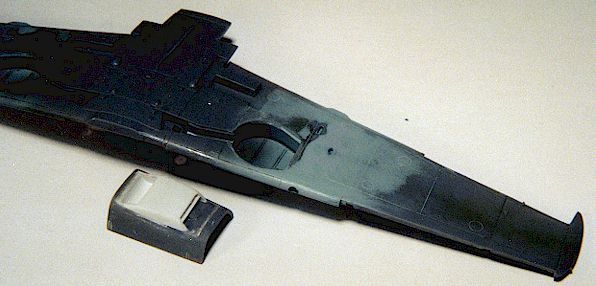
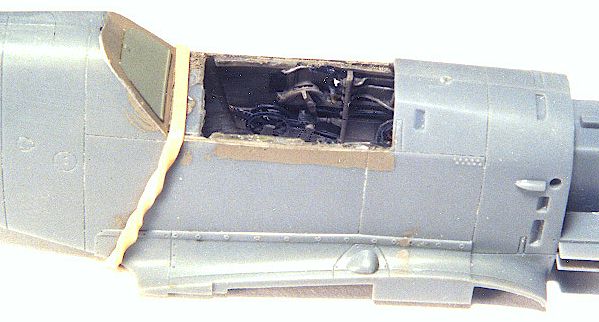
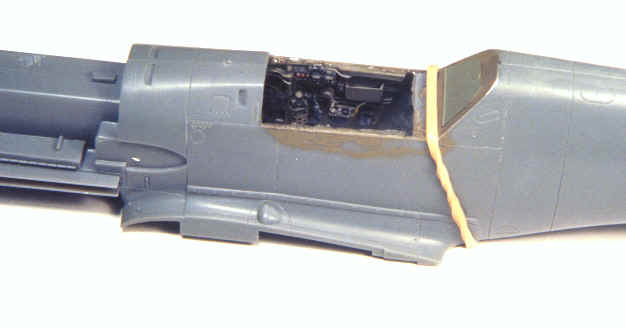
Cockpit Since I was doing all this work, I decided to use an aftermarket cockpit set. I happened to have two of the old Teknics Bf 109E sets for the Hasegawa kit. I do not like the way Tamiya engineered the cockpit on this model. I much prefer the Hasegawa engineering here. It turned out to be very problematic adding my Teknics detail set. The Tamiya fuselage is much wider than the Hasegawa kit. In order to keep the relative thickness of the cockpit walls thin, I sanded the fuselage sides paper-thin. This creates a problem because the fuselage floor is also the rear decking of the cockpit. Once the sides where thinned down, I had to basically toss the rear decking because making it fit would have been much worse than adding my own. I made the rear decking and cockpit sill from an aluminum cookie sheet (the cockpit sill is not attached in this photo). Overall I really like the Teknics set. It has lots of photo-etched handles and knobs and the detail is very good. Can you see the three "T" handles just in front of the throttle quadrant? The trim wheels and associated chain drives are nicely done, as is the exquisite oxygen regulator. Overall a very nice set. Be warned though, this set does not fit into the Tamiya kit very well at all.
Since my Me 109E would have been built before the RLM order than mandated the use of RLM 66 as the cockpit color for fighters, I used RLM 02 for the sidewalls and RLM 66 for the instrument panel and cockpit floor.
Thus far I have a few suggestions of how to improve the Tamiya Bf 109E-3 kit and make it about as good as a box-stock Hasegawa kit with some minor surgery. The next section will describe how I fixed the kit propeller, added some detail to the landing gear, and improved the fabric-covered surfaces, and hopefully have this project all finished up. Since the Hasegawa kit is already correct, this project is technically a waste of time, but no one can argue that I had fun doing it J. Simple modifications can be very satisfying. I would encourage you to try it. Frank Crenshaw Model, Article
Text and Photographs Copyright © 1998 by Frank
Crenshaw
|
 removing the cannon bulges
from the wings and adding large a gun port to the leading edge of both wings. My Bf 109E-1
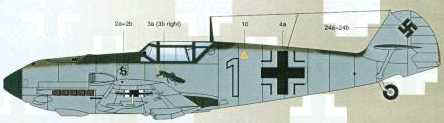
will eventually carry the markings of I /JG 26 during the phony war - just after the
defeat of Poland and just before the attack on France. During this time the 109s did not
have headrest armor and the camouflage markings consisted of an RLM 71/ 02 splinter over
an RLM 65 base which came very high up the fuselage. There was no mottling or RLM 04 id
markings used at this time. These aircraft were very well cared for by their crews and
show very little weathering.
removing the cannon bulges
from the wings and adding large a gun port to the leading edge of both wings. My Bf 109E-1
will eventually carry the markings of I /JG 26 during the phony war - just after the
defeat of Poland and just before the attack on France. During this time the 109s did not
have headrest armor and the camouflage markings consisted of an RLM 71/ 02 splinter over
an RLM 65 base which came very high up the fuselage. There was no mottling or RLM 04 id
markings used at this time. These aircraft were very well cared for by their crews and
show very little weathering.