Home
| What's New |
Features |
Gallery |
Reviews |
Reference |
Forum |
Search
Home
| What's New |
Features |
Gallery |
Reviews |
Reference |
Forum |
Search
|
|
|
Messerschmitt Bf 109G-10 by
Bernd Willmer
I used Revell´s
1/48 scale Bf 109 G-10 kit for this quick project 2 years ago. I made some minor
modifications to this kit, e.g. repositioning of the control surfaces. The
purpose was mainly to test the Aeromaster acrylics for the first time.
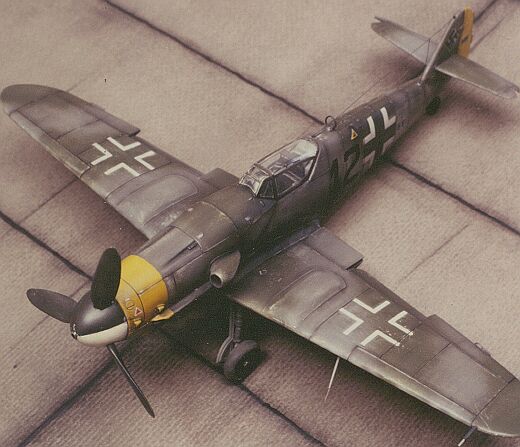
After assembly I airbrushed the model with 2 coats of silver from Revell. I let it dry for 2 days before I applied the Farbton 76 to all lower surfaces and to the whole fuselage. Next step was to airbrush the Farbton 75 in the appropriate areas. After the Farbton 75 was dry I masked off the Balkenkreuz on the fuselage sides and filled it with Farbton 83. After a few minutes I removed the masking and finished the camouflage scheme with the Farbton 83.
After the camouflage colors dried for about 2 days, I started the weathering process. The first step here was to represent the paint chipping in areas that would've been affected by wear or little dings with a scalpel. Then I used a already worn wet sanding paper of the finest grain (1200) I had and started to remove the top layers of the camouflage colors so either the underlaying camouflage color or the "bare metal" will show through.
I continued
the weathering process by applying an oil wash from matt black & umbre to
the recessed panel lines. I let the wash dry for a few hours. I then applied
a second wash of matt black & umbre to the whole model. I darkened
the panel lines silghtly by using dark brown pastels. The exhaust stains were
applied with my airbrush using a black-brown mixture (typically for the Daimler
Benz engines...). The last step were some oil streaking in the engine area. Finally I
applied a coat of matt clear varnish from Aeromaster.
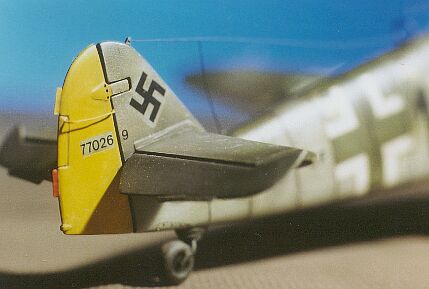
Some time
later I had the chance to have a look in "THE OFFICIAL MONOGRAMM PAINTING
GUIDE TO GERMAN AIRCRAFT 1935 - 1945". This book also includes a color
photograph of "schwarze 12". The authors stated that the camouflage
was a standard 74/75/76 scheme. I do
not agree with them as the dunkelgruen 83 is
clearly visible in the photograph. The author´s mistake is easy to explain: at
the time the book was published they didn´t - and couldn´t - know that Farbton
83 was darkgreen color.
I would like
to say thanks to Lynn Ritger for a correction of the text and Brett Green for
scanning the photographs and the final preparing of my article.
Click on the thumbnail to view the
image full-size.
Article and Model Copyright © 1999 by Bernd Willmer
|
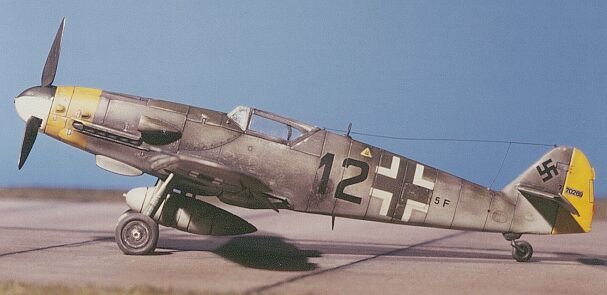
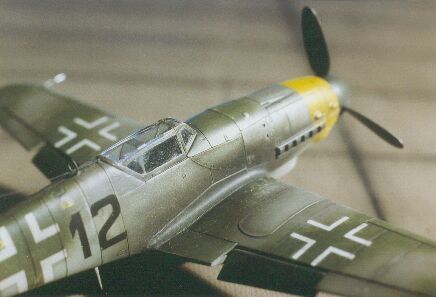
 Prior
to decaling I cleaned the model and then started to apply the decals. I used
Microscale Set and Sol to let the decals snuggle down to the model´s surface.
The Balkenkreuze came from Revell´s
decal sheet. The swastikas are also from Aeromaster - and they are real
treasures when you have them in Germany! The black 12 came from the Aeromaster
sheet "48-047 Luftwaffe Fighter Numbers (Part 1)". The unit code
"F5" and the Werk-Nummer "770269" are dry transfers from
Letra Letters.
Prior
to decaling I cleaned the model and then started to apply the decals. I used
Microscale Set and Sol to let the decals snuggle down to the model´s surface.
The Balkenkreuze came from Revell´s
decal sheet. The swastikas are also from Aeromaster - and they are real
treasures when you have them in Germany! The black 12 came from the Aeromaster
sheet "48-047 Luftwaffe Fighter Numbers (Part 1)". The unit code
"F5" and the Werk-Nummer "770269" are dry transfers from
Letra Letters.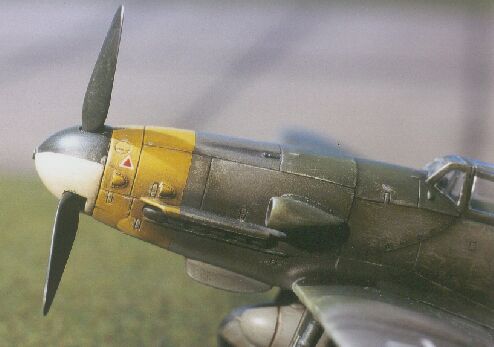 My
primary reference was a color photograph in the book "Messerschmitt Bf
109" by Hans-Juergen Becker. The camouflage is a 75/83/76
scheme with a yellow rudder and a yellow nose band. These marking are
typical for early 1945 era. Having this in mind I decided to apply 1/3 white on
the otherwise schwarzgruen 70 spinner.
My
primary reference was a color photograph in the book "Messerschmitt Bf
109" by Hans-Juergen Becker. The camouflage is a 75/83/76
scheme with a yellow rudder and a yellow nose band. These marking are
typical for early 1945 era. Having this in mind I decided to apply 1/3 white on
the otherwise schwarzgruen 70 spinner.