 Home
| What's New |
Features |
Gallery |
Reviews |
Reference |
Forum |
Search
Home
| What's New |
Features |
Gallery |
Reviews |
Reference |
Forum |
Search
|
|
|
Messerschmitt Bf 109G-10 by Ingemar Caisander
By 1944 the Messerschmitt Bf 109G had become quite overweight and slow compared to its Allied counterparts. An attempt to increase the speed of the G-series was therefore made. The solution was based around the refined DB605D engine. Sporting an enlarged supercharger and with increased compression ratio, the new 35.7 litre engine could pump out 1800 hp at 2800 rpm continously, or an awesome 2000 hp for a short period of time when the water-methanol (MW-50) injection boost was engaged. This made the G-10 very fast indeed. It was, in fact, the fastest of the entire G-series. When the MW-50 boost was engaged it could reach well over 700 kph at an altitude of 6000 m! Armament consisted of two quick-firing 13-mm machineguns mounted above the engine crankcase and one 30-mm "pneumatic hammer" MK 108 autocannon firing through the spinner. Apparently there were some reliability problems with this latter weapon, it being prone to jamming mainly due to insufficient cooling and vibrations. In time, though, these problems were ironed out. Luftwaffe units known to have flown the G-10 were JG1, JG3 - 6, JG11, JG27, JG52, JG53 and JG300.
I usually build 1/35 scale armour. I had toyed with the idea of building a late war variant of the 109 for some time when I finally fell for the beautiful box art of this Revell kit! Featuring a nicely camouflaged RVD G-10 releasing its drop tank just moments before entering a dogfight made it really stand out among the many aircraft kits on the shelf. So, a few minutes and about $10 later I was ready to start working on my first 1/48th scale aircraft model!
When I first opened the box I was actually a bit surprised by the sparsity of parts in the box: could this really be everything needed to build a "Gustav"? There are three light grey and one clear sprues with a total of no more than 40 parts. The wings consist of three major parts; two upper halves and one single lower part. The latter is complete with molded-on radiators and belly rack. The fuselage is made up of two halves. The short-stroke tail wheel, propeller axle and engine cowling are all part of these halves and not supplied as separate items. A typical 300-litre drop tank is also included but no extra equipment or armament. Panel lines are recessed and the general detailing of the model is quite good. Fit is also good. The fuselage halves on my example were a bit warped but this was easy to fix. Some parts needed a small amount of putty and/or a little sanding but generally everything went together nicely. Built straight out of the box I'm sure the model would look very good, although perhaps a little simple. With just a little effort, though, you can improve the detailing and quite substantially enhance the appearance of the finished aircraft. I set out to construct my example without too much extra work or detailing, being more interested in getting the completed model to look good rather than being absolutely accurate in every detail.
Construction began with the rather sparingly detailed cockpit. Some detailing on the floor and on the cockpit walls is present, including a very basic trim adjustment wheel, fuel regulator and switch boxes but not much else. A rudimentary pilot's seat and a simple control stick is also included. The separate instrument panel is better but I'm not sure if it is really that accurate. Some of the instruments seem to be in wrong places. If you want a well detailed cockpit I guess you would be much better off buying an aftermarket set or be prepared for some serious scratchbuilding. Since I didn't plan on displaying the cockpit I pretty much left it as it was. Moving on to the front of the fuselage there are two small oil cooling scoops either side of the nose. Unfortunately these are molded solid so they had to be opened. Using a sharp knife and a needle this was done. It is a bit tricky and time consuming but the end result is well worth the effort. The gun aperture in the spinner is also molded solid. This isn't very realistic looking and since the large spinner is a natural view-catcher it had to be modified. I cut off the extending plastic "stub" with a sharp knife, drilled a hole in the center of the spinner and finally added a small "tube" made from thin paper (you could of course use a small brass or styrene tube instead but I think that would have been too easy...!).
The spinner, propeller and backplate were then cemented together but not attached to the fuselage just yet. The separately moulded exhaust stacks is a nice feature, however their detailing and appearance can be improved. According to photos of late 109s there is a rather prominent welding seam at the centre of each exhaust pipe; this is replicated using a small piece of stretched sprue, cemented using superglue so that the sprue softens and will follow the curve of the pipe. It's a bit tricky and time consuming to get them all right and aligned but it is well worth the effort. The exhaust stacks look much better after this modification. Just make sure you have a lot of stretched sprue to spare since once cut into small pieces these little "devils" will easily be eaten by the terrible monster that live under the work bench! Of course, if you really want to superdetail your model you should also drill each of the exhaust pipes open, or better yet use a photoetched metal detail set. The exhaust shroud just below the air intake was sanded down to almost paper thickness according to reference photos this shroud is made from thin sheet metal. The oil radiator under the engine was detailed with small pieces of brass wire. A small plastic support strut was also added at the front of the intake. The molded-on muzzles of the cowl mounted 13-mm machineguns were removed and new gun muzzles were made from small pieces of thin electric wire insulation and cemented in place. The spent shell ejection chutes for the 13-mm machineguns are present on the underside but need to be cut open. Small pieces of 0.5-mm sheet styrene were then added along the sides of the openings in order to represent the shell ejection chutes leading up to the machineguns themselves. The ejection chute for the engine-mounted MK 108 autocannon is missing altogether so a rectangular opening had to be cut just inboard of the right wing root. All openings were then blanked off from the inside with sheet styrene. The wings were now cemented together. The three major wing parts fit together very well and no putty was needed, just some sanding in order to get the joints smooth. All wing panel lines next to the control surfaces were carefully scribed with a needle and a sharp knife in order to make them more pronounced. The rudder and some of the panel lines on the fuselage got the same treatment. I used a small piece of copper wire as replacement for the molded-on actuating rod for the trim tab on the tail rudder. Finally the rudders on the tailplanes were cut off completely and then re-cemented angled slightly downwards. After installing the exhaust stacks, cockpit tub and oil radiator the fuselage halves were cemented together and then attached to the completed wings. The fit at the wing roots is quite tight - the parts almost "snap" into place. I had to add small amounts of putty to the forward part of the wing roots in order to get a smooth join.
The supercharger intake and the modified tail planes were then cemented to the fuselage, care being taken to get the latter as horizontal as possible. Note that the supercharger intake should have a small weld seam added to its rear side using the same technique as for the exhaust pipes. Now the unusual creature on my workbench somewhat started to resemble a "Gustav"... The landing gear is a very simple and straightforward affair consisting of four parts on either side: gear leg, gear door and two wheel halves. After being cemented together the weels where sanded flat on the bottom in order to get a weighted appearance. The uppermost part of the gear legs consist of a solid plastic "box" with a guiding tooth. This part fits securely into an opening in the wing root, thereby ensuring the correct inclination angle and at the same time elegantly eliminating a possible weak link. I added pieces of copper wire in order to imitate the hydraulic brake line running down the landing gear legs. After cementing the drop tank halves together a small piece of electric wire insulation was added to the nose. There are photos of tanks both with and without this feature but I decided to add it to my model. Apparently there were quite a number of different drop tanks available, generally of the same size but differing in design. The fuel feed lines were made from small pieces of copper wire and a strip of paper was used to imitate the hanger strap. The four sway braces were also thinned down somewhat. Finally the port underwing mast/antenna and the aileron mass balances were added. The FuG 25A IFF whip antenna under the fuselage, the MW-50 drain pipe and the pitot tube were added / replaced by a stretched sprue, a piece of electric wire insulation and copper wire respectively. I also decided not to use the kit supplied mast for the main radio aerial but instead depicted the aerial entering the fuselage through a small lead-in just behind the canopy. The molded wingtip position lights were also cut out, new ones being made from a clear stretched sprue. These were then installed, sanded flush with the wing, painted with clear green and red paint and finally coated with a layer of white glue in order to protect them during painting of the model.
The entire cockpit was painted Schwarzgrün 70, when dry it was gently brushed with grafite powder ( scraped off from an ordinary pencil ) in order to give it a metallic look. The pedals, knobs and other typical areas of high wear were more intensively brushed, making these areas almost look like bare metal. Most of the gauges on the instrument panel were painted flat black, each then recieving a drop of clear varnish to imitate the glass. The exhausts were drybrushed with different shades of brown and rust and finally very gently touched with graphite powder. Since I didn't bother drilling out each one of the exhaust pipes I instead simply accentuated the "openings" with a small amount of flat black. The completed propeller assembly was painted flat black and then heavily brushed with grafite powder on the propeller blade inclination mechanism and the gun aperture. After this followed a layer of Schwarzgrün 70 on the blades and the spinner. Although the typical white spiral was more common on late-war 109s I decided to have the spinner in the earlier 1/3rd white instead.
I also decided to use a rather unusual variant of the older 74/75/76 grey-tone type of camouflage, adding pathes of Dunkelgrün 83 on the upper fuselage surfaces and for the side mottle. The reference aircraft I used for this project was a G-6/R-3/R-6 of JG 27, camouflaged in 74/75/76 (or possibly 75/76/83), with a green RVD fuselage band and white rudder. Since the white rudder was most likely a left-over of some earlier Mediterranean service it is probably quite inaccurate for a G-10, but I decided to have it anyway. In my opinion the model just looked so much better with it! In addition to this reference aircraft I also "borrowed" the general camouflage scheme layout of Xavier Lena's beautiful Bf 109 G-6/R-3 featured elsewhere here on Hyperscale. Using the Humbrol line of colours I began by painting the entire aircraft in Lichtblau 76, when this had dried completely I moved on with the camouflage scheme on the upper surfaces; Graugrün 74 and Grauviolett 75 on the wings and the same colours plus Dunkelgrün 83 on the upper fuselage. Finally the 74/75/83 mottle on the fuselage sides was added. Since I always brush-paint my models I used an almost dry brush in order to reproduce the sprayed-on appearance of the paint. The trim tabs on the rudders were finished in red and the rear rudder was, as mentioned earlier, painted white. The Humbrol colours I used to represent the RLM range are listed below:
Now it was time for the decals. The Revell kit contain markings for two G-10s - "white 9" (a high-altitude escort interceptor in over-all Lichtblau 76) of JG 1, and "black 11" of JG 27 in standard 76/81/82 camouflage. I chose to use the markings for the latter except for the number, thereby completing the model as "white 6" of 2nd Gruppe, JG 27. The decals are nicely printed and rather thin. When slid off of the support paper there is also very little excess film around the decal itself. Not too surprisingly (since the kit is manufactured in Germany) the swastikas for the rear fin have been omitted from the decal sheet. This meant some searching through the piles of my yet-to-be-built kits... I finally managed to find an old Italeri He-111 "Zwilling" in 1/72nd scale; on this model's decal sheet there were two swastika crosses of about the correct size for my G-10 (mayhaps they are just slightly too big but I decided to use them anyway). When all decals had been attached I sealed them with a protective layer of flat varnish.
Weathering was next. I wanted the aircraft to look very well used but still in good shape - dirty and worn but in one piece. I started with a rather dark wash over the entire model, followed by a light grey drybrush to accentuate the recessed panel lines and some of the detailing respectively. The areas just behind the gun muzzles were given streaks of flat black, simulating soot. The underside of the fuselage received a further pretty dark wash of diluted black and a little brown, simulating oil stains from a severe leak in the oil cooler. The front of the drop tank was treated in the same way.
The last thing I did before completing the model was to add small streaks of silver, simulating chipped paint, at the left wing root, around the canopy area and at the edges of some of the removable cowling panels. The leading edge of the propeller blades also got a very slight touch of silver. To complete the aircraft the scratchbuilt Revi gunsight (I lost the original kit supplied item earlier thanks to handling it with my not-so-good pair of pliers...), the canopy and the main radio arial were then added; I used a very thin strand of copper wire painted flat black to replicate the latter.
This model was a nice break from my usual armour projects. I'm quite pleased with the result, at least considering it being my first "real" aircraft model (I have built some planes before but only in 1/72nd scale or smaller). The kit itself is rather simple but nevertheless features some nice detailing although I guess it's nowhere near the quality of, for example, the recently released Hasegawa "birds". Built straight out-of-the-box you get a nice model. With a little effort and some scratchbuilding you can turn it into a genuine attention-grabber. Considering the low price of the kit I'd say you get excellent value for your money. In other words - highly recommended!
Model, Images and Article Copyright
© 2000 by Ingemar Caisander Back to HyperScale Main Page Back to Features Page |
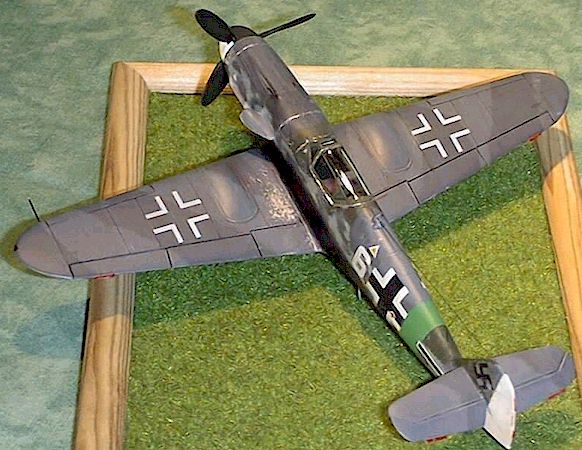
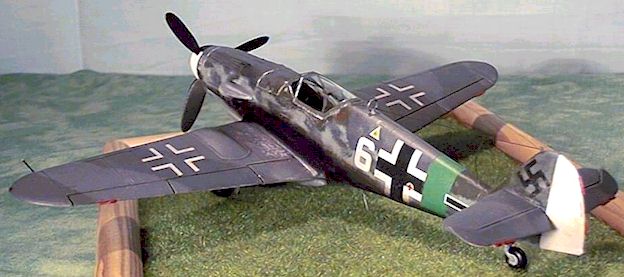
 This model was my first attempt at building a "winged beast" in
1/48th scale.
This model was my first attempt at building a "winged beast" in
1/48th scale. 
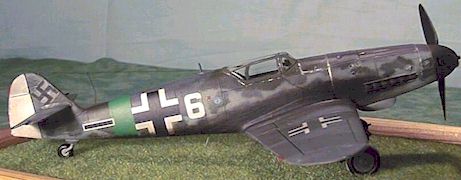
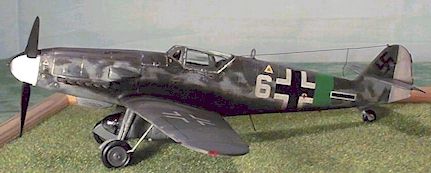 The fuselage sides behind the exhaust pipes were very heavily drybrushed with
black, grey and brown, simulating very extensive exhaust staining from the large
DB 605 engine. Finally the entire aircraft was sprayed with flat varnish to seal
everything.
The fuselage sides behind the exhaust pipes were very heavily drybrushed with
black, grey and brown, simulating very extensive exhaust staining from the large
DB 605 engine. Finally the entire aircraft was sprayed with flat varnish to seal
everything.