Home
| What's New |
Features |
Gallery |
Reviews |
Reference |
Forum |
Search
Home
| What's New |
Features |
Gallery |
Reviews |
Reference |
Forum |
Search
|
|
|
Messerschmitt Bf 109G-1 by
Floyd S. Werner, Jr.
Some airplanes are destined to be built by a divine influence - not that it guarantees a better end result though! This kit was started before I went to Bosnia. I thought this was as a good project I could work on while deployed. I tried to build two Hobbycraft kits at a time (like my friend was doing to the Tamiya FW-190 kit) but found out this was too much work. I finished the G-4 in Oblt Tonne's paint scheme with an umbrella, and just carried this one around for a while.
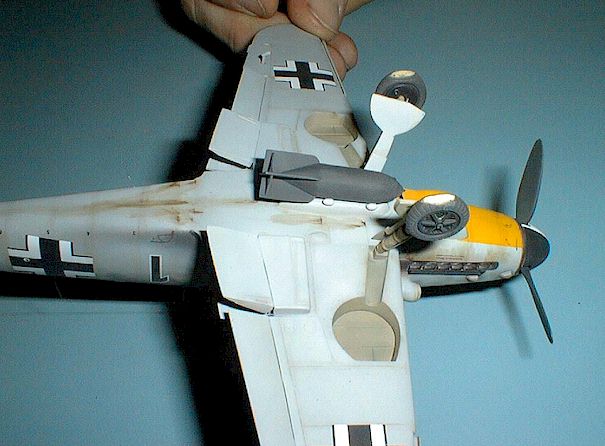
I had to add a scoop above the supercharger intake to depict the G-3. Yes I know I built it as a G-1, but the model started life as a G-3. The variants are externally no different except the addition of wheel well bulges. This was the first bit of intervention I mentioned earlier. I had a subject aircraft in mind of JG2. As I was getting ready to build I noticed a glint of light off one of the bulges but I hadn't included it nor had I made the modifications to the wheel wells. The photo is from very long range and I just overlooked it. So I had to make a G-1.
I decided that most of the flight control surfaces should be articulated. I cut all them off, including the leading edge slats. This required building up the surfaces to accept the repositioning. I was going to use the KMC set but opted not to. I found the parts to be slightly undersized with the exception of the lower inboard flaps. Attach the front part of the horizontal stabilizers now and then continue with the wings. Here I used some Eduard stuff for the radiators. I also put an actuating rod in the leading edge of the radiator with some .010 rod. I think the wings are the weak spot of the Hobbycraft kit. I love the fuselage, but the wings are just not right. Actually the ailerons just aren't right. Don't get me wrong - when this kit is built up, even out of the box, it looks like a 109. For the price it is only beaten by the Monogram kit. I tried something different when I attached the wings to the fuselage. I like to try something different on every model. This time I tried my wife's acrylic filler for her nails. Let me tell you - DON'T. It smells terrible but even worse is it hardens harder than superglue and is a bear to sand, let alone scribe. It may have applications but I don't know what yet. About this time I put the model on the "to-do" shelf. I wanted to build a 109 and build it quickly for some reason so I pulled this model out to finish. Here is where I noticed that I failed to see the wing bulges. Oh well, I needed a G-1 in the collection anyway. After looking at the Prien and Rodeike book "Messerschmitt Bf-109 F, G, & K" I found the one I subject I wanted to depict, flown by Heinz Knoke with a bomb used to bomb the bombers. Neat concept. I didn't have a bomb-carrying 109 or an aircraft from JG-11 so it was decided. Then came the second intervention. While in Houston getting my Airframe and Powerplant rating I was studying at the local Barnes and Nobles. During a break I wandered over to the military history section where a book literally fell off the shelf at me when I grabbed another book. It was Knoke's biography "I Flew for the Fuhrer". Whoah, freaky. With this little bit of intervention I knew I was on the right track. Now to the spare parts box to get the bomb rack from a Fujimi kit. This was right before the underwing set for the 109 became available from Verlinden. The Fujimi example was great and it came with a bomb as well. It easily fit under the fuselage and we were off to the races.
Locating holes for small lengths of wire were drilled into the control surfaces using a pin vise. This allowed me to position the control surfaces to my own taste. I used an Eduard upper inboard flap because it fit better than the KMC item, but used the KMC part for the bottom. They looked really good when assembled. For the slats, I inserted a piece of styrene from the top of the wing to the bottom part and then rounded it off. For the slats and outboard flaps I used a modified Medallion part that I have cast. It fit well but required some fitting adjustments. The rudder was the kit part built up with styrene. If you have never tried re-positioning flight controls you can use the KMC method which really is just about the same amount of work as using the kit parts. Then came the third and final intervention. Aeromaster announced the release of Knoke's markings a few days prior to painting. I called King's and special order the set so I can finish. I had all the required markings in my decal books, but found it eerie that Aeromaster would release it when I needed it. Of course I took the opportunity and bought them.
I installed the landing gear on and prepared to paint the model. I used a variety of paints that ranged from Model Master RLM 76, to Polly-S RLM 74 and a mixture of Tamiya paints for RLM 75. The sides were mottled in the same combination with the addition of MM RLM 02. I tried my new Tamiya airbrush and was happy with the results. However, I decided I needed more practice with the needle. Bent that sucker about half way through the paint job!
After a coat of Future the Aeromaster decals were great and fit perfectly. Sealing the decals with Future and a Polly-S Flat prepared or weathering. As usual I used artist oils, mainly burnt umber. I airbrushed the exhaust streaks. After they had dried I used some pastels to bring out the brown in the exhaust. Using a silver pencil and pen I roughed up the wing walk and the leading edges. I used hypodermic needles for the cowl guns. Finally, seal it with a coat of Polly-S Flat to bring this model to an conclusion.
The Hobbycraft kit matches the book by Beaman "Last of the Eagles" exactly. It looks correct when built. I think it requires a little too much work, but it is a good kit. If you don't care about the flaps and slats then this kit is quite nice for around $10 US. After this effort, though, I would rather buy the Hasegawa kit for about twice as much! Floyd S. Werner, Jr. Article and Model Copyright © 1998 by Floyd Werner.
|

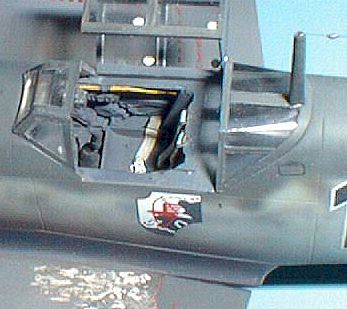 I used a Cooper Detail Set for the cockpit as usual. RLM 66
overall dry brushed with RLM 02. The Hobbycraft kit requires that some panels be filled so
don't forget to do this now. I made the scoop for the G-1 by taking a .025 rod and
drilling a hole in the fuselage and bending the rod to bend down to the fairing. Gluing
this down sets it. I then used a No11 Exacto blade and made a hollow indention in the
leading edge to open it up. One conversion task that must be done to make an early G is to
round out the gun troughs. After this is done you must scribe the panel around the
troughs. It was relatively easy, but it is the only way to make an completely accurate
early G (pre-G6).
I used a Cooper Detail Set for the cockpit as usual. RLM 66
overall dry brushed with RLM 02. The Hobbycraft kit requires that some panels be filled so
don't forget to do this now. I made the scoop for the G-1 by taking a .025 rod and
drilling a hole in the fuselage and bending the rod to bend down to the fairing. Gluing
this down sets it. I then used a No11 Exacto blade and made a hollow indention in the
leading edge to open it up. One conversion task that must be done to make an early G is to
round out the gun troughs. After this is done you must scribe the panel around the
troughs. It was relatively easy, but it is the only way to make an completely accurate
early G (pre-G6).