 Home
| What's New |
Features |
Gallery |
Reviews |
Reference |
Forum |
Search
Home
| What's New |
Features |
Gallery |
Reviews |
Reference |
Forum |
Search
|
|
|
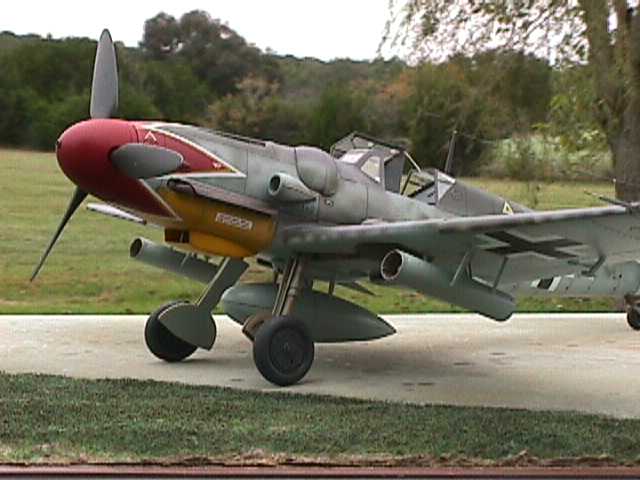
Messerschmitt Bf 109G-5 by
Floyd S. Werner, Jr.
Construction is straightforward. The interior is okay, but could be spruced up with the Eduard set. I used the Cooper Detail set, but it was a little too small. Next time I will try a Kendall interior because it looks slightly bigger. I painted the interior RLM66 as usual for an aircraft of this period. One thing you will notice is that the fuselage has a slight curve to the tail, DON'T try to straighten it. It is beautiful, maybe a little exaggerated, but still a very nice touch. A word of caution on the panel in front of the cockpit. The panel engraving on the panel is delicate and difficult to rescribe. I know - I have sat down and tried to rescribe them 10 times on a kit before finally filling them and saying "is this worth the frustration?". Don't put the oil cooler on just yet. Don't forget to open the hole for the D/F loop before putting the halves together. Luckily, I didn't need it for my airplane because I forgot. Attach the front and rear parts of the canopy. Make sure you mask before you attach them because it is easier. I used Scotch tape.
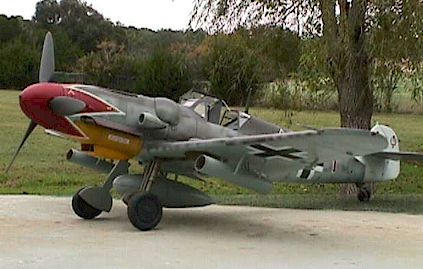
The wings are left over from the earlier Hasegawa offerings. This is good and bad. It is good because they are correctly shaped and the flaps and slats can be lowered. It is bad because the wheel wells don't touch the top of the wing half leaving a huge gap in the wheel well. Not very desirable. Another problem is the new bumps that have to be added mount in holes that fit in the wheel well quite visible. What I did here takes nerves of steel. I mounted the bumps on top of the wing half with liquid cement and let it dry overnight. I then held them up to the light and drew the outline of the bulge. Next I took my Dremel and made a depression into the bulge as the real aircraft had. The trick here is to make it even and not go through the bulge, now that would cause me some depression. The other thing that is a pain is you have to scribe a panel line on the top of the wing. Why they couldn't do it I don't know. Oops, forgot that you will have to square the wheel well by removing the circle, left over 109F. Not too big a problem there though. I used an Eduard set on the radiators because I wanted to have my flaps open. If you want to have the drop tank make sure you drill out the holes. A word about the drop tank mount is that it is not shaped correctly and is missing the notch on the backside of it. I had drilled the holes before I noticed and said the heck with it. The mount fits without filling or glue. Mine is just in the holes it fits that good. Before I mounted the wings I put on the tail surfaces. You must cut the trim tab to the proper shape. No big deal unless you cut too much or too far.
Okay, now put the fuselage and wings together. Pay particular attention to the trailing edge of the wing. I used .005 sheet plastic to keep it lined up. I had no problem with the fit here but did have to make sure that the dihedral stayed correct with masking tape. After the wing root area is acceptable attach the supercharger intake. It won't even require filling - the fit is great. About now is when I start to make sounds like a DB-605 and "fly" my airplane around the model desk! After landing at my desk I cleaned up the smaller parts such as landing gear. Here is the pesky problem of those injector pin marks. They are other places as well but here they are a pain because you have to get the round contour. The drop tank is a different version than the one usually slung under a 109. For that reason only I decided to use it. Now is a good time to paint the landing gear area RLM 02. I went ahead and put on the landing gear so I could mount the WGr 21 rockets.
Just a quick review of the ART rockets. ART is a Czech company that is not normally available here in the States. They provide the entire rocket system except for the ignite wire. I was going to use wire for strength to mount them but could never get them to line up correctly and look good. I went off to my spare parts box and grabbed some struts from the Fujimi kit (I might have a built a few of them in the past). A word of advise on this set it provides a rolling tube that is just slightly big but I used it. It gives you four tubes to roll thank God.
After ruining one because the metal would not bend I remembered a trick that Scott Bregi told me. TIP: Heat the photo etch over the stove until it changes color a few times and then let it cool and it is a whole lot more malleable (big word that isn't even in the spell checker). Milton suggests heating and then squelching in water but I tried this and had no success. If you can't find the ART set the Eduard, # 48-110, Bf-109G-6 set for the Fujimi has the tubes but no rolling pin or rockets. It isn't as nice but easily usable. I had to cover the seam so like the real thing I added rails inside of the tubes. The outside seam was filled with putty and super glue. I assembled the flaps and slats at the angles that I wanted. The Eduard photo etch looks great. I also used the stiffeners for the flaps after sanding out the mold marks from the flaps. This is an easy way to get great looking inboard flaps. The outboard flaps require filling because there is a depression on both the top and bottom half. Easily done but it should never have happened. I really liked the wheels on this kit and decided to use them, and not the True Details I usually use.
After washing the model I started painting. I used Polly Scale because of the color variation between RLM 74 and 75. My photos show a big difference between the two colors. One other interesting thing about this aircraft is that it had "zigzag" camouflage demarcation. I used masks and held them away from the surface with masking tape. I masked the wing crosses and painted the model to fit them. If I had to do it again I would do like I did the fuselage crosses and paint the decal before putting them on. The Polly Scale dries flatter than anything I've ever seen. You must use their thinner though. It sprayed really well and built up easily on the mottle. In fact I think this paint scheme is the best camouflage I've ever done. I thought the RLM 75 was too red but it looks good on this model.
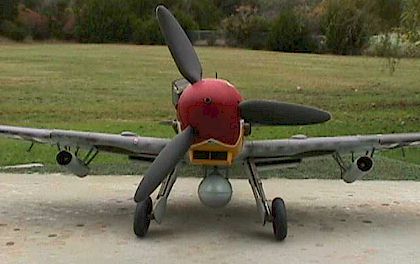
I forgot to mention that I had carefully measured the dimensions of the tulip and masked and painted the tulip insignia red. Yes I know the color nazis will come and get me but I wanted a deep dark red and not the bright red of RLM 23. After the second gloss coat and a Dullcoat I did minor weathering with pastels and oils. I tried pastels for the exhausts and found it quite nice. The last thing I did to make my G-5 was to add silicone gel tablets to the canopy. I also added a armor shield to the canopy frame to complete my back date. Adding little things, canopy, seat belts from Fotocut and antennas brought the model to closure. It makes a nice colorful addition to my collection.
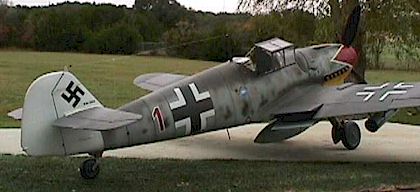
It depicts the Bf 109G-5 of Hermann Graf when he was in command of Jagd Gruppe 50 at
Weisbaden/Erbenheim in 1943/44. Graf had this colorful 109 and his equally colorful 190.
My recommendation is buy and build this model. You will have to do a little work but you
won't have to pay Fujimi prices or work as much as a Hobbycraft kit.
Article, Images and Model Copyright © 1998 by Floyd Werner.
|
 I built this kit
as a G-5 equipped with WGr21 cm rockets. This slight backdate took only the slightest bit
of extra work. This latest 109 offering is a long awaited kit and has only one slightly
disappointing aspect. What I mean by slightly is that every (and I do mean every) part
that has been updated or added has mold marks or injector pin marks! While this is not
really bad it does mar an otherwise beautiful kit. The fit is great and the look is great
but the propeller nose cone looks too large to me. I didn't scale it out, but did consider
adding the Medallion cone.
I built this kit
as a G-5 equipped with WGr21 cm rockets. This slight backdate took only the slightest bit
of extra work. This latest 109 offering is a long awaited kit and has only one slightly
disappointing aspect. What I mean by slightly is that every (and I do mean every) part
that has been updated or added has mold marks or injector pin marks! While this is not
really bad it does mar an otherwise beautiful kit. The fit is great and the look is great
but the propeller nose cone looks too large to me. I didn't scale it out, but did consider
adding the Medallion cone. 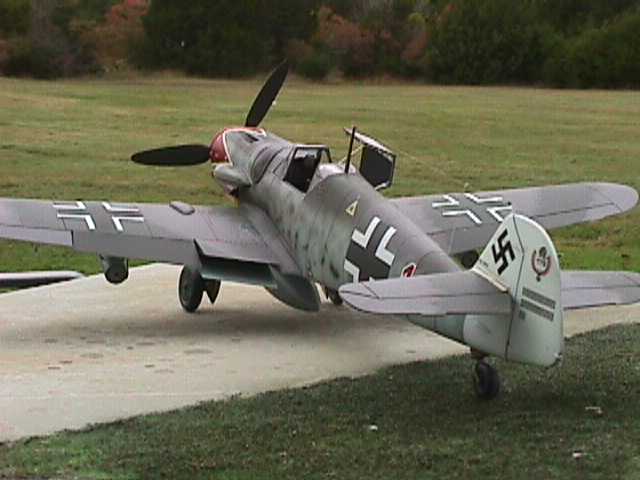
 I now started on
the front of the fuselage. Hasegawa made a unique (read sort of smart) engineering
solution to the complex shape of the nose. They give you an insert that happens to fall on
the panel line. If done correctly it will require no filling. I used Tenax-7 on this
application because I wanted the parts to mate but not melt or ooze plastic out of the
joint. Then came the bulges that make a G-5 or G-6. If you build the G-5 version then
listen to the correction sheet that comes with the instructions. If you are building a G-6
follow the usual instructions despite what Hasegawa says. Check your aircraft. I loved the
supercharger intake on this kit and used Tenax-7 on it. Don't attach it yet, but it looks
really nice.
I now started on
the front of the fuselage. Hasegawa made a unique (read sort of smart) engineering
solution to the complex shape of the nose. They give you an insert that happens to fall on
the panel line. If done correctly it will require no filling. I used Tenax-7 on this
application because I wanted the parts to mate but not melt or ooze plastic out of the
joint. Then came the bulges that make a G-5 or G-6. If you build the G-5 version then
listen to the correction sheet that comes with the instructions. If you are building a G-6
follow the usual instructions despite what Hasegawa says. Check your aircraft. I loved the
supercharger intake on this kit and used Tenax-7 on it. Don't attach it yet, but it looks
really nice. 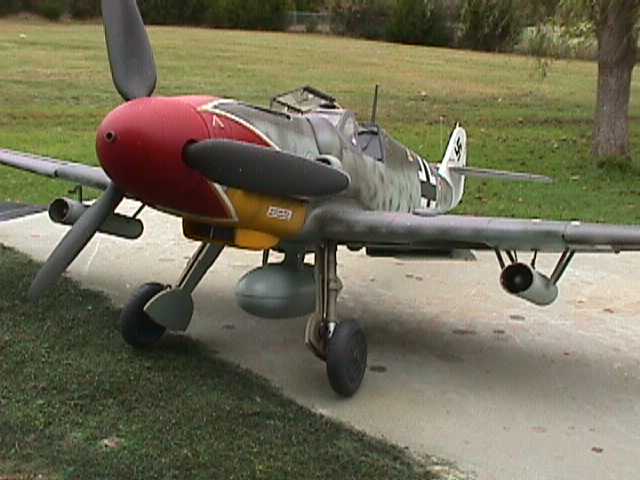
 Decals were a mix
of War Eagle (from my first 109) and Aeromaster. I tried to stay away from the kit decals
because they are thick. They all reacted well with Mr. Mark Softener. The War Eagle decals
are still available but are difficult to find. DON'T use the Aeromaster decals for
Graf's machine. The only thing I used was the victory markings and even these should have
had the marks closer to the wreath. DON'T use the War Eagle Jager emblem either I can't
find any photos of him on any aircraft not even the one depicted in the Hasegawa
instructions for Grislawski's machine. The tulip nose was tough.
Decals were a mix
of War Eagle (from my first 109) and Aeromaster. I tried to stay away from the kit decals
because they are thick. They all reacted well with Mr. Mark Softener. The War Eagle decals
are still available but are difficult to find. DON'T use the Aeromaster decals for
Graf's machine. The only thing I used was the victory markings and even these should have
had the marks closer to the wreath. DON'T use the War Eagle Jager emblem either I can't
find any photos of him on any aircraft not even the one depicted in the Hasegawa
instructions for Grislawski's machine. The tulip nose was tough.