Home
| What's New |
Features |
Gallery |
Reviews |
Reference |
Forum |
Search
Home
| What's New |
Features |
Gallery |
Reviews |
Reference |
Forum |
Search
|
|
|
Messerschmitt
Bf 109K-4
The Messerschmitt Bf 109K-4 was the last design of this famous marque to see service with the Luftwaffe. Unlike the DB605 variants before it, the Bf 109K was not recycled from old airframes, but was purpose built as a high performance fighter. This ultimate 109 entered squadron service in October 1944. Only around 700 Bf 109K-4s were produced - the last leaving the production lines in April 1945. For more details about the camouflage and markings of this aircraft, see Part Four of "Late-War Luftwaffe Fighter Camouflage" here on HyperScale.
The Messerschmitt Bf 109K-4 has been kitted in 1/48 scale on a number of occasions over the last decade. Revell Germany added a small extra sprue to their well-established Bf 109G-10, while Hobbycraft and Fujimi both released new kits. The Hobbycraft kit was a major disappointment in terms of fit and accuracy; the Fujimi kit was expensive and (in my opinion) over-engineered; and the Revell kit, although the most accurate in outline, suffered from its age, its lack of detail, thick clear parts and it Bf 109G origins. Now it is Hasegawa's turn.
The parts breakdown of Hasegawa's new 1/48 scale Bf 109K-4 will be familiar to anyone who has seen the earlier Bf 109G-6 and G-14 releases. Out of seven grey plastic sprues, four are common to the Bf 109G-14 kit. This is not to imply that Hasegawa has skimped on the engineering of the kit. It simply represents a sensible use of readily available, high quality parts. The three new sprues contain all of the parts that characterise the last of the 109 line. These include
The fuselage is specific to the Bf 109K-4 variant. Radio and filler hatches are all in the correct positions - there is no need to fill or rescribe lines on the fuselage. The tail has been re-engineered too. The trailing edge of the rudder seems somewhat thinner than earlier releases and it now includes the small triangular antenna mount on the top of the fin.
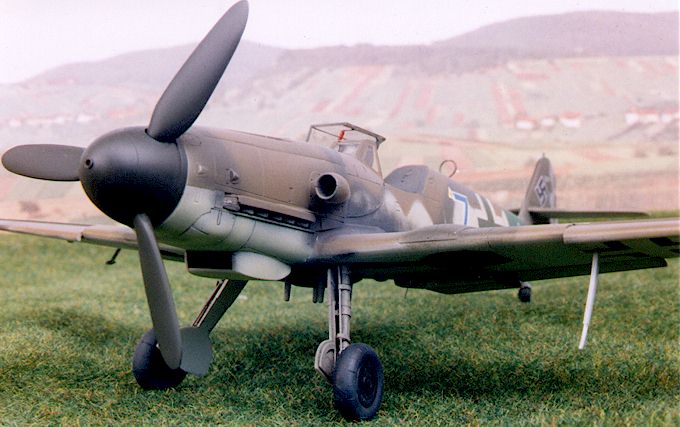
To their credit, Hasegawa have moulded the tailwheel doors open on the fuselage halves. This certainly simplifies construction. However, most photos of Bf 109K-4s on the ground show the tail wheel doors closed. Even Hasegawa's marking instructions illustrate both aircraft with the tailwheel down and the doors locked shut! The determined modeller can always cut the doors off and reposition though - it's not a big deal. If the doors are left open some extra detail may be advisable, as the closing mechanism was quite prominent. The new outer gear doors are a bit basic too. There is also some doubt about whether the doors actually featured the "bulge" on the outer surface and, if it did, whether it was so pronounced. After looking at many photographs of Bf 109Ks over the last few weeks I still can’t tell for sure. A strange box shape is moulded onto the panel behind the pilot's head. It is too small to be a bulge for the MW50 tank, and in any case the K-4 did not feature this bulge. It should be removed with a sharp knife. The shape of the conformal cowl has been the subject of much discussion on HyperScale. See Bob Rinder's photos of the "Evergreen" Bf 109G-10 here on HyperScale for an impression of this complex shape. An accurate asymmetrical cowl has eluded manufacturers for years, but it looks to me as if Hasegawa have got this fundamentally correct. The round bulges at the lower forward corners of the cowl (required to accommodate the Fo987 oil cooler) also look good. The top cowl is very well done. It features a crisp hinge running down the centreline and deep gun troughs. A new windscreen incorporates the appliqué panels and reversed "scoop" typical of the type. The cockpit is basic, but the main features of the Bf 109K-4 are there with the exceptions of the control switch and fuse panel for the MK103 cannon, plus some boxes, switches and instruments on the starboard-side cockpit floor. Anyone concerned about the shortcomings of the cockpit will probably use one of several after-market sets already available from quality players including Cooper Details, Aires and CMK. The wing sprue originates from the Bf 109F releases of the early 1990's. This means that some minor scribing and cutting is necessary to modify the wings to the later standards. The instructions clearly mark the modifications required. These generic wings feature separate slats and flaps. The new, big wheel bulges are admirably thin. The locating holes in the wings have been thoughtfully positioned so that they will not be visible when looking up into the wheel wells. Surface detail is by way of crisply engraved panel lines. Ejector pin marks are, in the main, restricted to the unseen inside surface of parts. Watch out for the marks on the mainwheel hubs though.
Building this kit is as simple as the contents of the box promise.
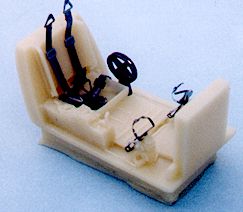
Cockpit My biggest diversion from the kit instructions was to replace the kit front office with the Aires cockpit in resin and brass.
The Aires set is not entirely accurate. The floor configuration is not typical, the prominent buttons on the circuit breaker box are missing and the auxiliary panel for the MK103 cannon is missing. I also initially thought that two instruments were missing from the acetate sheet, but references indicate that these are actually holes in the instrument panel. I used .020" brass wire to depict the missing buttons on the circuit breaker box. Two rows of holes were drilled and short lengths of brass wire were fed through the holes. I also added the auxiliary panel for the MK103 from a small block of scrap styrene.
The cockpit components should be installed in the assembled fuselage halves. The brass and acetate instrument panel looks great after painting. Although this assembly can be attached direct to the kit coaming, I decided to reinforce it by gluing a strip of styrene between the fuselage halves directly forward of the panel. I then attached the instrument panel to the styrene strip using super glue. The assembled cockpit tub fits perfectly in the Hasegawa fuselage after either thinning the back of the cockpit tub (behind the seat) or removing the raised rear locating strip on the kit fuselage halves. I chose to slice the excess resin off the back of the cockpit tub using a razor saw.
Main Construction
The top cowl cover is marginally too narrow. I didn’t take any corrective action because the fault was so small. A couple of strips of Milliput and a few minutes with a sanding stick will eliminate the problem altogether. The wings require some slight modification due to their Bf 109F ancestry. A new panel line must be scribed on each upper wing (as noted in Step 1 of the kit instructions) and the round main undercarriage openings have to be squared off (Step 3). The big bulges look very convincing when in place on the wing upper surfaces. The edges of these parts are moulded to scale thickness, and convey the impression of the real bulges very well indeed. I filled a sink-mark on the top of the starboard side bulge with Milliput.
I drilled out the exhaust stacks (parts D8 & D9) and MG131 barrels (parts F23). I also thinned the edges of the port-side exhaust cover (part D6). Don’t forget that the big supercharger intake (parts A5 & A6) had a seam along the join line – so don’t sand it off the kit parts! The kit does not include the trailing FuG25 IFF antenna for the lower fuselage. Curiously, however, the kit fuselage does have a small scribed circle representing the isolated glass (perspex??) mount. At least it’s easy to work out where to drill! The upper rear fuselage also features a small scribed circle representing the isolated lead-in for the aerial wire. I drilled three small holes in preparation for the wire after painting – in the centre of the circle, in front of the DF loop (part F6), and through the triangular antenna mount on the fin. Hydraulic lines were added to the undercarriage legs using copper wire. These were secured with narrow strips of masking tape. Hasegawa do not propose the installation of either of the supplied drop tanks or their mount. However, my references show that the fuselage mount (part D17) was frequently fitted, and the 300 litre tank (parts D4 and D5) was also commonly seen in place. The photographs of my subject aircraft seem to show the remains of the drop tank mount, so I used kit part D17. The photographs are ambiguous about the outer gear doors (parts B2 & B3), so I left them off. The Aires set includes a brass replacement for the Galland Panzer pilot’s armour but I prefer the kit part. I added two short mounting arms from brass strip to the Galland Panzer (part F22) and modified the Aires canopy release with the addition of a handle from styrene rod.
I commenced the paintjob by pre-shading – spraying the panel lines black. I also sprayed a green mix to represent the RLM 25 RVD band of JG27, and painted the rudder RLM 75 Grey-Violet (Gunze HXX). The wheel wells and undercarriage were painted RLM 02 Grey at this stage too. I attached the inner and outer gear doors to the wheel wells (in the closed position) with blobs of Blu-Tack, effectively masking the undercarriage bays. After masking the RVD band and rudder with Tamiya tape, the lower wing was sprayed Gunze H417 RLM 76 White-Blue. The lower wing was, in turn, masked and the fuselage sides and lower surfaces were sprayed Gunze H74 Sky, representing the Yellow-Green colour sometimes seen on late-war fighters.
Photographs of this aircraft indicate that the fuselage crosses were toned down. The white section of the cross seems to have been partially or totally oversprayed with the Yellow-Green colour. The dark colour of the cross seems to be RLM 83 Dark Green. I decided to mask the outside section of the cross with pre-cut sections of Tamiya masking tape, and use simplified green cross decals when the painting was finished. I also decided to use paper masks to assist with the wavy fuselage demarcation line. Those little yellow "Post-It Notes" are ideal for this job due to their low-tack removable adhesive. This was also the time to mask the canopy – a job I always dread! The canopy received a quick squirt of Tamiya X-63 German Grey after masking.
Decals were sourced from Aeromaster "Reich Defense Part 2 (Bf 109Ks)" set number 48-097. This decals set supplies the green centre section of the fuselage cross as a separate decal, so it was ideal for my purposes. The green of the cross decal corresponded almost perfectly with the Gunze RLM 83 Dark Green. Most stencil data was overpainted on the subject aircraft with the exception of the prominent fuel filler triangle.
I replaced the kit pitot tube with a sturdier item made from fine brass tube and rod. The delicate dangly bits – mass balances, FuG16ZY and FuG25 IFF antenna - were also added now that the painting was finished. Aerial wire was rigged with monofilament through the holes drilled earlier in construction. Krystal Kleer, painted white, was used to represent resistors on the wire. The fit of the windscreen was so good that I did not bother to use cement. It is tight enough to stay in place under most circumstances. A coat of Gunze Flat Clear was the final step in a fast but satisfying project.
After all the anticipation the quality and buildability of this new kit didn't disappoint me. It is, in my opinion, the best of Hasegawa's Bf 109s to date.
Whether you build this model out of the box or use it as a basis for a superdetailing project, you will have an accurate and attractive replica of the last version of the Messerschmitt Bf 109.
"Messerschmitt Bf 109K" by Ing. Ales Janda and Ing. Tomas
Poruba. Published by JaPo This is a fabulous, one-stop reference for the Bf 109K. It contains reference photos, line drawings, scrap views, colour profiles and much more. If you only have one reference for the Bf 109K, this is the one to buy!
Model, Images and Article
Copyright © 1999 by Brett Green Back to HyperScale Main Page Back to Features Page |
 The Aires cockpit
is cleverly packed in a clear vacform pack, with the delicate steel fret secured between
the pack and the instructions, and the resin pieces in a transparent blister. The resin is
light in colour and the detail looks a little soft. The steel parts are nicely detailed
and easy to work with. A clear acetate sheet is also included for the instruments –
my favourite depiction of this important feature.
The Aires cockpit
is cleverly packed in a clear vacform pack, with the delicate steel fret secured between
the pack and the instructions, and the resin pieces in a transparent blister. The resin is
light in colour and the detail looks a little soft. The steel parts are nicely detailed
and easy to work with. A clear acetate sheet is also included for the instruments –
my favourite depiction of this important feature.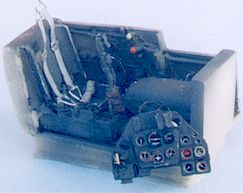 The only other
modification was to add a three-dimensional knob to the brass throttle handle using a
small blob of Krystal Kleer. The cockpit tub was now painted and assembled. I sprayed the
cockpit parts with Tamiya XF-63 "German Grey" and applied a thin wash of black
oil paint before picking out the details in yellow, white and black. The cockpit detail
looks much crisper with a coat of paint.
The only other
modification was to add a three-dimensional knob to the brass throttle handle using a
small blob of Krystal Kleer. The cockpit tub was now painted and assembled. I sprayed the
cockpit parts with Tamiya XF-63 "German Grey" and applied a thin wash of black
oil paint before picking out the details in yellow, white and black. The cockpit detail
looks much crisper with a coat of paint.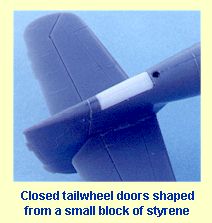 The biggest
remaining modification was the fabrication of closed tailwheel doors. This was achieved
using a small block of styrene shaped roughly before gluing to the tail wheel well
opening. The styrene was then sanded to shape and scribed to represent the join between
the closed doors.
The biggest
remaining modification was the fabrication of closed tailwheel doors. This was achieved
using a small block of styrene shaped roughly before gluing to the tail wheel well
opening. The styrene was then sanded to shape and scribed to represent the join between
the closed doors.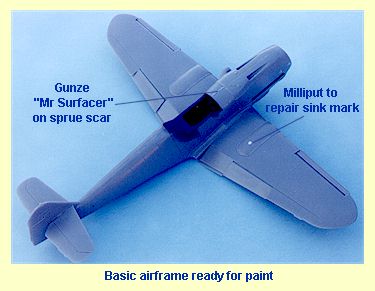 Basic
construction of the kit continued without problems. The fit of all the major components
was perfect.
Basic
construction of the kit continued without problems. The fit of all the major components
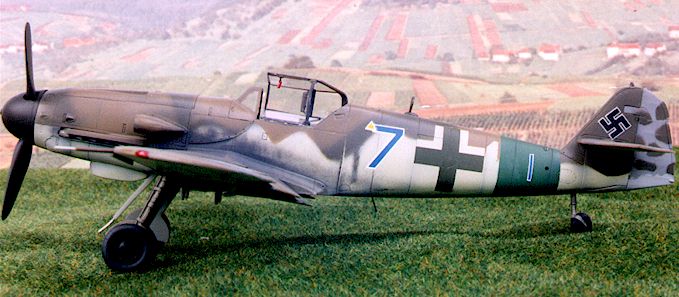
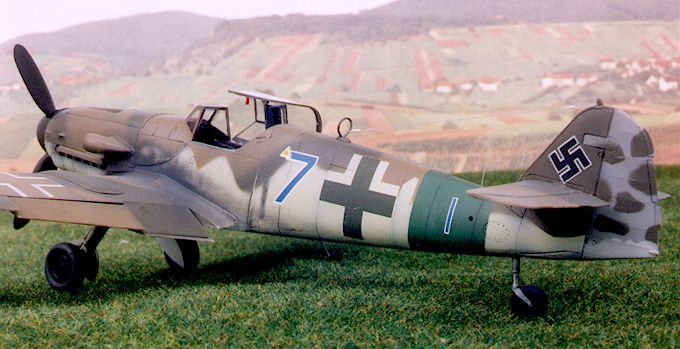
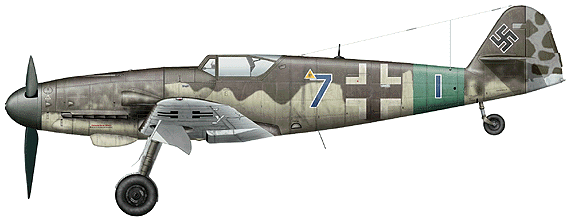
was perfect.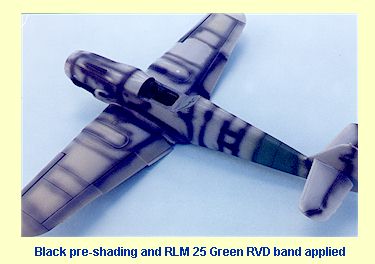 My chosen subject aircraft is
"Blue 7" of 12./JG27. This aircraft features toned-down fuselage markings, an
unusual camouflage demarcation, a different coloured rudder and a green RVD band.
My chosen subject aircraft is
"Blue 7" of 12./JG27. This aircraft features toned-down fuselage markings, an
unusual camouflage demarcation, a different coloured rudder and a green RVD band. 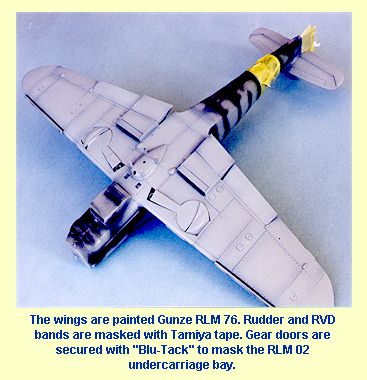 Murphy’s
Law struck at this point. I realised that I had masked the RVD band in line with the kit
panel lines (per Aeromaster’s instructions) but the reference photos in the JaPo book
showed that the band was actually set back from the panel lines of fuselage stations 6 and
8. There was no alternative to masking again and respraying.
Murphy’s
Law struck at this point. I realised that I had masked the RVD band in line with the kit
panel lines (per Aeromaster’s instructions) but the reference photos in the JaPo book
showed that the band was actually set back from the panel lines of fuselage stations 6 and
8. There was no alternative to masking again and respraying.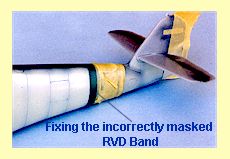 With all of the masking in
place the upper-surface camouflage colours were sprayed. I used Gunze H304 Olive Drab
mixed with a few spots of Gunze H72 Dark Earth to represent faded RLM 81 Brown Violet; and
Gunze H423 RLM 83 Dark Green.
With all of the masking in
place the upper-surface camouflage colours were sprayed. I used Gunze H304 Olive Drab
mixed with a few spots of Gunze H72 Dark Earth to represent faded RLM 81 Brown Violet; and
Gunze H423 RLM 83 Dark Green.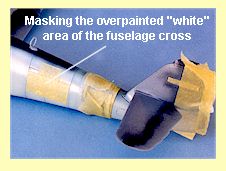 When the masking tape was
removed a template (supplied by Chris Wauchop) was used to spray the hard-edged RLM 83
Dark Green mottle on the rudder. Templates were also used to mask the ragged demarcation
between this mottled finish and the White-Blue bottom of the rudder.
When the masking tape was
removed a template (supplied by Chris Wauchop) was used to spray the hard-edged RLM 83
Dark Green mottle on the rudder. Templates were also used to mask the ragged demarcation
between this mottled finish and the White-Blue bottom of the rudder.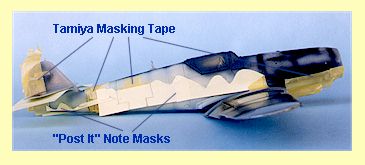 Weathering
comprised a simple spray of thinned black paint for the exhaust stain and oil streaks on
the fuselage undersurface. The wheel wells, undercarriage legs, inside of the gear doors
and the tailwheel strut received a thin wash of black oil paint.
Weathering
comprised a simple spray of thinned black paint for the exhaust stain and oil streaks on
the fuselage undersurface. The wheel wells, undercarriage legs, inside of the gear doors
and the tailwheel strut received a thin wash of black oil paint.