Home
| What's New |
Features |
Gallery |
Reviews |
Reference |
Forum |
Search
Home
| What's New |
Features |
Gallery |
Reviews |
Reference |
Forum |
Search
|
|
Messerchmitt
Bf 109K-4 by Mike Millette
In light of the release of the Hasegawa kit, an article on the Hobbycraft Bf 109K may seem a rather pointless. This kit was actually finished before the Hasegawa kit was released, but due to an extended work assignment away from home, the write-up got delayed.
After reading Brett's article on the Hobbycraft Kurfurst, I was determined to have a go at it anyway. Since Brett had identified the kits pitfalls, I figured I could set out with some confidence. Besides, the Hasegawa kit was still months away. So, armed with Brett's construction article I went to work, determined to make a decent job of this kit.
Construction of the kit proceeded very much like in Brett's article. Instead of the Cooper details set, I used a combination of the Eduard photoeched set, some kit parts and other scratch built bit and pieces. For the most part, the Eduard pieces fit quite well. I also added the Moskit metal exhausts. In this regard the separate upper cowling piece was a real benefit. It allowed me to paint the kit first before installing the exhausts. The upper cowling piece is such a close fit that it was simply slid into place, the kit was painted, the cowling removed and the exhausts installed from inside. The cowling was then slid back in place and a tiny amount of liquid glue was used to secure it. Only minor touch-up was necessary to restore the paint. My biggest concern, of course, was the vertical alignment of the horizontal tail surfaces. After reading Brett's article and examining the kit parts, I came up with a couple possible solutions to the problem. Enlarging the elevator cutout and then filling the resultant gap didn't hold a lot of appeal - particularly because now the elevators would be unevenly located with respect to the molded on fairing on the vertical surface. I decided that the easiest thing to do was to glue the tail planes in place first and then line up the vertical surface. While not perfect, it does work rather well. In order to get the necessary flex in the rear fuselage, the last alignment pin on the bottom of the fuselage needed to be removed. Once the forward fuselage was glued together, the aft fuselage left and right halves could be flexed so that the horizontal planes matched up. It actually didn't require a whole lot of movement and once the glue had set, it only took a little work with 400 grit sandpaper to get the spine and belly smoothed out and the vertical tail reshaped.
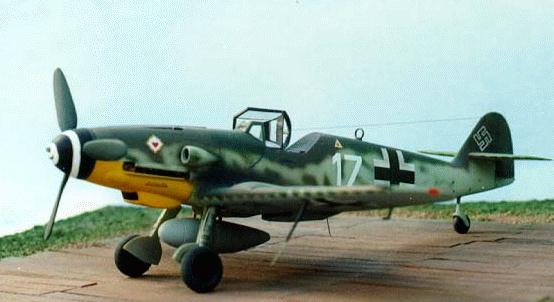
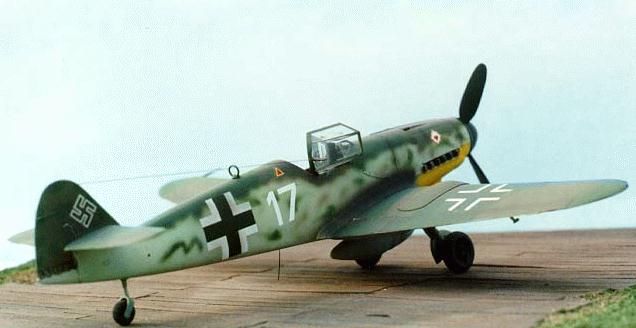
White 17 is one of the best documented Kurfusts I have seen. Even so, the exact color scheme is in some doubt. Different sources have claimed RLM 74 Gray Green/75 Gray Violet/76 White Blue; or 81Brown Violet/83 Dark Green/84 Green Blue/76; or 81/83/76. My primary reference for this project, the JaPo book had several photos of this aircraft from both sides. Looking at the various photos and profiles in the JaPo book, as well as a profile of White 17s squadron-mate, White 1, in Sundin & Bergstrom's "Luftwaffe Fighter Aircraft in Profile" I concluded that the fuselage was probably painted RLM 81/83/84 with 81/83 mottling and a little 76 on the bottom of the vertical stabilizer. The wings looked to be painted 81/83/76.
All of the painting was done freehand using Aeromaster enamels and a Badger 150 except for the leading edge of the wing. The evenness of the scallops as the paint wraps around the leading edge did not seem like an easy task to accomplish freehand so a mask seemed like the best solution. A paper mask of the scalloped edge was cut out, offset from the leading edge using carpet tape and sprayed through. It leaves a nice, soft, even scallop. Pretty close to the way it looks on the real aircraft. Another solution for the scalloped leading edge would be to use the Cutting Edge Bf 109K Special #1 decal sheet (CED 480085) or Aeromaster sheet "Reich Defense Part II - Bf 109K" (48-097). These sheets include strips of decals with the scalloped edge already cut and they match the RLM 76 paint color. The only problem is they give a hard edge as opposed to the soft sprayed edge visible in photos. Aeromasters "Operation Bodenplatte Pt 2, 48-223 sheet provided the markings for White 17. For the most part I was pretty happy with the decals, the only area where I had a problem is that the werk number was to large to fit across the rudder. I'm not sure which kit this was intended for but it sure didn't fit Hobbycraft's. Had I checked this beforehand I might have cut the decal apart and applied the numbers one by one. As it was, I discovered this while attempting to apply a wet, slippery decal. I ended up pushing it back as far as it would go, but it still overlaps the rudder joint a bit.
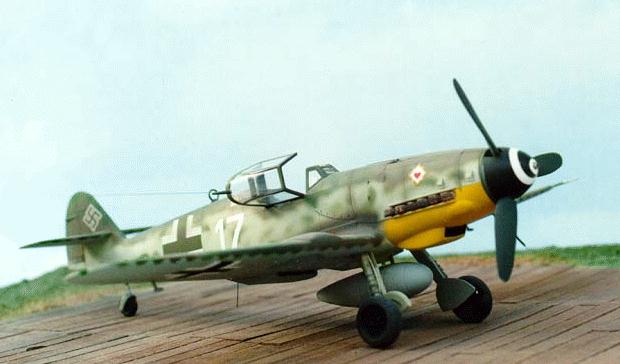
One item that surfaced while looking at the pictures in the JaPo book was the presence of landing gear extension flags similar to those on the Fw 190s. The photos on page 30 & 45 show it most clearly. Apparently these appeared on the K model for the first time. I have no proof what color they really were, but given that the Fw 190s were red, that seemed a logical choice. I used short lengths of stretched sprue to simulate the flags. Holes were drilled in the upper wing to accept them rather than glue them straight to the wing surface.
The wing tip position lights were also cut out prior to painting and substituted with clear sprue. These were then sanded flush with the wing and painted using Tamyia Clear Red and Clear Green. Thin wire, robbed from a car detail set (anyone who thinks the aircraft model aftermarket is in overkill mode ought to see what the car guys are up to), was used to make the brake lines on the main struts. Remember to put a small loop in them at the bottom.
I really enjoyed building this kit. The dimensions are better than both the Fujimi or Hasegawa kits (OK, the cowl isn't asymmetric...) the panel lines are crisp and I thought it was reasonably well engineered. Aside from the frustration with the werk number, the lack of an asymmetric cowl and fiddling with the tail, it went together fairly well. Had I not known about the problems with the horizontal tail alignment, I'm sure it would have been a much less rewarding build.
Personal Correspondence with Jerry Crandall, Nov 1998 Late War Luftwaffe Fighter Camoflage, Part 4 1998 by Brett Green Messerschmitt Bf 109K 1997 by Ing. Ales Janda & Ing. Tomas Poruba Last of the Eagles 1979 John R. Beaman Jr. Messerschmitt Bf 109F, G & K Series 1993 Jochen Prien & Peter Rodeike Luftwaffe Fighter Aircraft in Profile 1997 Claes Sundin & Christer Bergstrom Messerschmitt Bf 109 Luftwaffe Fighter 1997 by Dan Patterson & Air Vice Marshal Ron Dick
Model, Images and Article Copyright
© 1999 by Mike Millette Back to HyperScale Main Page Back to Features Page |