Messerschmitt
Bf 109T-2
by Dan Salamone
|
Messerschmitt
Bf 109T-2
Oblt. Herbert Christmann, Staffelkapitan 11./JG11, Lister-Mondal, Norway 1944 |
With a total production run of nearly 35,000 machines, the Bf 109 filled many roles
with various air forces. Perhaps the most unique variant of all was the Bf 109T- a
shipboard fighter designed to fly from the deck of the never-completed carrier Graf
Zeppelin. With a total of only 80 Bf 109T built, this version of the famous
Messerschmitt fighter had remarkable longevity, serving from their completion in 1941
until at least 1944. A few possibly survived until 1945.
 This variant was
originally equipped with an arrestor hook, catapult attachments, and a more robust
tailwheel to withstand the rigors of carrier operations. The most obvious physical
difference were the extended wingtips. These increased the wingspan from 32’
4.5" on the standard Bf 109E series to 36’ 4.25" on the "Toni".
This longer wing had a spoiler on the top of the wing to help reduce landing speed, as
well as longer leading edge slats and ailerons. This variant was
originally equipped with an arrestor hook, catapult attachments, and a more robust
tailwheel to withstand the rigors of carrier operations. The most obvious physical
difference were the extended wingtips. These increased the wingspan from 32’
4.5" on the standard Bf 109E series to 36’ 4.25" on the "Toni".
This longer wing had a spoiler on the top of the wing to help reduce landing speed, as
well as longer leading edge slats and ailerons.
The Bf 109T-1 had the general appearance of the E-3 with the older type canopy. The T-2
(which is the subject of this article) was equipped with the later E-4 style canopy. These
aircraft also carried a different supercharger intake from the E series version.
When the Graf Zeppelin was finally canceled, the aircraft already completed were
stripped of their naval gear and delivered to units that operated from short landing
strips, such as those found in Norway. The longer wingspan of the Toni was ideal for
operations from this environment. They saw service with many units such as JG 5, JG 11, JG
77 and the Jagdstaffel Helgoland.
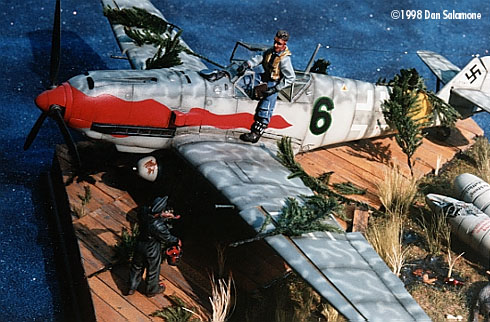
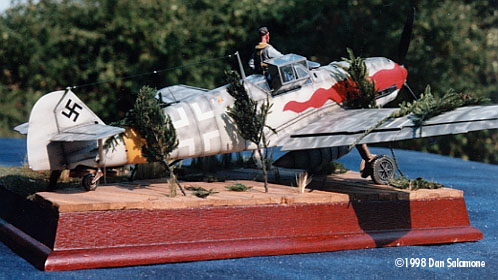
The aircraft depicted in the diorama is Black 6 flown by the Staffelkapitan of
11./JG11, Oberleutnant Herbert Christmann. At the time this unit flew from the wood plank
airfield at Lister-Mondal in southern Norway. Quite possibly the most gaudy Bf 109
documented during World War II, Black 6 was lost in combat during the spring of 1944.
Surviving this, Oblt. Christmann lost his life over the invasion front in August 1944
while flying a Fw 190 A-8 of 1./JG11. At the time depicted in this diorama, Black 6
carried six kill marks on her rudder.
The basis of this conversion was the Hasegawa 1/48 Bf 109E-4, kit # JT 161 to be exact.
This is one of the retooled versions of the original Hasegawa offering, and they seem to
have corrected any outline problems. For what it is worth the dimensions of the kit scaled
perfectly with drawings in Model Art #375, Bf 109B-E. The basic kit itself fit very well
and went together with no major problems. A few small areas to look for are as follows:
- Part A11, which is the intake lip for the oil cooler should fit flush with the outline
of the oil cooler, and not protrude.
- One of the tailplane struts was very short, I replaced both with strut stock and epoxy
putty fairings.
- Part MA1, the photoetch head armor, was tough to fit into the canopy without surgery.
Other than that this kit was excellent. The photo-etched radiator and oil cooler grills
are very well done, and surprisingly are very visible when the model is finished. I did
replace the cockpit with the resin and brass cockpit provided in the older Verlinden Bf
109E set, #384. This did improve the appearance of the interior, but the instructions were
rather vague with the placement of various items, such as the trim wheel and instrument
panel. This problem was solved by consulting the before mentioned Model Art #375 and test
fitting the parts. Overall this kit was everything modellers have come to expect from
Hasegawa, well engineered and building into a nice replica.
Additional modifications to the basic kit:
- Aileron , rudder and tailplane linkages.
- Rudder repositioned
- Gun barrels drilled out.
- Brake lines and antenna added, wingtip lights made from plastic stock.
- Adding simple engine detail where visible through slots in cowl.
- Additional canopy detail, glass panel lines, handles, etc.
T h
e C o n v e r s i o n |
 Hawkeye Designs set
#303 was used for the main parts in this conversion. For roughly $12 US you get a simple
instruction sheet with a little background information, as well as thirteen well molded
resin parts. These include extended wingtips, slats and ailerons, as well as the new
supercharger intake. Finally you get the catapult attachments, and two types of arrestor
hooks. Overall the quality of these parts is high with very few (if any) air bubbles. Hawkeye Designs set
#303 was used for the main parts in this conversion. For roughly $12 US you get a simple
instruction sheet with a little background information, as well as thirteen well molded
resin parts. These include extended wingtips, slats and ailerons, as well as the new
supercharger intake. Finally you get the catapult attachments, and two types of arrestor
hooks. Overall the quality of these parts is high with very few (if any) air bubbles.
I did not need any of the carrier gear for my subject.
The conversion starts by removing the outer 33cm from each injection molded wingtip.
The aileron molded into the top of each wing must be removed as well. The resin parts fit
very well with the plastic wings. The only problem was that the resin parts were slightly
thicker than the plastic wings. I glued everything with CA and, when cured, sanded the
joint with a sanding pad until the difference was eliminated. Other than that this was a
drop fit project. The ailerons and slats need a little tweaking, and the kit supercharger
intake should be replaced with the resin one supplied by Hawkeye. After assembly, the new
resin wing tips add 11cm. to each wing tip - a noticeable difference.
There are other small changes needed to finish the conversion to "T" series
standards. The best reference for this is "Sea Eagles" written by Francis
Marshall. This book is very difficult to find now, but Aviation Usk may have a few copies
remaining. If making the naval version with arrestor gear this book will also help with
placement and markings of these aircraft.
Here is a list of the final, minor modifications:
- Add the access panels for the GM-1 boost system.
- Scribe in the upper wing spoilers.
- Various panel lines found on the wings.
In summary, a simple conversion but one that changes the appearance of this classic
fighter aircraft.
P a
i n t i n g a n d M a r k i n g s |
Here is where the fun began! There are not many photos of this aircraft, but many color
profiles over the years. Almost every one portrays this aircraft with different colors or
markings. I worked primarily from the photo on page 39 of Jet and Prop Foto-Archiv Volume
2.
 This, and other
photographs of Black 6 are overexposed and make interpretation difficult at best. We all
know that black and white photograph interpretation is at best a series of educated
guesses based on other information that has been verified through artifacts and/or color
photography. Luckily in this age of electronic communications I was able to correspond
with many people who were able to help me in my attempt to create a historically accurate
replica. This list includes the author of "Sea Eagles" Francis Marshall, as well
as Claes Sundin, Kjetil Aakra, Phillipe DeMuelder and Bob Rinder. Without the input of
these gentlemen this project would of been much more difficult- my thanks to all of you!
Even as I was applying decals new information was presented to me on Black 6- some of
which contradicted previous information. Keep in mind that this was my view on the data
and photos provided to me and in no way do I claim that this is the definitive answer on
how this aircraft appeared. Simply, until some type of proof, be it physical or
photographic, shows otherwise this is my interpretation of what Black 6 looked like in the
spring of 1944. This, and other
photographs of Black 6 are overexposed and make interpretation difficult at best. We all
know that black and white photograph interpretation is at best a series of educated
guesses based on other information that has been verified through artifacts and/or color
photography. Luckily in this age of electronic communications I was able to correspond
with many people who were able to help me in my attempt to create a historically accurate
replica. This list includes the author of "Sea Eagles" Francis Marshall, as well
as Claes Sundin, Kjetil Aakra, Phillipe DeMuelder and Bob Rinder. Without the input of
these gentlemen this project would of been much more difficult- my thanks to all of you!
Even as I was applying decals new information was presented to me on Black 6- some of
which contradicted previous information. Keep in mind that this was my view on the data
and photos provided to me and in no way do I claim that this is the definitive answer on
how this aircraft appeared. Simply, until some type of proof, be it physical or
photographic, shows otherwise this is my interpretation of what Black 6 looked like in the
spring of 1944.
As I mentioned, the photo was overexposed. Going by the book, this aircraft should of
been RLM 74 and 75 over 76. However, I could not make out two shades of a darker color on
the fuselage spine or wing leading edge. Also, the aircraft had a soft wave pattern
painted on the upper surfaces in a light color similar to the fuselage sides. It is
apparent that this aircraft flew many missions over water- I interpreted the colors as RLM
75 over 76, with the wave pattern also in 76. I felt the only other explanation for the
wave pattern was that it could be a worn winter camouflage, but in that case it would
normally show more mottle on the side of the fuselage.
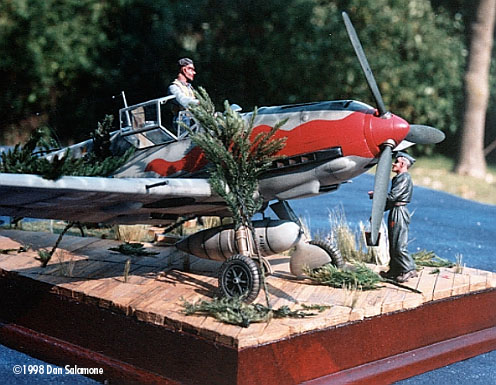
The first remarkable item in this photo is the large flame running from the spinner to
just beneath the cockpit. This is a highly unusual marking for a Luftwaffe machine and
leads me to believe that there were many "odd" things about Black 6. Best guess
is that the flames were a personal statement by Oblt. Christmann - but perhaps it was also
a marking device for his pilots to identify him in combat, or even a device to help locate
the aircraft in case it went down in a remote area. There is no way to confirm the reason
for the marking, but it does beg to have an answer. The last major marking to mention is
the yellow RVD band of JG11 located near the rear of the fuselage.
So we have a three year old combat aircraft, rare in itself at this point in the war.
Add to this an unusual (for a fighter) camouflage scheme, and the flames on the nose. This
aircraft is a perfect example of how many variations in camouflage and markings there were
in the field. The camouflage scheme makes sense for the environment in which this unit
flew. I would love to see how the other 20 or so Bf 109T of 11./JG11 were finished. My
guess is that they were in a variety of schemes, but as a common thread I feel they would
reflect their individual needs in this harsh combat environment.
Aeromaster enamels were used for the color scheme. I sourced the decals from various
sheets from both Aeromaster and Super Scale. The model was finished using a variety of
clear coats to seal the artist oils and chalk weathering. I used clear flat misted lightly
over the entire model, but chose semi gloss for the red flames to show newer paint. Also,
semi gloss was sprayed on the leading edges of the wings, and fuselage spine to show the
sheen usually found on Luftwaffe aircraft.
B a
s e a n d F i g u r e s |
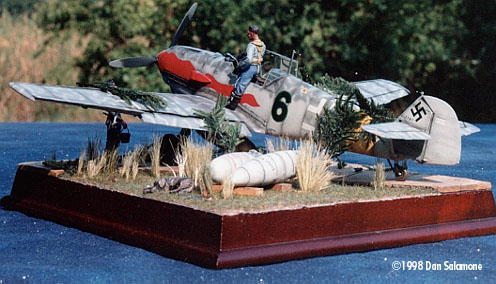
 The wood base was
sourced from a Kaiyodo dinosaur kit. I made the wood planks from strip wood. First I
removed any rough edges, then took my Dremel with a wire wheel and gouged the surface to
simulate woodgrain. Then I splashed some black acrylic paint at random to simulate oil
stains and knots in the wood. When dry, I brushed Floquil wood stain onto the wood strips,
making sure to vary the amount as to give the appearance of different shades of wood.
After letting this dry overnight, I cut the wood into both 4 and 6 scale foot planks,
cleaning up the ends as needed. This was done with a razor saw and mitre box. Finally, I
glued the planks to the base with RC 56, a flexible white glue. I started with the inside
planks, working my way towards the edges. The corner and edge pieces were cut in the mitre
box and placed into position. The planks were laid out with appropriate gaps and
imperfections one would expect from a deck used by aircraft in a combat environment. Once
dry, I touched-up any planks that lost their stain, and then dry brushed grey over the
wood for a weathered appearance. The wood base was
sourced from a Kaiyodo dinosaur kit. I made the wood planks from strip wood. First I
removed any rough edges, then took my Dremel with a wire wheel and gouged the surface to
simulate woodgrain. Then I splashed some black acrylic paint at random to simulate oil
stains and knots in the wood. When dry, I brushed Floquil wood stain onto the wood strips,
making sure to vary the amount as to give the appearance of different shades of wood.
After letting this dry overnight, I cut the wood into both 4 and 6 scale foot planks,
cleaning up the ends as needed. This was done with a razor saw and mitre box. Finally, I
glued the planks to the base with RC 56, a flexible white glue. I started with the inside
planks, working my way towards the edges. The corner and edge pieces were cut in the mitre
box and placed into position. The planks were laid out with appropriate gaps and
imperfections one would expect from a deck used by aircraft in a combat environment. Once
dry, I touched-up any planks that lost their stain, and then dry brushed grey over the
wood for a weathered appearance.
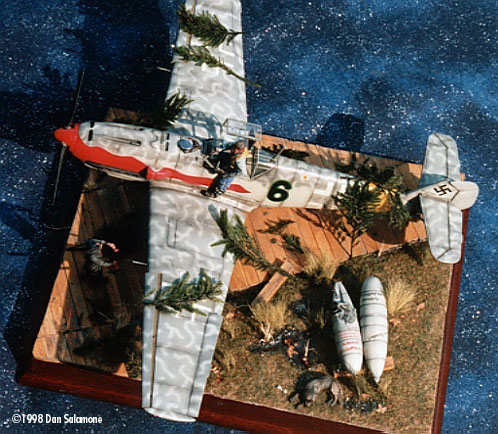
The groundwork was based on Celluclay. When dry I painted it with brown acrylic paint.
Acrylic gloss medium was used to secure the field grass. This was glued into place then
cut to various shapes after dry. Again gloss medium was used to apply the static grass. I
also added some grass growing between the gaps in the planks. The various grasses were
from Woodland Scenics and Hudson and Allen. The standing water and puddles were made from
2 hour epoxy, and Hudson and Allen fall leaves were added for some extra
"debris".
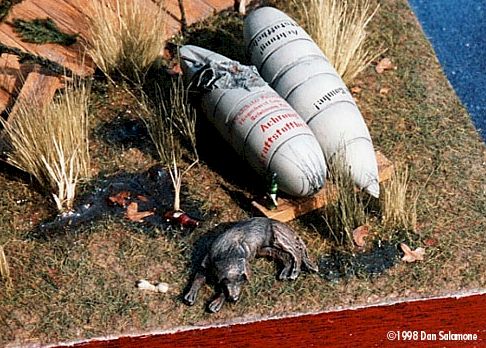
Items on the base include two spare 300 liter drop tanks placed on a few wooden planks.
The wrench is from a Verlinden set, and two resin bottles were also added to show a human
touch. The bottle near the drop tanks has a "torn" label, hard to see on the
photos……
The pilot and crewman come from various Verlinden sets. The crewman has some minor
modifications. His paint bucket has also been modified to have a separate handle, and also
has a paint mixing stick in it. The dog comes from a Scale Model Accessory set, and his
bone is epoxy putty.
All the figures were painted with Ral Partha acrylic paints and sealed with Floquil
Figure Flat spray.
 As a final touch I used pine boughs from Hudson and Allen to replicate the
commonly seen use of young pine trees and branches as a quick way to conceal aircraft on
the ground. As a final touch I used pine boughs from Hudson and Allen to replicate the
commonly seen use of young pine trees and branches as a quick way to conceal aircraft on
the ground.
The finished project shows Oblt. Christmann preparing for another mission while one of
his ground crew touch-up the red flames on the aircraft. Small items to notice are the
pilots’ cap and pistol near the windshield, spilled red paint on the crewman and
bucket, as well as the dog sleeping near some puddles in which lay fallen leaves and an
old bottle. I believe that when a model is shown in an environment that it operated it
enhances the overall appearance, and makes it much more interesting to view than a model
sitting alone. It adds the human element, and after all that is what really captures the
viewers’ eye.
I have wanted to build this aircraft since seeing the MPM kit a few years ago. The Hawkeye
conversion made this easy, and building the base and groundwork was a nice departure from
plastic. I can see where people get caught up in train layouts! I would like to thank
again all the people who helped with opinions and information, the computer has enabled
communication between model builders and researchers like never before.
There are many photographic examples of aircraft, as well as other vehicles, that show
a departure from the "official" guidelines. For Luftwaffe fans, JG 54 is a great
example with all their field applied paint schemes in Russia, and JG 5 in Norway another.
I would like to see more people rely on their eyes and instincts to a greater extent when
interpreting black and white photos, and less on camouflage directives that have been
repeated for years. Not only has the state of building models changed drastically over the
past 10 years, but the quality of research material has increased as well. It is time that
people embrace this, after all, short of having physical evidence of a paint color even
the best researcher has to rely on an educated guess. Instead of solely relying on what
has been accepted for years, look at things with an open mind and you will see many
details and nuances that you may of missed before!
B o
o k s a n d M a t e r i a l s |
Books
These books were very useful during this project:
- Model Art Special #375
- Jet and Prop Foto Archiv Volume 2
- Sea Eagles
I believe all three of these books are available from Aviation Usk: http://206.96.81.2:80/avusk/
Model Art is also available from Hobby Link Japan: http://iac.co.jp/~hlj/
Materials
These kits, sets and materials were used:
- Hasegawa Bf 109E-4/7 # JT 161
- Verlinden Bf 109E Update set #384
- Verlinden German pilot set #1339
- Verlinden German pilot and ground crew #467
- Verlinden Bf 109 Underwing stores #1321
- Hawkeye Designs Bf 109T conversion #303
- Hudson and Allen pine boughs, field grass, static grass and mud
Most of these kits and sets are available from Aviation Usk, or Northcoast Modelworks:
http://www.loraincounty.net/modelworks/
Model, Article Text and Photographs Copyright © 1998
by Dan Salamone
Page Created 03 October, 1998
Last Updated 26 July, 2007
Back to HyperScale Main Page
Back to Features Page
|  Home
| What's New |
Features |
Gallery |
Reviews |
Reference |
Forum |
Search
Home
| What's New |
Features |
Gallery |
Reviews |
Reference |
Forum |
Search