Home
| What's New |
Features |
Gallery |
Reviews |
Reference |
Forum |
Search
Home
| What's New |
Features |
Gallery |
Reviews |
Reference |
Forum |
Search
|
|
Messerschmitt Bf 109 V14 by Craig Chidley and Jim Kiker
Several years ago, Mitch Thompson wrote an article for "Scale Aviation Modeller International" about converting existing Messerschmitt Bf 109 kits into the Bf 109 V14. This article had quite an effect on both of us and is what led us to become so obsessed with this aircraft.
The Messerschmitt Bf 109 V13 and V14 were racing prototypes utilizing the new Daimler-Benz DB 601 engine (also in prototype form) for the first time in a Bf 109. They paved the way for the very similar looking E-0 series (often mistakenly identified as D-series aircraft) and eventually the more familiar "Emil" as we know it in kit form.
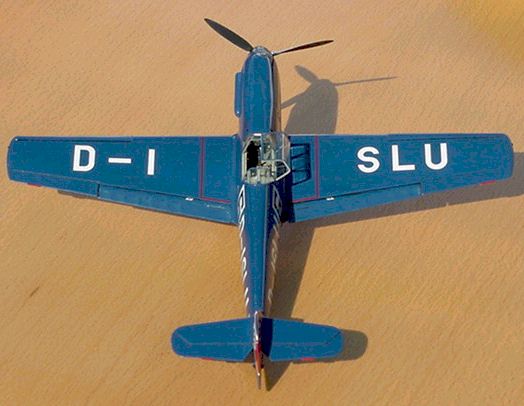
Using the German civil registration D-ISLU and with w/nr.1029, the V14 (often, again mistakenly, identified as the V10 in at least two references) was the 20th B-series airframe produced by BFW before being allocated to their test program. First flown on 28 April 1937, it was later prepared for Ernst Udet to be flown at the 4th International Aviation Meeting near Z³rich Switzerland between 23 July and 1 August 1937. After flying the airplane to Z³rich himself, Udet flew the aircraft in the Alps Circuit Race on 27 July, experienced engine trouble, and crash-landed the plane. He was not hurt but the aircraft was a write-off, ending a very brief, and no doubt embarrassing, public debut. Mitch's article spurred us on to go looking for more information and begin planning our own projects, quite independently, and with surprisingly different results.
The conversion can be attempted utilizing the Bf 109E-3's from Hobbycraft, Hasegawa, or Tamiya. Whilst reasonably simple, it can be time consuming to get all the finer details correct. The biggest areas requiring attention are the supercharger intake, exhausts, and the removal of the underwing cannon bulges. Everything after that is reasonably straight forward, keeping in mind that the fuselage, back from the firewall, must be backdated to B-model configuration. This basically involves filling and re-scribing panel lines and little else. How the two of us went about it is another story howeverģ
by Craig Chidley I began this project about four years ago using the Hasegawa 1/48 scale Messerschmitt Bf 109E-3 kit as the basis. The model was originally going to be built as an E-1 but after seeing the SAMI article I knew immediately how it was going to be finished.
Presuming this aircraft to be a hybrid between the B & E models (judging by fuel filler points and it's time of appearance) I used Eduard's B-model etched set for the cockpit, replacing all of the E-model equipment such as instrument panel and various levers. The V13 seems to have the early style bucket seat so the kit item was extensively ground down with a Dremel tool until it looked about so. Fine Molds seat belts were also used to finish off. The Russian M-Hobby book on the Bf 109B, captured during the Spanish Civil War, was invaluable here. The cockpit was painted in a lightened mix of AeroMaster RLM 02, washed and drybrushed. The instrument panel and various cockpit accessories were finished in RLM 66. Externally, the aircraft was sprayed in AeroMaster RLM 24 Blue enamel (yes, the matt one!) and the tail band masked and painted in RLM 23 Red. Initially I wasn't really looking forward to the gloss painting part but after much rubbing with a soft cloth and two brush applied coats of Johnson's Super Stride (or whatever it's called in your part of the world) we were almost there.
Decals were applied at this stage with the old Superscale 10 & 13mm Luftwaffe white letters being used for the civil registration, some XtraDecal swastika's, with white surrounds, for the tail, a set of AeroMaster 109E stencils dotted in various places around the airframe and Mitch Thompson's tried and almost true technique of cobbling together a couple of DML He 162 white data stencils for the manufacturers information near the tail. I can't for the life of me remember where the black 6 came from but some white decal sheet from Propagteam was used for the racing number surround. Two more coats of Super Stride were hand brushed on and the entire aircraft polished with Meguiars Swirl Remover and Final Inspection to bring the thing up to how you see it today.
In light of the references available today I'm still not 100% convinced the aircraft was not blue. Initially this assumption was made solely by referring to the Me 209 V1 that was painted a similar blue. Having seen the photos of the crashed aircraft in the Radinger & Schick book (after completion of courseģisn't it always the way?) the fuselage still looks much to dark, when compared to the tailband, for it to be another shade of red. RLM 23 isn't exactly a pink. This book also refers to it being "weinrot" in colour. I could believe the contrast if, say, RLM 28 Weinrot was used though it would have made for an awfully drab aircraft. Still, there maybe some light at the end of the tunnel as a new book has appeared in Switzerland on Swiss 109's and includes new photos of aircraft from the D³bendorf races. Will it never end??
Click on the thumbnails below to view the full-sized drawings
by Jim Kiker I decided to base my conversion of the 1/48 scale Tamiya Messerschmitt Bf 109E-3 , since it included the correct early style canopy and featured dropped slats and flaps. Tamiya's famous ease of assembly was another factor. I didn't initially have very much in the way of references, but I managed to assemble a lot of good information through my local club members (Charlotte Scale Modelers), and through the Internet. Thanks to my friends both local and global, to Brett for HyperScale, Craig Chidley, and the Luftwaffe Discussion Board for all the help! Planning the project included three main sections. First, deciding what extra detailing I wanted to do to the basic kit; second, laying out the conversion work; and third was the finish. It is a common refrain, but good references and careful study at every stage of a project yields big returns when the hacking begins. You will note that this project sounds like a lot of work, but none of it is terribly hard and doing it in small sections does give one a sense of accomplishment along the way.
Improvements to the Kit I like to display my models in a "ready for the next sortie" stance, although in this case, I retained both the open slats and extended flaps. Lowered elevators are a common stance for an aircraft with unpowered flight controls, provided they are unlocked, so lowering the elevators is the norm for me. I cut the elevators away from the horizontal tail and added .010" plastic strip stock to the edges. I filed the trailing edge of the horizontal tails into a rounded concave shape, sanded a convex curve on the elevators' leading edge, and then re-glued the pieces together, making sure that they were remounted symmetrically. I replaced the kit's engine oil and cooling flaps with scratchbuilt flaps using .010" plastic sheet, reinstalling them in the open position. I also added a rear and an internal fairing (to direct the air down and out) for the engine oil cooler, using plastic sheet and some micro screen for the rear of the radiator. There is a visible gap in the wheel wells between the wall of the well and the "top" (bottom of the top wing) in the kit. I added plastic stock around the upper rim of the wells, smoothed the interior, and sanded down the extra thickness until the top wing fit correctly again with no gaps around the well. Lots of dry fitting and short spurts of sanding are the order of the day here. In the cockpit, I used parts from Eduard's PE set, including the instrument panel, rudder panels, and the trim wheels. I added rib detail on the left side using strip stock, and then built a throttle quadrant, oxygen hose, brake lines on the rudder petals, and other miscellaneous bits. I made a scratchbuilt seat (some of my information indicated that the seat in this aircraft did not have a narrow top back, like the kit seat), and then added PE seatbelts. I mixed Floquil paints to a shade of RLM 02 for the interior (and all the other interior surfaces, wheel wells, inner gear doors, etc.). I painted the interior, and then added a light wash of dark gray. I painted the various boxes scale black, the instrument panel dark gray, drybrushed some light scuffing on the floor and other common wear areas (but kept it light!), and finished the cockpit with the required bits of color such as yellow/red handles, as needed.
I cut off and opened up the rudder control cable runs in the rear fuselage. At the very end of the project I added these control cables using fine beading wire from a craft store. Making use of the 109E build article in the September 1997 issue of "Scale Aviation Modeller International," I also added a round lump in the cavity just under and behind the spinner (there is a tank there). I later added a piece of plastic to blank off the area behind. I then removed the kit tie downs under the wings (just solid pieces in the kit) and replaced them with model railroad tie down rods made of fine wire, resulting in robust, petite tie down rings. As an aside, I had to shim the wings at the rear during construction- they fitted too far into the recess at the rear; the good news was, after this, the wing roots fit better with no step at the joint! To replicate the joint line where the fuselage halves were joined on the real aircraft (visible from the wing root back on the bottom and from the canopy to the vertical tail on top), I gently sanded the outer edges before assembly (a couple of light passes with a fine sanding stick are all you need!). With careful gluing, a nice panel line was left without the need to scribe down the spine of the completed fuselage.
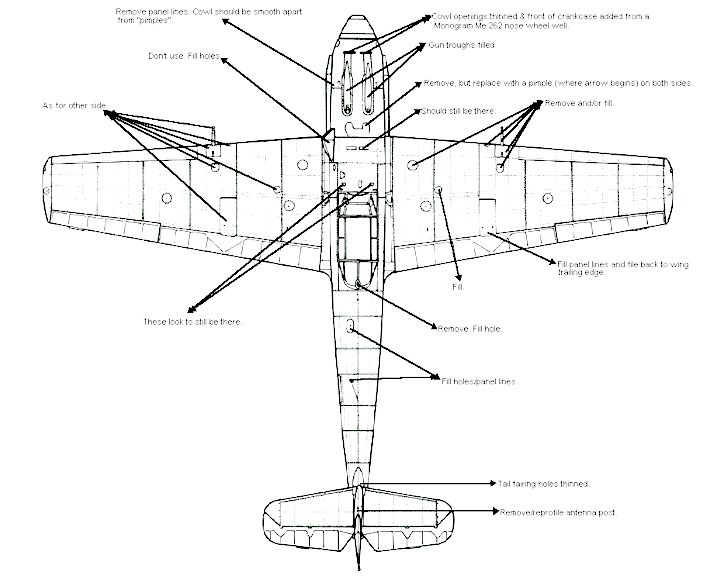
Conversion I used Mitch's article and the profiles in the ModelArt Special No.375 "Messerschmitt Bf109B-E" book for the main portion of the conversion, which included creating the long supercharger intake and the flush engine exhausts.
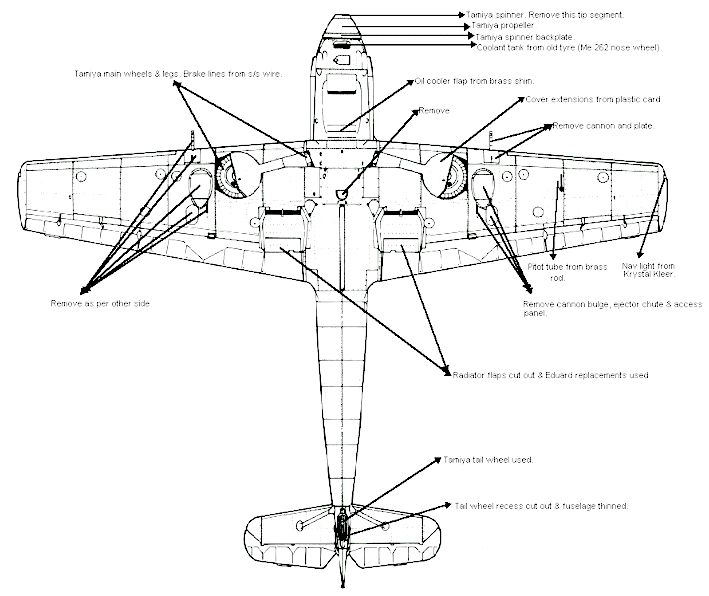
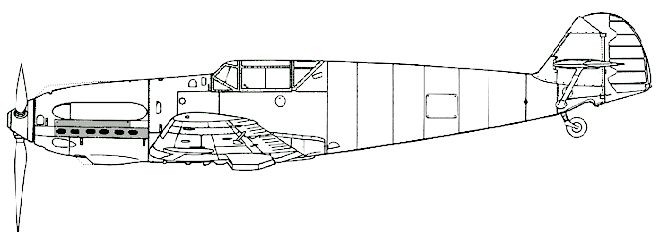
This profile came from the ModelArt Special. The dotted lines along the top of the nose and in front of the chin scoop are closer to the Tamiya E-3 kit (Since changed in their E-4/7 release). Also note the enlarged supercharger scoop, and the exhaust panel (shaded). The cowling gun troughs and the fairing at the back top of the upper engine cowling have been removed. On the wings, the guns, shell chutes, and bulges are also removed. The fuel filler has also been repositioned from the kit location high on the spine behind the cockpit, to just below the rear edge of the canopy (the small round access panel). Back at the tail the radio mast is removed; note the contours. I filled and sanded smooth the kit's indention for the standard supercharger intake. I cut a section out of the left side of the cowling for the new intake, leaving about 3/16" on the rear. I cut a length of 5/32" aluminum tubing and flattened it somewhat using a large flat metal ruler, making an oval shape of the correct width (or height, if you will). I added some sheet plastic to the inside lower front edge of the cowling and filed a "scoop" into it to fit the new intake. After thinning the front edge of my new intake, I epoxied it into place, and then added a lump of Milliput to form the rear section that fairs into the fuselage shape. I also sanded off the protruding shapes on the top rear edge of the cowling and filled the gun troughs using gel superglue. Finally, I added .010" strip around the inside of the engine vents in the front of the cowling (to give me additional plastic) and sanded the front end down. As this was the first Tamiya molding of this aircraft, this area of the kit was not especially accurate and needed to be reduced and reshaped.
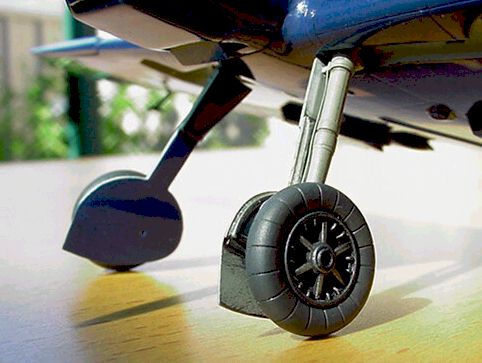
After checking the fit on both sides, I laid out the exhaust holes and punched them out with a punch and die set. When adding these pieces to the kit, these holes overlay the slot for the kit exhausts; I added bits of strip plastic between the holes on the backside to fit into this slot, since the plastic is very thin and fragile. After mounting these pieces, I drilled out the area behind each hole (later backed with sheet plastic). All this gives you round exhaust holes, so the tricky part is filing these round holes into elongated exhaust openings- note that they are race track-shaped, not pure ovals. I wound up working a little, then putting it down for awhile; I found it very helpful to keep looking at these exhaust openings with fresh eyes to ensure their shape was as identical as possible and properly lined up. Adding some tape along the top and bottom of the holes helps with alignment a great deal; just make sure that you use low-tack tape (remember, this is only .005" sheet!). I eliminated the kit's under-wing gun bulges and spent shell chutes. I cut this area out of the lower wing, cut out pieces of sheet plastic to fit the holes, and then glued them in with more sheet behind, overlapping the joints. I then filled the seams with superglue and sanded everything smooth and rescribed as needed. After the wings were together, I filled in the gun barrel openings. I also added one small vent on the left side of the fuselage behind the supercharger, and eliminated some un-needed detail on the aircraft's belly. During the course of the build, I also removed the antenna wire mount from the vertical fin, and filled in the mounting hole in the rear canopy section. I added extensions to the bottom of the landing gear covers, made from .010" sheet with some strip stock "stiffeners" on the inside. I did not have a good photo for this, so I exercised my best judgment; I'm not sure I want to know more now!
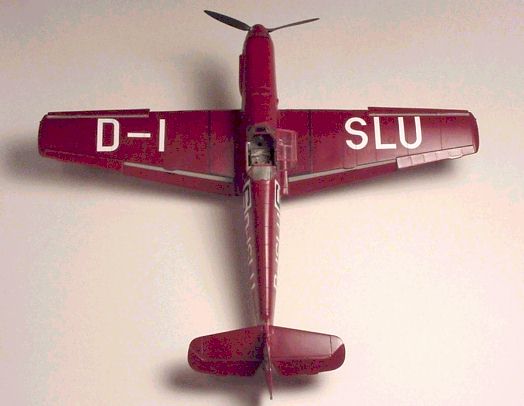
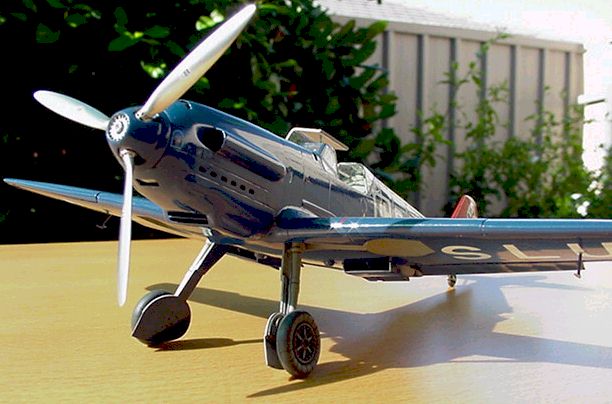
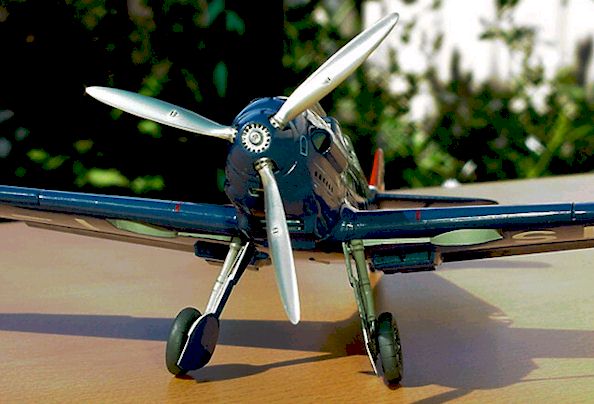
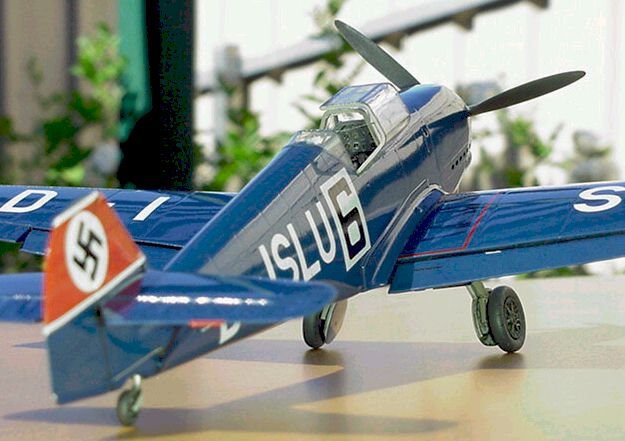
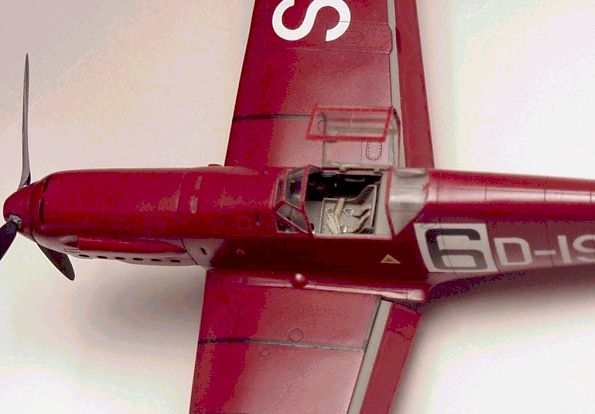
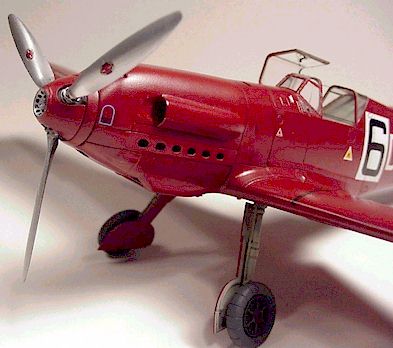
Painting and Markings Most experts have agreed that this aircraft was painted dark blue, perhaps RLM 24, citing the known black & white photos. These photos do show the aircraft was painted darker than the known red shade of the tail band. However, to date I have been unable to locate a color photo of the aircraft or factory documentation that blue was used. "Messerschmitt Me 109, Alle varianten: von Bf 109A bis 109E" by Radinger & Schick, published by Aviatic Verlag, specifically says this aircraft was painted wine red. In the same book, the caption of a black and white photo of the 109 aircraft at the 1937 flying meet lined up together refers to Udet's all red machine. A biography of Udet also refers to this aircraft as being all red, although the photos do indicate that it must (at least) have been a darker shade/color than the known bright red tail band. In addition, newspaper accounts indicate that Udet flew the V14 to the Air Meet himself, and that it was a red machine. Finally, this aircraft had white pin stripes along the edges of the tail band. The only other aircraft known to have had this additional marking were red or wine red, such as Udet's personal transport aircraft. In the end I chose wine red. I mixed Floquil railroad colors (red and blue) for the finish. Here's the hard part. Knowing that red, as a color is difficult to paint, even wine red, I masked off the airframe and undercoated it in white, then painted the red. The result was a disaster and I almost threw the whole thing in the trash. After setting it aside for a while, I took my model geek buddies' advice and tried stripping it with Polly S brand stripper (nothing to lose, right?). Lo and behold, it all came off in the end. I then repainted the wine red over the gray plastic of the kit, and followed up with a coat of Polly Scale clear acrylic. Once the paint started looking glossy, it really came alive. The canopy front and rear section had been glued in earlier. The entire canopy was masked using Easy Masks, sprayed 02, and then painted wine red along with the airframe. I purposely finished the model with a semi-gloss sheen; pure gloss in this scale does not look realistic to me. The Civil code letters were a problem. There were some decal sheets out there (Microscale, 13 and 10mm white Luftwaffe letters) that would have worked, but I could not find both of them. I decided to have some dry transfers made. The Civil codes, racing number, and the white background for the numbers are dry transfers from my own artwork, sized to match photos (5/8" for the wings, 3/8" for the fuselage, if you're interested). This was expensive, to the tune of about $35, but the results are spectacular. The letters look (to me) to be the right size and while super thin, they are completely opaque. I had never tried this method before, but one of my local model buddies does it a lot for his scratchbuilt projects (thanks, Bill!), and I must say, in some cases it's the best way to go. The tail band, circle, and swastika are one piece and came from an Aeromaster decal sheet for early 109's, while the pinstripes on the band were white stripes from the spares box. Airframe stencils came from an Aeromaster 109 stencil sheet, while the white data lines on the lower left rear fuselage came from "bits and pieces" I gathered from friends. The wing walk strips, by the way, are also dry transfers, from Woodland Scenics (another model railroad item). Dark gray artist's oils were mixed, thinned, and washed into selected panel lines around the engine and the control surfaces. I used a medium-dark gray wash for the rest of the panel lines. The spinner was painted RLM 02 gray (to better match the tone of the kit's gray plastic), with the wine red mix over it to match the hue of the airframe, and then clear glossed. The rear of the prop blades (and the wheels) were painted scale black (a very dark gray mix I use), then the hub and front of the prop painted with Floquil Old Silver in a couple of thin coats. A light oil wash around the hub to pop the detail was added before assembly. The landing gear got brake lines added, painted 02, given a clear gloss acrylic coat, lightly oil washed, and then clear flat coated. Model Master Chrome Silver was used on the oleo sections. Position lights were painted Chrome silver, coated with mixes for the dark red and blue green as appropriate (using Gunze clear acrylics), then clear coated. The rudder and the tailwheel were cocked slightly off center when mounted to add a final touch. Thanks to the great information I've run across, I will be mounting this racer on a grass setting. I have figures of Udet (okay, it will be him when I'm done!) putting on a flying coverall, while Dr. Wurster reviews the course layout with him on a map - but that's another story!
Click on the thumbnails below to
view the images full-sized.
1. "Scale Aviation Modeller International" Vol. 2, Issue 4, April 1996. 2. "Scale Aviation Modeller International" Vol. 3, Issue 9, September 1997. 3. Model Art Special No.375 "Messerschmitt Bf 109B-E", Model Art Co., 1991. 4. Bf 109 V14 Article and Conversion Drawings by Craig Chidley 5. "Messerschmitt Me 109, Alle varianten: von Bf 109A bis 109E" by Radinger & Schick. Aviatic Verlag, 1997. 6. Citations from Ernst Udet's biography and several newspaper accounts, translated and provided by Michael Kirk, Stefan Karver, Anders Bruun, and others.
Model, Images and Article Copyright
® 2000 by Craig Chidley and Jim
Kiker Back to HyperScale Main Page Back to Features Page |
 With
the cannon bulges already removed, the task ahead didn't seem too daunting. Boy,
was I wrong! With just one photograph of this aircraft at hand (this was before
Radinger & Schick published their work) and relying on a number of the
pre-streamlined V13 photos I leapt into it. Somewhere along the line it was
shelved for eighteen months before inspiration struck again and the finished
item emerged. As many of the modifications required are pointed out in the four
profiles I'll let them speak for themselves and just add some brief notes.
With
the cannon bulges already removed, the task ahead didn't seem too daunting. Boy,
was I wrong! With just one photograph of this aircraft at hand (this was before
Radinger & Schick published their work) and relying on a number of the
pre-streamlined V13 photos I leapt into it. Somewhere along the line it was
shelved for eighteen months before inspiration struck again and the finished
item emerged. As many of the modifications required are pointed out in the four
profiles I'll let them speak for themselves and just add some brief notes.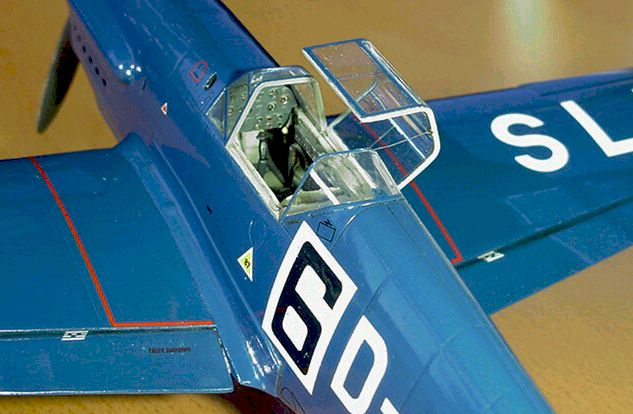

 The
flush engine exhausts were another mini-project. I began by taping off the
surrounding detail and sanding off the kit exhaust detail that stands out from
the fuselage. I used clear tape to make outlines of the exhaust panels (the
highlighted area on the drawing). I cut out .005" sheet plastic in this
shape.
The
flush engine exhausts were another mini-project. I began by taping off the
surrounding detail and sanding off the kit exhaust detail that stands out from
the fuselage. I used clear tape to make outlines of the exhaust panels (the
highlighted area on the drawing). I cut out .005" sheet plastic in this
shape.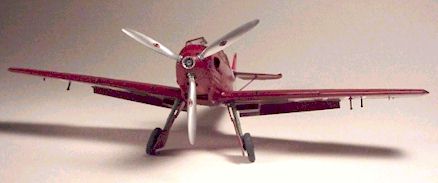 The
kit spinner needs to be modified as well. I started with the open piece (for a
gun barrel) from the kit. I sanded the front edge down, making the spinner
slightly shorter in length. Using a rounded sanding drum in my fingers, I
enlarged the original opening; the rounded shape made the opening wider at the
front. During finishing, this area was painted to represent natural metal, and
then tiny dots of flat black paint were added to simulate cooling holes. With
the hub of the propeller poking through, it looks pretty good.
The
kit spinner needs to be modified as well. I started with the open piece (for a
gun barrel) from the kit. I sanded the front edge down, making the spinner
slightly shorter in length. Using a rounded sanding drum in my fingers, I
enlarged the original opening; the rounded shape made the opening wider at the
front. During finishing, this area was painted to represent natural metal, and
then tiny dots of flat black paint were added to simulate cooling holes. With
the hub of the propeller poking through, it looks pretty good.