Home
| What's New |
Features |
Gallery |
Reviews |
Reference |
Forum |
Search
Home
| What's New |
Features |
Gallery |
Reviews |
Reference |
Forum |
Search
|
|
|
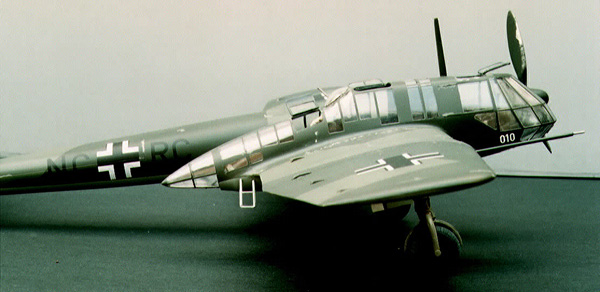
Blohm und Voss Bv 141 by Lukasz Kedzierski
Ever since Airfix released their 1:72 scale Bv-141 I wanted to build a model of this bizarre aircraft. However, I never got around to building it in 1:72 scale for a few reasons. Firstly because the old Airfix kit looks terrible, and secondly because I moved to 1:48 scale (at least in WWII department). Last year HiPM came up with Bv 141B in 1:48 scale, which found its way to my unassembled kits pile straight away. More importantly, I got it as a wedding anniversary present so there was no excuse to delay the project! I started working on it immediately.
I decided to build the model out of the box since my references are very limited when it comes to esoteric subjects such as Bv 141. I downloaded a nice collection of Bv-141A and B photos from the web and found two brief chapters in "general" Luftwaffe books from my collection. In the process of gathering information I learned that a "glasshouse" cockpit of Bv-141 had a lot in common with Fw-189, therefore I used an excellent book published by Aviapress in their series "Skrzydla w Miniaturze" (Wings in Miniature) as a guide for Blohm und Voss cockpit.
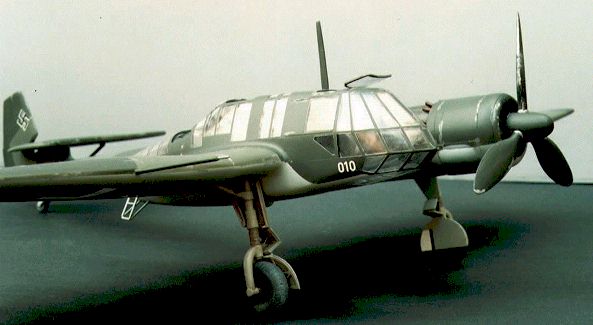
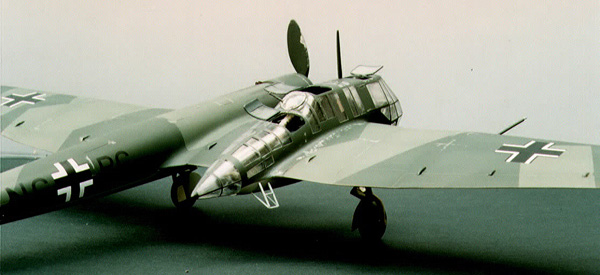
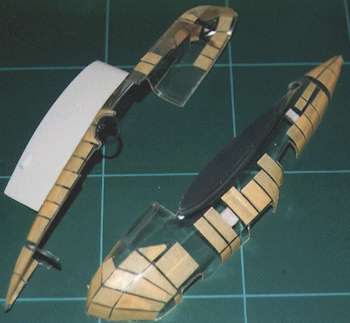
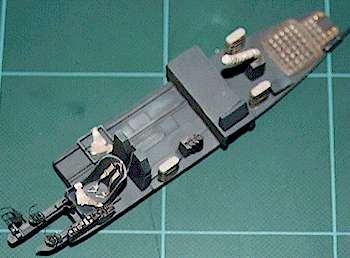
This was my first HiPM kit and I must say it was very good. Upon opening the box I was struck by the size of this thing - the tailboom is about 30 cm long! There are four sprues with parts moulded in light grey plastic, one sprue of clear parts, small photo-etched set and a decal sheet printed by Propagteam. After closer inspection I discovered that all the large parts were moulded very nicely, whereas sprue D containing all the small parts (undercarriage, machine guns, cockpit components) had a lot of flash and looked like it was from another kit. Nevertheless, after cleaning up all the parts came up to standard and looked acceptable. Panel lines are engraved, although a bit vague in places. The entire crew compartment is moulded in clear plastic of acceptable clarity, but can use some polishing and a coat of Future. The clear crew compartment is is a very good idea since probably 90% of it consisted of glazed panels to facilitate 360° view - it was a reconnaissance aircraft after all. The instruction booklet consists of 12 pages with sprue map, clear assembly diagrams and 3 pages of painting instructions (RLM numbers are used). One painting guide is for the cockpit, undercarriage and machine guns and 2 pages with side, up and down views of an entire aircraft.
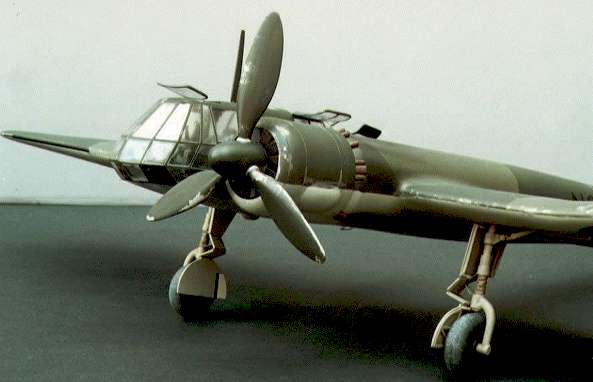
Wings were next and there was no problem here. The tail boom goes together like a dream as well. I decided not to include bomb racks (four are provided, but no bombs) since there are no location points for them and they require a lot of cleaning up. Wings done, tailboom done, crew compartment done - time to put them all together. This was straightforward too, but I had some gaps underneath at the tailboom and wing joint. Be careful with the alignment of all these components since there are many opportunities to get it wrong. Engine nacelle assembly did not cause any problems. In case you are wondering there is no BMW 801 engine included, but nothing can be seen behind the cooling fan (provided as photo-etched part) anyway.
Main undercarriage followed. All the parts went together without causing any problems, but when I glued them into the wheel wells it looked like one of the legs was a bit too long and the whole model was a bit crooked. I have no idea what went wrong (it all seemed to be OK before assembly), but the problem was solved by trimming one of the undercarriage legs to bring my Bv-141 to horizontal position. Construction was completed with antenna and crew access ladder, which I scratchbuilt because I was already fed up with cleaning up all those little bits and pieces.
Now to the most exciting part of model making (at least for me) - painting. What we have here is a really interesting aircraft with an extremely boring camouflage scheme: RLM 70/71/65. I used Aeromaster acrylics (RLM 70 and 71) and Aeromaster enamels (RLM 65 and 66 - used to paint cockpit interior and entire exterior of the crew compartment before main camouflage colours were applied), Gunze Sangyo acrylic RLM 02 was used on undercarriage. Each colour of the main camouflage was applied twice. The second coat was lightened with white (approximately 30%) and used inside the panels leaving panel lines highlighted with darker shade. Weathering was completed with some silver paint chipping, exhaust stains and a subtle wash with oil raw umber. Everything was sealed with Super Shine (Australian equivalent of Future). Decal sheet is printed by Propagteam and offers markings for 5 prototypes (all in the same camouflage scheme). It consists of a set of letters and numbers for different aircrafts, full set of crosses for one aircraft and swastikas (in halves).
There was little carrier film, which I trimmed anyway (I always do, since it solves the problem of silvering later on), colour density was good (just the white outline in crosses, everything else is black so the density is good). All images were very thin and reacted well to Aeromaster Set and Sol solutions without any adverse effects, sinking into panel lines. The entire model was then sealed with a coat of Humbrol semi-gloss clear and various panels were added in open position to the cockpit. It is pretty big for a single engine aircraft, and stands out on the shelf due to its unusual shape and size. What can I say - an excellent wedding anniversary present.
Click the thumbnails below
to view images full-sized.
Article, Images and Model Copyright © 2000 by Lukasz Kedzierski
|
 I
started construction by masking.
I
started construction by masking.
 Next,
I turned my attention to the cockpit.
Next,
I turned my attention to the cockpit.