![]()
Blohm
und Voss Bv 155
Review of the ARBA Bv-155
in 1/48th Scale
by
Floyd S. Werner Jr.
|
Blohm und Voss Bv 155 |
| B a c k g r o u n d |
The history of this airplane starts with the requirement for a high altitude fighter version of the Messerschmitt Bf 109.
The need for a Spezial-Trager-Jagdeinsitzer (Special carrier single seat fighter) and a Spezial Hohenjager (Special High Altitude fighter) was expressed in 1942. Willi Messerschmitt attempted to concurrently develop both but because of other commitments he was forced hand over the design development to Blohm, and Voss.
Blohm und Voss found several problems with the basic design requiring significant re-engineering. The DB632 engine was originally slated as the powerplant, but because of development delays it was decided to fit the powerful and operational DB603U. Armament was to be one MK 103 through the propeller and two wing mounted MG 151/20 cannon.
BV -155 V1, W.Nr 360051 took to the skies for the first time on February 8, 1945.
Numerous problems in the air forced the maiden flight to be cut short. Furthermore, despite a wide undercarriage the plane had the tendency to ground loop - an experience well known to Bf-109 pilots! This was partially caused by the broad 12’1 5/8" wooden propeller blades.
The first prototype had logged over 10 hours by the time the British overran the airfield in 1945.
When the British arrived at the Hamburg facility in May they found the three prototypes. The V1 was airworthy and the V2 and V3 were under construction. They immediately transferred the first two prototypes to England.
The V1 was subsequently flight tested until it crashed. The aircraft was then 90% restored using parts from the V1 the V2. The aircraft was displayed in this condition at Farnbourgh during 1945. After the display the V2 was shipped of to the US and Wright Patterson test facility. In turn, after study, it was finally turned over to the Smithsonian where it resides today.
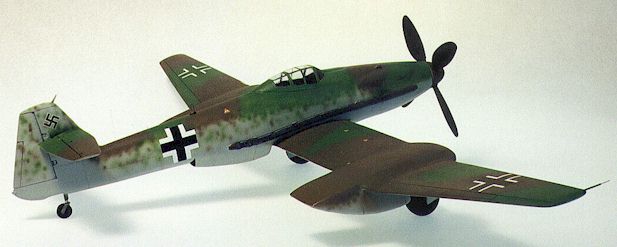
| T h e M o d e l |
The kit consists of 2 clear canopies, 14 resin parts that are relatively bubble free, and 14 pewter white metal parts.
The first thing you will notice when opening the box is the size of this single seat fighter. It is huge - even bigger than the Bf-110.
| C o n s t r u c t i o n |
As there are no instructions (they’re not really necessary) I decided to start with the cockpit. It was a rather easy assembly that includes the seat, instrument panel, tub, and cyclic stick. Fit was good. I painted the assembled cockpit RLM 66 washed with black and drybrushed with RLM 02. I detailed as best I could make out from the available photos of the mockup.
A word of caution: don't attach the instrument panel yet as this part will have to shoehorn into the clear canopy part. It will require test fitting to prevent problems with the canopy later in construction.
The fuselage is built in two sections, fore and aft. The recommended method is to attach the horizontal stabilizers prior to fuselage construction. I found this to be one of the biggest problems with the kit. The fit was bad at the leading edge. I ended up pinning the stabilizers together on the rear fuselage and filled in the resulting gaps with sprue and super glue.
After clean up this area looks good, but it was a bit of a challenge.
Next I attached the two fuselage parts together. This was easily done by the locating bubble on the parts. It did reveal a slight step between the front and back. This was easily smoothed over by super glue and Tamiya putty. If I had to do it again I would have used epoxy resin to do this.
Now is a good time to add the front and aft halves of the supercharger. These parts fit well and required little resin to fill the gap. It was around this time that I said to myself - "Self, you have that resin over there on the shelf why don't you use that instead of super glue?" I used resin because it bonds directly to the pieces and provides strength, and because it is made of the same stuff as the kit it sands at the same rate.
At this time I took the aircraft cross-country to the airshow at San Marcos where it was eagerly received by all. With the help of my daughter, Athena, we continued the construction and started her kit. Athena built a Monogram 109G-10 - you were expecting a Mustang or something? I think not!
We used her 109 to test the colors for the 155 together. And she knew she was building a 109 like her Dad liked to do.
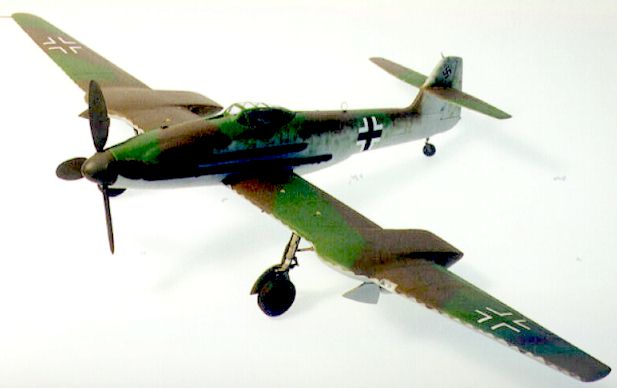
Now I took on the big challenge - the wing. This is where you sit back and wonder how this thing could have ever turned quickly. The wing is reminiscent of a glider and they have a dihedral in the outer portion of each wing. Fortunately the construction was straight forward and just required a little of putty at the attachment. I used the sandwich method here.
What I mean is that I apply putty between the parts and then super glue the parts and press together. The filler squeezes out and you just clean it up a little. I added .005 inch circles for the fuel tank filler ports on top of the wing. After a brief test fit of the wings to the fuselage the immense size is driven home.
Before attaching the wings I attached the underwing radiators. They fit well and required only a little resin as a filler. I painted the radiator portion of each and also painted the RLM 76 that would be very difficult to paint after it was assembled.
Prior to assembling the wing and fuselage I primed them both with Floquil primer and wet sanded everything. I did this for two reasons. First, I could find any mistakes and bubbles now when I could reach them and secondly because in the master construction there were minor surface imperfections that needed to be filled. Nothing big but the paint helped. I replaced the DF loop attachment on the fuselage spine.
I also rescribed any lines removed and then reprimed all the parts. The wing to fuselage joint fit remarkably well, thank God, because the supercharger tubes run down the side of the fuselage and make getting at the wing root near impossible. A little filler was used at the front section again more to add strength than as a filler. Now I had this big thing that was difficult to handle but beautiful. Maybe bigger is better, we'll see.
I decided to attach the landing gear now to prevent the bottom of the plane from getting scratched up. The white metal parts fit like a champ and cleaned up beautifully. I used pins to mount them to the wings for strength. They were painted in RLM 02 as were the wheel wells. I noticed at this point that I was missing the retraction strut from my kit. I used the main landing gear leg from a Monogram P-47 (I told you this thing was big) and added some tubing to finish the part. The tail wheel just required clean-up and paint prior to attaching.
The canopy is one of the few irritations with this kit. It is almost opaque. After hitting the canopy with my Millennium 2000 polishing kit and two coats of Future it eventually looked better. ARBA gives you two canopies so you could easily display it open, but I decided to keep it closed as the interior, while nice, is not overly special.
Now you will discover the reason for leaving the instrument panel until now. The clear part has a notch and the instrument panel has a corresponding area. If the instrument panel position isn't exactly correct the canopy will not line up at the front. The canopy not only covers the canopy but the panels in front of the canopy. The fit was nice. I just had my usual problem attaching the vacuformed canopy. Somebody show me that trick with Elmer's glue because I am obviously doing it wrong! After masking the canopy frame I painted the area with RLM66.
I took a break at this point to marvel at the design of this machine. Blohm and Voss obviously liked the P-47 supercharger system.
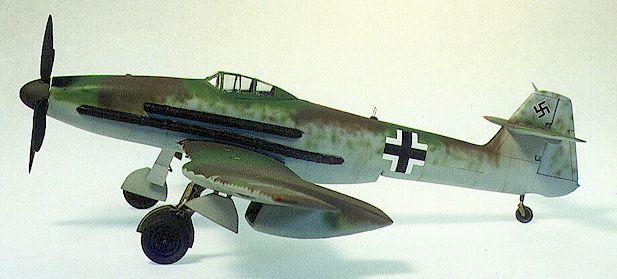
| P a i n t i n g a n d D e c a l s |
Paint was applied with my Badger 150 using a fine needle and Aeromaster colors - RLM 76
for the underside and RLM 81 and 83 for the top side. I referred to the photos and
drawings in the Monogram Close-Up 20 for the pattern. I masked the leading edge scalloped
pattern. Everything else was sprayed freehand.
After a gloss coat I added some decals. These came from the spares box as the kit does not supply any decals. I wanted to make the V1 which only had the minimal of markings. The Close-Up tells you what size to use and where. I was unsure of the fuselage cross if it was black or the brown-violet color interior. I went with the black to add some color to the kit.
The propeller blades and spinner were now added. I recommend that the blades be pinned to the spinner. Also you need to pin the spinner to the fuselage - the white metal blades are so heavy that I don't think epoxy or super glue would hold it long.
Weathering was kept to a minimum as this was really a factory fresh airframe. I used Tamiya smoke on the underside and also Burnt Umber wash. The flight control surfaces were highlighted with Dark Gray india ink. The top-side was weathered with burnt umber and a slight dry brush of white.
A coat of Dull coat and I was done except for adding the antennas and the wing tip lights. Hint from Dr. Derk - mix Elmer's and your paint of choice, in this case the clear red and green, and then using a pin or toothpick apply where you need it, the wing tips and if you look inside on top of the cyclic for the gun switch.
| C o n c l u s i o n |
Overall impression of this kit is - wow!
I recommend it to anyone who has the desire to add a beautiful exotic German airplane to their collection. The overall fit is good, with the exception of the horizontal stabilizers. This is only my second resin kit and it was very nice and could easily represent someone's first resin project.
I enjoyed this kit immensely and will buy other ARBA releases in the future.
| R e f e r e n c e s |
Monogram Close-Up 20 Blohm & Voss 155 by Thomas Hitchcock
German Aircraft Landing Gear by Gunther Sengfelder
German Aircraft Interiors 1935-1945 Vol 1 by Kenneth A. Merrick
Back to HyperScale Main Page
Back to Feature Articles Index