|
Macchi
C.202
by
Randy Lutz
 |
Macchi
C.202
363a Squadriglia, 150o Gruppo, Bengazi, Libya, 1942 |

HyperScale is proudly supported by Squadron.com
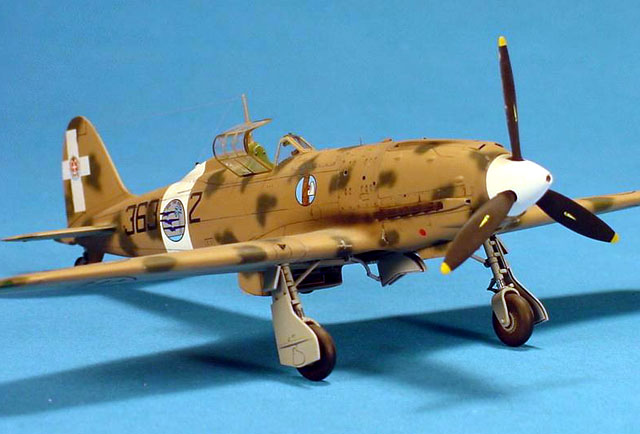
Hasegawa's 1/48 Macchi C.202 Folgore
is combined with the excellent Jaguar cockpit detail set to depict a Macchi
C.202 "Folgore" of the 363a Squadriglia, 150o Gruppo Autonomo
Caccia Terrestre, based at Bengazi, Libya in 1942.
The Macchi C.202 Folgore (Thunderbolt) is generally considered to be
the best Italian fighter of the Second World War. It was a direct descendent of
the Macchi C.200 Saetta (Arrow) and made its debut in 1940. The C.202
shared many of the same features with the C.200 such as the wings and empennage,
however the fuselage was an entirely new design. Whereas the C.200 was based
upon an open cockpit, air cooled radial engine, the new Folgore featured
a fully enclosed cockpit and an aerodynamic cowling enclosing the proven Daimler
Benz DB 601, liquid cooled in-line engine.
It is interesting that the Italian aircraft industry had relied so heavily on
radial engines in their military aircraft, despite the fact that the
aeronautical designers had realized excellent performance with in-line engines
between the two wars, and principally in the Schneider Cup series. The decision
to utilize the DB 601 engine gave the Regia Aeronautica some of the most
respected fighters of World War II, not only in the C.202, but also in the C.205
Veltro, the Fiat G.55 and the Regianne Re.2005.
Making its operational debut in Libya, the Folgore soon saw action on
all fronts in Africa, the Balkans, and the Mediterranean, along with 12 machines
being detached to Russia. From a modellers perspective, some of the most
interesting paint schemes belong to the C.202s used in Russia, as they displayed
yellow theatre markings on the nose and rear fuselage, yet still retained their
desert camouflage.
As a testimony to the longevity of the Folgore, it was still in use
after the armistice, in the units of the Co-belligerent Air Force and the Republica
Sociale Italiana, and served as a trainer in the Aeronautica Militaire
Italiana until 1948.
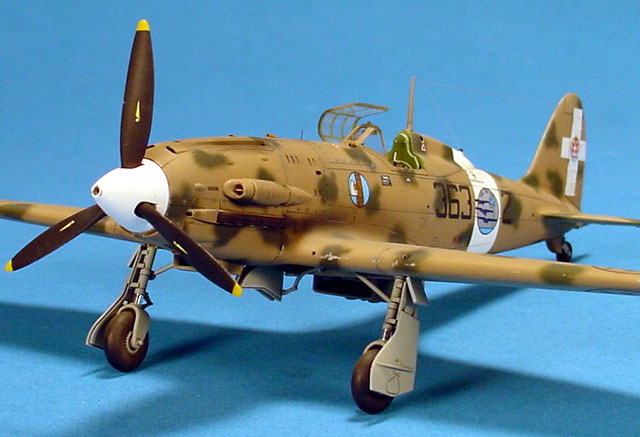
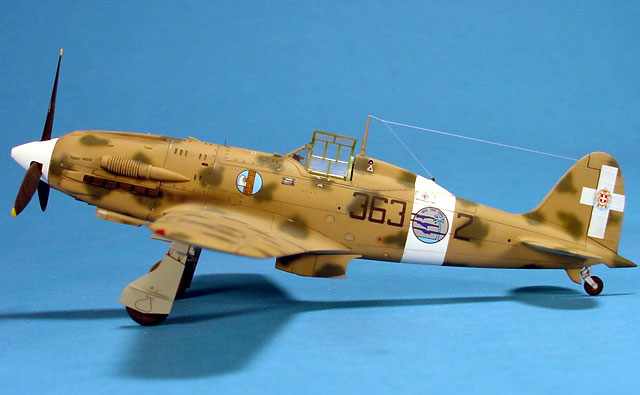
The subject of this review is a machine from the 363a "Gigi Tre
Osei" Squadriglia, 150o Gruppo Autonomo Caccia Terrestre, based at
Bengazi, Libya in 1942.
Hasegawa's
1/48 Scale Macchi C. 202 |
The subject of this article is Hasegawa's Macchi C.202. The model consists of
74 parts and 4 clear pieces. Of the 78 total parts, 7 are not for use with the
C.202, but are meant for the C.205 Veltro. The main parts are moulded in medium
grey and display fine recessed scribing. The kit features a nicely detailed
cockpit by injection-moulded standards that would be more than acceptable if
built out of the box. However, modellers being the perfectionists that we are, I
wanted to improve my model by using the Jaguar cockpit set. The Jaguar set is
cast in a tan coloured resin and the 22 parts display an incredible amount of
detail and depth. The set is not just limited to the cockpit, but also includes
replacement exhaust manifolds, and a wheel well insert that replicates the busy
plumbing found at the back of the engine.
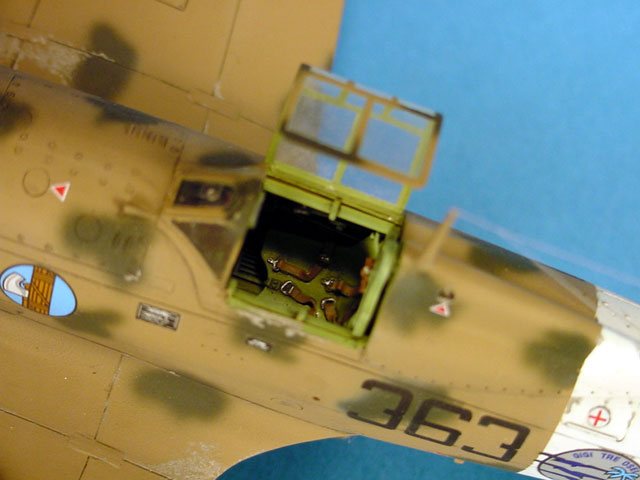
The initial steps involved cleaning up the resin pieces and modifying the kit
fuselage halves to accept the resin cockpit. One of my most enjoyable aspects of
building aircraft is the painting and detailing of cockpits, and the Jaguar set
is an absolute pleasure to paint. For the most part, the cockpits of Italian
aircraft were painted in Verde Anticorrosion (anti-corrosion green). The closest
FS equivalent is 34558, however, at the time that this model was built, this
colour is not offered by any of the major hobby paint companies. I mixed my own
interpretation of the colour using Xtracolor enamels, and airbrushed all the
interior components. When mixing this elusive shade, make more than you need and
store it in a jar, as invariably, you will need it again before the model is
finished. A dark wash was applied to the cockpit parts and when dry, my usual
dry brushing followed.
The instrument panel and some of the smaller cockpit details were painted
semi-gloss black, for which Testors Model Master Black Chrome is ideal. I have
come to use this black to such an extent that I very seldom use flat black
anymore. A little grey dry brushing and the basic cockpit components were
completed.
Jaguar supplies two seats with their detail set; one with seat belts cast in
place and one without. I used the seat with the belts as it looked as good, or
better than I could make using photo-etched hardware. The completed cockpit
assembly was installed in the fuselage halves, and it was back to the airframe
construction.
The horizontal stabilizers do not fit well. I found them to be loose, and
wobbly and care must be taken to ensure that they set up at right angles to the
vertical fin. Two parts comprise the supercharger intake. All that is missing is
the intake shutter, which I made from a small disk of styrene punched out using
a Waldron punch.
Next I moved on to
the wing assembly and my first step was to discard parts C2, C15 and C16. These
three parts are replaced with the Jaguar resin wheel well insert that does a
much better job of reproducing the busy look of the gear bay. My reference
sources indicated that the gear bays on Italian aircraft were finished in the
same colour as the underside of the airframe. For this colour, I used Xtracolor
X134, FS16307 as it generally accepted as the closest match to the Grigio Azzuro
Chiaro 1 (light blue grey 1). This same grey was airbrushed on the landing gear
struts as well as both sides of the gear covers and the underside of the flying
surfaces. A dark wash and then a very light grey dry brushing followed it.
The resin wheel well insert was first airbrushed black, then airbrushed with
a dark grey, deliberately not getting into all the small crevices. Next it was
airbrushed a lighter grey which covered less area than the previous dark grey. I
used the colour photographs in the Aero Detail to determine which hoses should
be finished in blue, red, green, yellow and natural metal. Once all the paint
was dry, the insert was given a liberal wash of black India ink, and finally
flat coated.
The unit was fastened in place and then the tops of the wings were glued to
the one-piece wing bottom.
The completed wing was next attached to the fuselage, and it was at this
point that I encountered the major fit problems with the kit. A small styrene
spacer is necessary at the trailing edge of the wing bottom and fuselage joint.
The wing can be adjusted slightly rearwards, but then a step results at the
leading edge of the wing filet. With the wing in place, I then discovered that
the scribing for the 4 wing spar inspection panels did not line up. Hasegawa has
split the panels with one half of each scribed in the wing and the corresponding
half scribed in the fuselage filet. To remedy this, I made new panels from .005
styrene and glued them over the originals. A light sanding to tone down the
edges of each panel followed this.
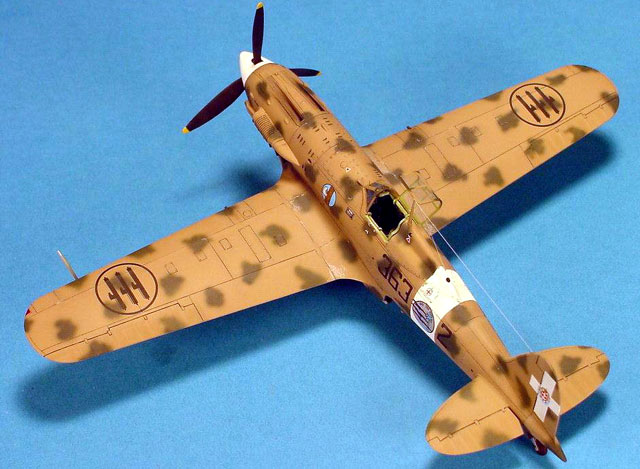
Before any airframe painting could begin, I had to determine in which scheme
the model was going to be finished. I would have preferred something a little
flashier, but, as this model was for review, I was limited to choosing between
the two schemes Hasegawa provided. One is the dark green rings over tan, or the
one shown here, dark green splotches over tan. This type of camouflage is
commonly referred to as Serir, which by definition refers to typical North
African scenery with small scrubby bushes. In either case, I first had to spray
on the white fuselage band using Testors Model Master Insignia White, FS17875.
When dry, it was masked off and the base colour of Nicciola Chiaro 4 (light
hazel-nut 4) was applied using Xtracolor X102 Tan Vietnam FS10219. This was
followed by small irregular patches of Verde Oliva Scuro 2 (dark olive green),
which was duplicated by using Xtracolor X109 Marine Corps Green FS14052. The key
with for successful patches is to keep them irregular in shape. Check your
references, and if possible refer to a photo of the subject being modelled as in
some cases the patches are more long than round. The intensity also varies from
very small and light to heavy.
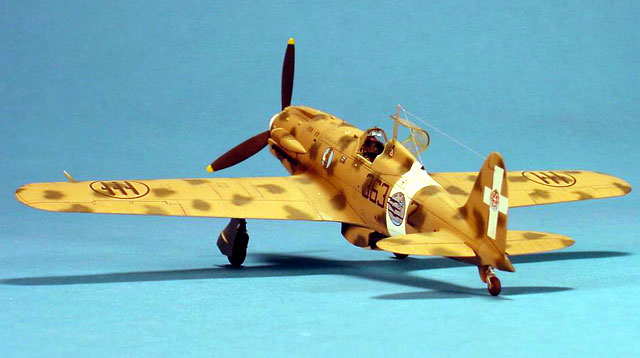
Note how the upper surface camouflage colours wrap around the underside of
the fuselage and the leading edge of the wings. While being common on Italian
aircraft, it was not applied in all cases.
Once the paint was dry, I applied the kit-supplied decals. These decals have
to rank as the biggest disappointment of the kit. They are printed by Cartograph,
and while displaying perfect registration and vibrant colours, they are terrible
in terms of adhesion. No matter how much Solvaset was applied, and no matter how
much poking and prodding they were subjected to, I could not get rid of the
silvering. Once all the decals were applied, I had to make templates and masks
to protect all the printed portions of the national insignia and squadron codes,
and go back and re-apply the camouflage over the model. The problem I
encountered may be as a result of something I did, or did not do, but in any
case, I will not use Cartograph decals again. I would like to say the decals are
unusable, but if you do not care what the finished product looks like, then I
suppose they are usable.
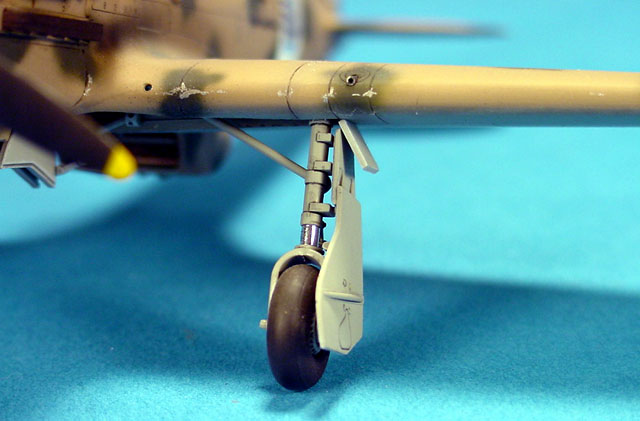
Next, the fiddly bits such as the landing gear, resin exhausts, and underwing
radiator were installed. I mixed up a wash of dark grey paint and turpentine and
applied it to all panel lines, while a black wash was used for any control
surfaces or access panels. Subtle chipping was next, using a silver
paint/Windsor and Newton Raw Umber oil paint mix thinned with turpentine. This
was painted on using a 000 brush. Once everything was dry, the model was
airbrushed with Testors Dullcoat. The undersides were dusted with dark grey
pastel along all panel lines while the topsides were treated to a lighter tan
pastel on all panel lines that run perpendicular to the direction of flight.
Panel lines that run in the direction of flight were highlighted with a dark
grey pastel.
The wing tip lights were brush painted using Humbrol gloss crimson #20, and
Brunswick green #3. The oleo, or shock portion of the undercarriage was covered
with aluminium foil, which was affixed using Micro Scale Aluminium Foil adhesive
and a stretched sprue antenna wire was the last item to be added.
Fit problems and lousy decals aside, the Hasegawa Folgore builds up into a
fine replica of one of Italy's finest fighters of the Second World War. If you
intend to add one of these fighters to your collection, this is the unanimous
choice over the Tauro or Gull Models offerings. I thought that it would be a
challenge to paint, but to the contrary, it was one of the easiest subjects I
had yet painted, and ends up being one of the most visually appealing as well.
Aero Detail 15, Macchi C.200/202/205. Dai Nippon Kaiga Company Ltd.,
Tokyo, Japan.
Ali D'Italia Aer.Macchi C.202. La Bancarella Aeronautica, Torino,
Italy.
Italian Air Force Camouflage in II World War by Nini Arena. Mucchi
Publishing, Modena Italy.
Macchi C.202 in Action. Squadron Signal Publications, Carrollton,
Texas.
Regia Aeronautica Vol. 1, A Pictorial History of the Italian Air Force
1940-1943. Squadron Signal Publications, Carrollton, Texas.
Click the thumbnails below to view
larger images:
Article, Model and Images Copyright © 1999 by Randy Lutz
Page Created 07 October, 1999
Last updated 26 July, 2007
Back to HyperScale Main Page
Back to Features Page
|
 Home
| What's New |
Features |
Gallery |
Reviews |
Reference |
Forum |
Search
Home
| What's New |
Features |
Gallery |
Reviews |
Reference |
Forum |
Search