Home
| What's New |
Features |
Gallery |
Reviews |
Reference |
Forum |
Search
Home
| What's New |
Features |
Gallery |
Reviews |
Reference |
Forum |
Search
|
|
Centaur Mk IV by Brett Green
Don't you just hate those modelling articles that casually suggest you butcher a $100 resin model to detail a $30 plastic kit? Well, that's exactly what happens in this project! I'll let you decide if my explanation for this drastic action is justified...
The Cromwell tank was designed as a replacement to the stoic Crusader and the still-born Cavalier. Both these earlier vehicles used a Rolls-Royce Liberty engine, while the new Cromwell was designed to accept the higher performing Rolls-Royce Meteor engine. Due to the unavailability of the new powerplant, the Cromwell was initially fitted with the older Liberty engine. This combination became the Centaur. Many of these underpowered vehicles were later converted to Cromwell standards with the replacement of the Liberty engine by the Meteor.
The Centaur Mk IV was equipped with a 95 mm howitzer. A small number of these vehicles earned the distinction of being the only Centaurs used during the D-Day landings. The Royal Marines Support Group operated them temporarily as fire support vehicles for the first few weeks of the campaign.
Accurate Armour's resin Cromwell/Centaur family of kits were amongst their earliest releases. Resin Cromwells were also offered by Cromwell (the company) in the early 1990s. These kits were well detailed but expensive. After years of mainstream manufacturers' disinterest in Commonwealth armour, Tamiya's Cromwell burst onto the scene in 1997. This kit is a beauty. It is well detailed and accurate, with glueable vinyl tracks, nylon string for tow cable, nylon mesh for grilles, a very nice Commander figure - even clear plastic for the spotlight lens. Surface detail is restrained, and options include a hedgerow cutter and external track tensioners. The fit of the kit is flawless.
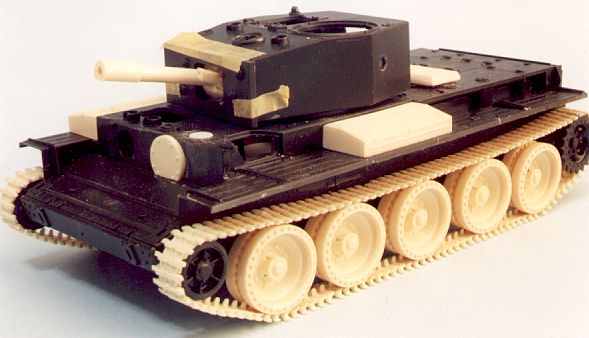
General I started this project in 1997 when the Tamiya Cromwell was first released - before they announced their Centaur Mk. IV. At the time it seemed to make sense to use parts from the now obsolete Accurate Armour kit in order to yield a subject I had long wanted to build. Within a matter of months it became clear that I should have just waited for Tamiya to release their Centaur! I originally bought Accurate Armour's Centaur IV kit at a half-price sale during 1994. Even with the 50% discount it still cost a hefty A$75. The kit did not include decals for the complex turret fire-control markings and I never could figure out an acceptable method to paint them by hand, so AA's Centaur joined the large number of models in my "build one day" pile. The release of Tamiya's Cromwell spawned a new family of accessories from Accurate Armour. Included was a Centaur IV conversion and a separate decal sheet for the D-Day markings on Royal Marines Support Group's Centaurs and Shermans. I gleefully ordered the decals and excavated my Centaur kit. Close comparison with the Tamiya Cromwell revealed a number of areas where the Accurate Armour kit was lacking. The biggest problem was the lower hull sides. The drive sprocket and idler wheel were moulded solid on the hull sides in one piece, complete with a curved section of track. This arrangement looked messy and resulted in a large amount of surplus resin at the base of the sprocket and idler. The solid upper hull had also warped at some stage. Even though fixing the warp may not have presented a problem, the solid resin hull made interior detailing impractical.
Nevertheless, there were other areas where the Accurate Armour Centaur was better than the Tamiya kit. The resin kit had a fairly comprehensive turret interior, the gun breech was very good and many details such as the hatches and cupola looked more convincing. The resin track lengths would also offer the benefit of portraying convincing "sag". The logical course of action? Kitbashing! As I wanted to build a Centaur IV I could use many of the unique features of the Accurate Armour model on the Tamiya host kit. Dry-fitting of the important components revealed that the project was feasible, so I set to work.
Lower Hull and Running Gear It seemed that the most complex part of the conversion would be adapting Accurate Armour's resin roadwheels to the Tamiya kit. The resin perforated wheels had a short pin to attach to a hole on the Accurate Armour lower hull. The Tamiya kit required a hole in the centre of each wheel to accept an axle. I decided to adapt the wheels to accept the "poly caps" that secure the plastic Tamiya wheels to the axles. The protruding pin was cut off and a small pilot hole drilled in the centre of each inside roadwheel. A hole was then drilled to accept the poly cap. However, the hole in the inside roadwheel was not deep enough to accept the full length of the poly cap. I had the choice of either shortening the axle stubs (which would result in a less sturdy grip) or drilling into the inside face of the outer roadwheels (and risk drilling through). I chose to drill deeper.
Adapting the Drive Sprocket Next step was to test fit a length of Accurate Armour's resin track against the width of the Tamiya drive sprocket. Tamiya's sprocket was approximately one millimetre too narrow to accommodate the AA track, so a circle of thin plasticard was glued between the sprocket halves as a spacer.
Tracks
Lower Hull Details Tamiya's kit hull is beautifully textured. Very little additional work is required. I simply added electrical cable for the smoke dischargers, and a few missing rivets and bolts here and there. These were created using sheet styrene and Waldron's Miniature Punch and Die set.
Turret
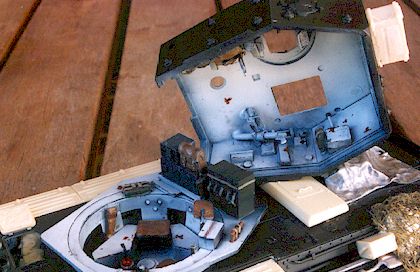
Two generous sized hatches crown the turret roof of the Centaur/Cromwell. These hatches will reward any effort to detail the interior of the turret. I was initially planning to use the Accurate Armour interior in the Tamiya turret. I had already cut the interior out of the Accurate Armour turret before I decided to start again from scratch. New false interior sidewalls were cut from thin plasticard with the aid of "the Chopper". A hole was punched in the rear of each false sidewall to represent pistol ports. A corresponding hole was drilled through the turret side to convey the thickness of the armour. Detail was added to the sidewalls before they were installed in the turret. The prominent interior bolts for the appliqué armour were produced from Waldron's Punch and Die set. A Thompson gun, a Bren gun, various stowage pouches, a bottle and a radio set were sourced from the spares' box. All other details (including episcopes, bomb thrower, seats and various boxes) were fabricated from plastic card, plastic strip, lead foil, fusewire and brass shim. There are two rectangular holes on the recessed inner edge of the turret base. These holes were filled, and the recess was corrected, by adding an appropriate diameter circle of plasticard. A floor for the turret basket was cut from plasticard with the aid of an Olfa Circle Cutter. This floor was suspended from the turret base by four lengths of brass shim. The resin 95mm howitzer breech fitted in the Tamiya mounting brackets after the hole for the starboard side had been slightly drilled out. No glue was required, allowing the gun to elevate.
Upper Hull
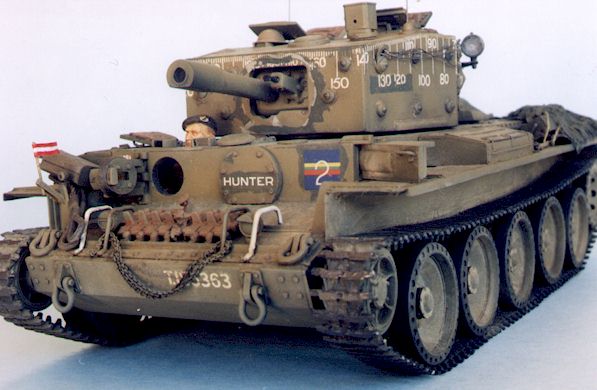
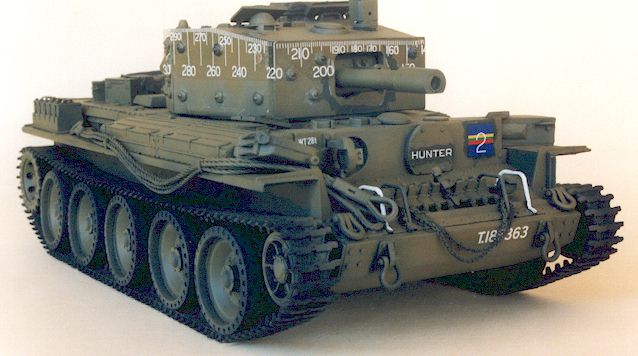
One of the more obvious differences between the Cromwell and the Centaur IV was that many of the 95mm equipped tanks used the auxiliary fighting compartment (Besa gunner) for stowage of extra ammunition. I added the blanking plate for the Besa MG from the AA kit, and punched a disc of plasticard to cover the 'scope cover at the top of the Besa gunner's compartment. I added stowage hooks for the heavy tow cables that run down the starboard side of the vehicle. I wanted to convey the impression of weight - I have seen too many tow cables floating above the surface of models! Using the nylon rope supplied in the kit, I secured the towing eyes with two-part epoxy glue. A mix of white glue and water was then prepared. The cables were paired up and carefully run through the gluey mixture. The wet cables were set aside for a few minutes then positioned on the vehicle according to my reference photographs. This method ensures that the cable pairs stay together and they maintain the drape and exact position required. I also find it easier than working with metal cables.
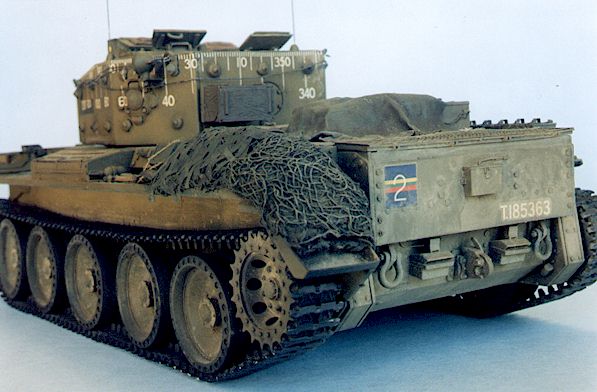
I cut a length from the unused vinyl kit track to position on the forward hull. In the photograph one link can be seen popping up, so this was represented. There is also a light chain, jerry can and a tankers helmet strewn on the forward hull, and a pennant flying from a short mast on the starboard trackguard mount. These items were sourced and scratchbuilt as necessary. The rear hull looks even busier. Although the view is not as good as the front, there is a rack on POW cans, furled nets (one standard and one with Hessian strips) and a tarpaulin on the rear deck. The petrol cans and the rack are a recent item from Ultracast. The tarp is lead foil (from a wine bottle - wine bottles are not safe in our house) covering various resin and plastic boxes.
I pre-painted the entire vehicle black, as is my usual practice. This subtly pre-shades the shadows and crevices of the vehicle after a carefully applied top colour coat. Centaurs were painted a brown shade. I used Tamiya XF-49 Khaki to represent this colour. It is certainly strikingly different to the regular green Cromwell. I sprayed this colour over the entire vehicle, taking care to avoid the tracks and the black rubber wheels. I sprayed the nets and tarpaulins different shades of green, then picked out various details by brush. Several generous coats of Rustall were applied to the tracks, and even more to the spare tracks on the forward hull. The outer headlight guards were painted white. A paper pennant in red-white-red was added to the mast on the front trackguard mount. Humbrol Metalizer "Gunmetal" was drybrushed on the treads of the tracks, followed by light highlighting with a Prismachrome silver pencil.
I purchased Accurate Armour's Centaur decals some years before starting this project, but the numbers for the fire-control markings on the turret looked far too neat. I therefore completed this impractical project by buying the Tamiya Centaur kit for its decals! Fortunately, I had another project in mind for the Centaur kit and my unused Cromwell road wheels. Tamiya's decals were a joy to use and very accurate. The fit could have been tricky due to the complexity of the markings, but they have been cleverly designed to avoid problems. Top marks to Tamiya again.
Weathering comprised a light wash of raw umber followed by a heavy dusting with pastel chalk. The pastels were further textured with a damp stiff brush to achieve a more random appearance. This effect was amplified in areas where soldiers' feet came into contact with the vehicle. A 2B Graphite Pencil was also used to subtly highlight hard edges, the tow cables and towing eyes.
Would I recommend Tamiya's Centaur or Cromwell? Absolutely. The engineering is stunning and it is one of the easiest plastic kits I have ever assembled. Would I recommend taking my hybrid path? Absolutely not! The folly of using a $100 resin kit to detail a $30 plastic model stemmed solely from the fact that I had the AA Centaur and would clearly never build it given the superior Tamiya product. This is not a criticism of Accurate Armour - I still have a fair pile of their resin that I am looking forward to building one day. It is just an acknowledgement that Tamiya's recent Centaur/Cromwell is a remarkable kit. An excellent Centaur can be built straight from Tamiya's box, although some of Accurate Armour's components were superior in terms of attention to detail. Fortunately, today's modeller can convert their Tamiya vehicle into one of many different hull types or functional variants, using Accurate Armour's conversion sets and Track Packs. We modellers indeed live in a Golden Age!
Click the
thumbnails below to view images full-sized.
Model, Images and Article Copyright
© 2000 by Brett Green Back to HyperScale Main Page Back to Features Page |


 With
the holes carefully drilled and the poly caps in place, I assembled the
lower hull. I left off parts C26 and C27. These were associated with the
external track tensioner found only on Cromwells. When the lower hull
assembly had set, the roadwheels simply pressed on to the axle stubs. I
adjusted the alignment of the roadwheels as best I could.
With
the holes carefully drilled and the poly caps in place, I assembled the
lower hull. I left off parts C26 and C27. These were associated with the
external track tensioner found only on Cromwells. When the lower hull
assembly had set, the roadwheels simply pressed on to the axle stubs. I
adjusted the alignment of the roadwheels as best I could.
 The
resin track was now installed. Four full lengths were required for each
side. Only eight lengths are supplied, so there is no margin for error!
First, three lengths were glued together in a long straight run. With this
long run positioned centrally over the top of the wheels and drive
sprocket, a hairdryer was used on high heat to soften the resin. While
still hot, the track was gently wrapped around the drive sprocket and
"tacked" into place with superglue. This process was repeated
for the idler wheel. The fourth length of track was added as the straight
bottom track run to complete the track.
The
resin track was now installed. Four full lengths were required for each
side. Only eight lengths are supplied, so there is no margin for error!
First, three lengths were glued together in a long straight run. With this
long run positioned centrally over the top of the wheels and drive
sprocket, a hairdryer was used on high heat to soften the resin. While
still hot, the track was gently wrapped around the drive sprocket and
"tacked" into place with superglue. This process was repeated
for the idler wheel. The fourth length of track was added as the straight
bottom track run to complete the track.

 Detail
on the Tamiya hull is very good but I substituted kit items with AA's resin
stowage bins, the large vent cover and white metal pioneer tools. Extra rivet
detail was added to the upper rear hull plate. The front of both track guards
were thinned out because the front mudguards were missing on the subject
vehicle, and the joining tab on the rear starboard track guard was cut off for
the same reason.
Detail
on the Tamiya hull is very good but I substituted kit items with AA's resin
stowage bins, the large vent cover and white metal pioneer tools. Extra rivet
detail was added to the upper rear hull plate. The front of both track guards
were thinned out because the front mudguards were missing on the subject
vehicle, and the joining tab on the rear starboard track guard was cut off for
the same reason. The
photographs of this particular vehicle showed a clutter of stowage from a
front-three quarter view of both sides. I was careful to faithfully recreate the
stowage per the photos.
The
photographs of this particular vehicle showed a clutter of stowage from a
front-three quarter view of both sides. I was careful to faithfully recreate the
stowage per the photos. I
wanted to experiment with a new method for the camouflage nets. As with
the chain, I wanted to convey the impression of weight and the correct
"sit". I started with a thin sheet of Milliput, and then covered
it with Verlinden netting. I rolled this combination into the approximate
size and shape required then moulded it to the rear hull, taking care to
represent the ends as realistically as possible. I repeated this process
for the second net. Next, I cut "Likeskin" medical tape into
thin strips. The self-adhesive tape was then stuck to the forward net to
represent the Hessian strips frequently seen on Commonwealth vehicles in
North Western Europe. Tie-down ropes were represented by string used for
rigging model boats.
I
wanted to experiment with a new method for the camouflage nets. As with
the chain, I wanted to convey the impression of weight and the correct
"sit". I started with a thin sheet of Milliput, and then covered
it with Verlinden netting. I rolled this combination into the approximate
size and shape required then moulded it to the rear hull, taking care to
represent the ends as realistically as possible. I repeated this process
for the second net. Next, I cut "Likeskin" medical tape into
thin strips. The self-adhesive tape was then stuck to the forward net to
represent the Hessian strips frequently seen on Commonwealth vehicles in
North Western Europe. Tie-down ropes were represented by string used for
rigging model boats.
 Before
applying the decals I had to attend to one more task. The photos show what
appears to be either peeling paint (revealing a darker colour underneath) or
some overpainting. After considerable examination of the photos I concluded that
it was a combination of both. Paint seems to have peeled away from the forward
turret surrounding the opening for the gun (probably due to heat) and elsewhere
markings, including the serial number and previous unit markings, have been
overpainted. I brush-painted dark green to represent these blemishes. A few
narrow lines of light grey were used on the heat-affected areas too.
Before
applying the decals I had to attend to one more task. The photos show what
appears to be either peeling paint (revealing a darker colour underneath) or
some overpainting. After considerable examination of the photos I concluded that
it was a combination of both. Paint seems to have peeled away from the forward
turret surrounding the opening for the gun (probably due to heat) and elsewhere
markings, including the serial number and previous unit markings, have been
overpainted. I brush-painted dark green to represent these blemishes. A few
narrow lines of light grey were used on the heat-affected areas too.