German Rocket powered aircraft and those that used RATO (rocket assisted take-off)
units used special highly volatile fuels. T-stoff was highly corrosive to any organic
material, so it could only be stored in aluminum cotainers. C-stoff could only be stored
in enameled, glass or anodically treated containers. No doubt these sensitive fuels
provided challenges in getting fuel to the aircraft. Specially designed trucks were used
for this.
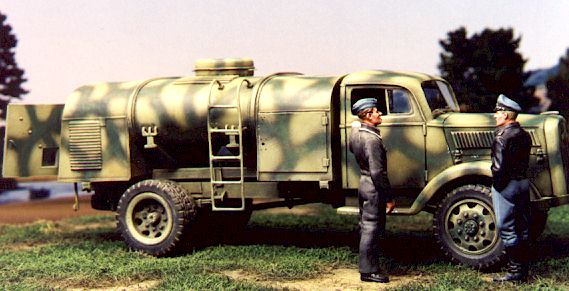
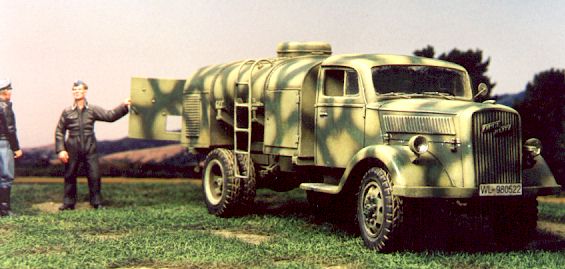
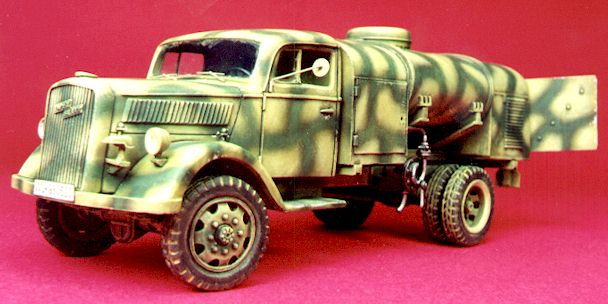
The subject of this article is the C/T-stoff truck produced by A/R Modellbau of
Hanover, Germany.
I had never heard of A/R Modellbau when I recieved this kit. They do a number of different
kits in 1/48 scale, designed for use in aircraft dioramas. The kits are produced in a
hard, completely odorless black resin. The castings are very good. Most of the small parts
are molded on "runners" with very small attachments to the parts themselves.
There are mold seams to clean up once the parts have been removed from the sprues, but A/R
have managed to avoid the extensive cleanup required by the large molding sprues used in
most resin kits. The ladder on the side of the tank is one of the trickiest bits of resin
casting I have ever seen, brilliant!
The pattern work is very good. The parts are well made with only an occasional blemish
needing trimming or filling.
The best feature of this kit is the excellent engineering. All parts fit positively
with one another.
Putting these parts together is a joy, the whole model fitting together like a well
made watch. It is kind of like assembling a Tamiya kit, except with better fit!
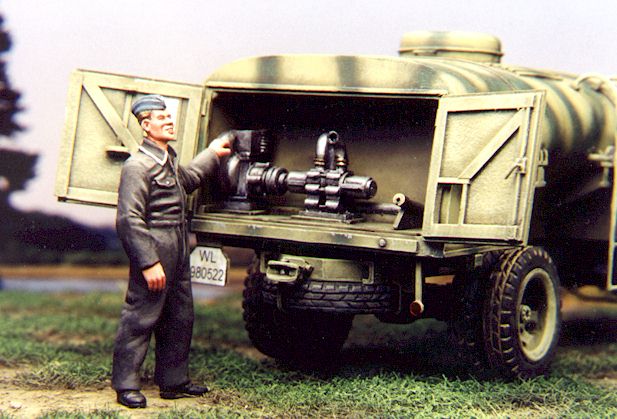
The rear compartment has separate doors that reveal a convincing fuel pump assembly. This
is important if you plan to use the model in an aircraft diorama. Chassis detailing is
very good. The chassis depicts the Opel Blitz 3 ton "A" (allrad, or all wheel
drive) chassis. The few photos I have found of these vehicles showed it mounted on a
standard "S" type, 2 wheel drive chassis. I cannot say whether or not any T/C
stoff trucks used the type "A" chassis.
For the most part, the model went together very well. I put it together in
subassemblies to ease painting. The model was not completely assembled until most of the
painting and weathering was complete.
I only encountered two problems in assembling this kit. The first is that the front
driveshaft was too short to fit between the differential and the transfer case. I cut out
the middle section and replaced it with plastic tubing cut to the correct length. A piece
of brass wire was cut slightly over length to fit inside this. The u-joints were then
drilled out to accept the wire and the whole bit glued together. It should also be noted
that the illustrations on the instructions show both front and rear differentials upside
down. They should be flipped over and glued on that way for the correct appearance.
The second problem was a little more difficult. The fuel tank assembly is broken into
three separate parts, with a separate "frame" that these parts mount onto. The
problem is that the heavy, solidly cast tank pieces suffer from more shrinkage than the
frame. When the tank parts are glued together, the frame is too long to accept them. The
frame part needed to be shortened and the chassis tweaked (bent down slightly) to get
everything together and lined up properly.
Beyond this, everything went together smoothly and effortlessly. I felt that the model
could use a little extra detailing though, so I added some bits here and there.
My kit was an early production sample. It contained wheels based on those in the old
Bandai Opel Maultier kit. These wheels were too narrow with weak hub detail. One wheel in
my kit (the spare) was of a different pattern, and much more accurate. I added bolt and
hub detail (inside and out) to this wheel and then made castings to get a complete set. I
understand that A/R now includes wheels similar to mine in all of the Opel Blitz kits.
I also made up a set of brake backing plates. These are not included in the kit and the
"see through" wheels are very apparent on the finished model. I also added
steering gear to the front end. This can be glimpsed from the outside of the model and I
think it looks "unfinished" without it. I used an Italeri 1/24 Opel Blitz kit
for help with details and found it an invaluable reference source.
The kit spare wheel hangs beyond the back of the chassis. This is not accurate and the
mount needed to be cut off and the springs trimmed a bit to fit it in the correct
(forward) position. I also added a mount and locking bar, after the wheel was glued in
place. The "Wings and Wheels" book , "Opel Blitz in Detail" was
excellent for this and other details.
The kit does not include windows, windshield wipers or a mirror. I carefully made a
template for the windshield out of sheet plastic. It was shaped by trial and error until
it fit neatly and flush. This was then used as a pattern for cutting the window out of
clear sheet plastic and glued in after everything was painted and weathered. Thin plastic
was used and effort was made to insure that the window remained flat after gluing. This is
critical to a realistic appearance.
The mirror was punched out of a silver sequin, using a Waldron punch set. The mount on the
door is made from stretched plastic tubing. This is glued in place, then the wire mirror
mount was glued into this as a final step. The windshield wipers and Opel Blitz logo on
the grille were swiped out of an FM Models Opel Blitz kit.
The model was painted with Tamiya paints. The basic paint job was followed by a wash of
Humbrol flat black. OI then drybrushed progressively lighter tones of the base colors,
yellow over yellow and green over green. Finally, the whole model was lightly drybrushed
with dirt colors.
This is a really nice kit, and I enjoyed building it immensely. Except for the glitches
mentioned, it was a very straightforward build. For those interested in this kit, A/R
Modellbau can be contacted at:
Horst Ragge
Hudeplan 42
30453 Hanover
Germany
Model, Photographs and Article Text Copyright © 1999 by Mike Good
Original Page Created 28 July 1999
Last updated 26 July 2007
Back to HyperScale Main Page
Back to Features Index
 Home
| What's New |
Features |
Gallery |
Reviews |
Reference |
Forum |
Search
Home
| What's New |
Features |
Gallery |
Reviews |
Reference |
Forum |
Search