Home
| What's New |
Features |
Gallery |
Reviews |
Reference |
Forum |
Search
Home
| What's New |
Features |
Gallery |
Reviews |
Reference |
Forum |
Search
|
|
|
Dewoitine D.520 by
Randy Lutz
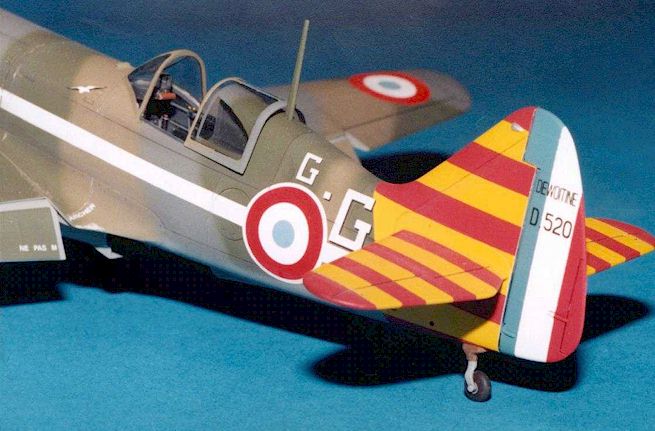
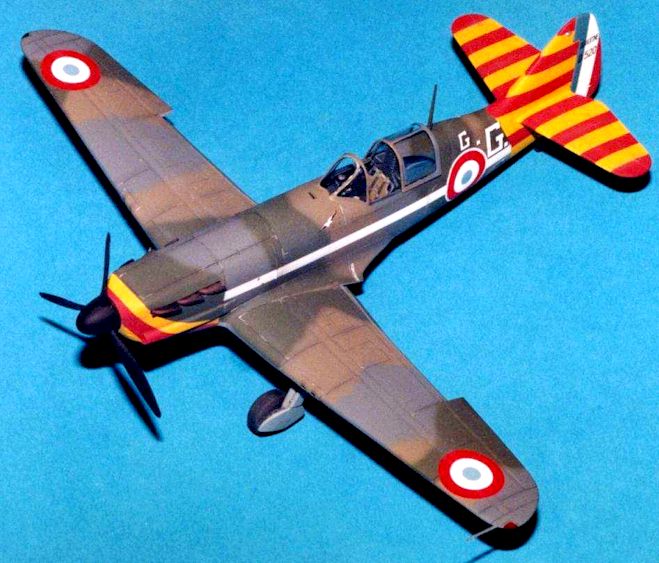
Tamiya's 1/48 Dewoitine D.520 finished as an Armée de L'Air de L'Armistice (Vichy) Dewoitine D.520 of Groupe de Chasse II/7, 1čre Escadrille, based at Sidi-Ahmed, Morocco during 1941, flown by Lieutenant Gabriel Gauthier.
Undeniably the best fighter available to the French in 1940 was the diminutive Dewoitine D.520. The concept for this fighter originated in 1936 as a private venture by Emile Dewoitine, immediately after his departure from the Société Aéronautique Française. The first prototype was airborne in October, 1938 while the last prototype took to the air during May, 1939. During those 8 months, numerous modifications were made to the rudder, radiators, canopy and landing gear. In April 1939 the first order was placed for a quantity of 200 airframes, and this was followed by a second order for an additional 510 in June. Production was exceedingly slow and by the time of the Armistice in June, 1940, the Armée de L'Air possessed only 437 operational aircraft. These aircraft accounted for 108 victories before the formation of the Armée de L'Air de L'Armistice. Dewoitines were not used solely by the French, but were also operated by the Luftwaffe, the Regia Aeronatica, the Bulgarians and the Rumanians The subject of this review is an Armée de L'Air de L'Armistice (Vichy) Dewoitine D.520 of Groupe de Chasse II/7, 1čre Escadrille, based at Sidi-Ahmed, Morocco during 1941. This aircraft was flown by Lieutenant Gabriel Gauthier, a 10 kill ace. Interestingly, Gauthier scored all 10 of his kills in an eight day period. Gauthier once said that he found it easier to sneak up on, and shoot down allied aircraft if he didn't apply the Vichy stripes to his own aircraft. No, no, no, I'm only kidding. To be truthful, I do not know what nationality his kills were, or in what theatre of operations he scored them, as information on Gauthier and his aircraft is somewhat rare.
The Dewoitine D.520 is another in the ever expanding line of superb Tamiya 1/48 aircraft. As is commonplace with Tamiya's kits, it is one of those models that if you were to throw a tube of glue into the box and then give it a good shake, the model would come out assembled. When you open the box the most astounding aspect is the pure simplicity of the kit design, the way the parts are engineered to fit, and the fine attention to detail. Two choices of spinners are provided, and the modeller has the option of displaying the model with the flaps raised or lowered, and the canopy and radiator outlet door opened or closed. The kit consists of 45 parts moulded in dark grey plastic and 5 clear pieces, along with 2 poly caps for the propeller. Flash must be a taboo word in the Tamiya plant as none was to be found on any parts. If I had to find anything negative to say about the kit it would be the choice of decals, both in terms of schemes provided and the brand of decals. Tamiya gives the modeller a choice of 3 aircraft: Pierre Le Gloan's white 6 of GC III/6; Lt. Madon's blue 2 of GC I/3, and a machine of GC II/18 finished in some form of German camouflage. At least one of those schemes could have been substituted with an aircraft displaying Vichy stripes. My other knock with the decals is the poor registration. In typical Scale Master® fashion, they are unusable. Fortunately, the modeller is able to choose from 4 different sets of decals produced by Aeromaster.
I will not go into great depth concerning the assembly of the kit, as it is typical with other Tamiya kits in this series. It was a snap! But, I will however touch on detailing aspects unique to the Dewoitine, some of which I did, and others which were outside the scope of my intention of providing an almost out-of-the-box review. First up, the cockpit should be painted a very dark blue and not the grey as suggested by Tamiya in the instructions. For this I used Xtracolor X393, Bleu de Nuit. All the basic components in the interior except the seat pad, and the instrument panel are in this colour. On the Dewoitine, the seat cushion was natural leather, so this portion was painted with Testors Model Master Leather, and the canvas seat back painted in khaki. Depending on your interpretation of khaki, it could be anywhere between tan and green. I cut out the plastic in the top two corners of the seat where the canvas seat back and seat frame meet, as there should be openings in each corner. There should also be two diagonal seat braces running from the seat back to the seat pan, much like the braces found on a P-51D seat. I did not add them as it would not be in keeping with an out-of-the-box model. My only deviation from building this model out-of-the-box was the addition of photo-etched seat belts, and this was something I debated about for a long time. In fact, the seat belts were the last item to be added to model, after all my other attempts at producing a reasonable set from paper or tape failed. In the absence of any conclusive colour information, and based on the only photograph I found of Gauthier's aircraft, in which the shoulder belts are hanging out of the cockpit, I painted mine a very dark green.
The instrument panel was first airbrushed with Testors Model Master Black Chrome. Then each individual instrument decal was punched out using a Waldron punch and applied one at a time. The gunsight provided by Tamiya resembles a clear plastic cube. To give it a more accurate appearance, the cube portion should be removed from the gunsight mount. Block sand the bottom of the cube until you are left with just the top section. It should resemble a thin, flat square with a round bulge in the centre. Using fine wire, fabricate four supports and fasten them to the gun sight mount where the original cube was located (one at each corner) and then fasten the remaining piece from the original cube onto the four uprights. Next, install a small square of clear acetate in between the uprights, sloping upwards from front to rear. This piece represents the reflector glass. On the inside of each fuselage half there are two ejector pin marks which may be visible once the cockpit is complete. Not taking any chances, they were filled with disks of thin styrene made using the Waldron punch. If you intend to build the model with the canopy closed, don't worry about the marks, as they will never be seen. Needless to say, all the interior components received my usual dose of washes and dry-brushing. It is almost mandatory with a cockpit colour as dark as the Bleu de Nuit. In step two of the instructions, it is suggested that the exhaust manifolds be installed at this time. Don't! There is absolutely no benefit to doing so at this point. If anything, it will complicate the painting steps later on. You can however, drill out the small tube at the front of the manifolds and each of the individual exhaust pipes in preparation for later installation. Once the fuselage is assembled you can install the wings, lower engine cowl and nose piece, and if done correctly, they will require no putty. In fact you can build this model without the use of putty, except to possibly blend in the rear quarter windows. If you wish to have the landing flaps dropped, I advise against installing them until after all the camouflage is painted. On the actual aircraft there is a small strip of grey paint along the leading edge of the flap in the area normally hidden when the flap is raised. On your model, this should be the same shade as the undersurface colour. In regard to the wings, there is a line of scribing missing from the top side of the left wing. It is supposed to run parallel to the scribed line immediately in front of the landing flap. Just look at the right side for comparison and remember that you saw it here first, as no other modelling publication has picked up on this oversight. Actually, I did not notice it until I had finished my model. Part B12 is the radiator fairing. It is not quite the correct shape in that is slightly too square in shape and should be more rounded. To my eyes, the difference is negligible and looks fine as is. It does however need to have the mounting flange thinned down marginally to meet the lower wing without a prominent ridge. All that is required is a few passes with a knife blade and it will be fine. Part B1 is the radiator rear shutter which can be installed opened or closed. A few minutes with a sanding stick to thin down the trailing edge will give it a more realistic look. If you desire, two small actuating rods can be added between the radiator rear shutter and the bottom of the fuselage.
Once all the basic components are attached, the clear parts can be installed. The windscreen fits with next to no problems. For the rear quarter windows, the fit is perfect. I elected to seal mine with cyanoacrylate glue and then sand the area smooth to blend the windows in to the fuselage. This step is optional, but it is the way I do my canopies. Preparatory to painting the model the canopies must be masked off. For this project I elected to try a new product called E-Z Masks. Some readers may be familiar with them, but for the uninformed, I will give you a brief rundown. To start, they are not like the True Details® Fast Frames®, in fact they are the exact opposite. These are pieces of very thin, pliable adhesive vinyl, pre-cut to shape to match the glass sections of the canopy. You first lightly wet the canopy with a mixture of water and liquid dishwashing soap. Don't skip this step as the adhesive on the E-Z Masks is quite aggressive and will be hard to position properly on a dry canopy. Then peel off a piece of vinyl and apply to the corresponding part of the canopy. Once in the proper position, just apply a little pressure to ensure the edges are down. Once all the vinyl pieces are in place you can paint you canopy as usual, and when finished, they can be carefully removed, resulting in perfect canopy frames.
Prior to outlining the colours used on my model, I think a short section dealing with French markings would be of benefit to most modellers, as it is very difficult to locate reference material covering this subject. What follows in the next few paragraphs is extracted from the excellent French publication, Le Dewoitine D.520, by Raymond Danel and Jean Cuny, Docavia Publishing, France. This section is found on page 329, Appendix 6, Camouflage and Insignia. Actually, this book should be mandatory reading for anyone wishing to build an accurate Dewoitine. "Camouflage and national markings. All D.520's produced in 1940 were camouflage painted in accordance with the official regulations then existing. The under surfaces were plain-coloured clear grey-blue whilst the upper surfaces made use of camouflage patterns in green, brown and deep grey-blue. The national markings consisted of the three-colour roundels at 4 wing and two fuselage locations, supplemented by vertical blue, white and red stripes on the rudder as was the standard practice for all French warplanes. The fuselage roundels of all D.520's delivered shortly before the armistice were shifted aft, at the request of certain pilots. Aircraft joining AC.1 Aéronavale squadrons in June 1940 were given an additional white band extending across the roundels on both sides of the fuselage. From July 1940 onwards, similar bands appeared on the D.520's operated by the Armée de L'Air de L'Armistice, with variations in the fore-and-aft extremities to allow of easier recognition of the aircraft belonging to one or other of the squadrons within a group. At Germany's request the engine cowlings and tail units of all D.520 aircraft sent to Syria were painted yellow to minimize errors of identification by German or Italian pilots during the long journey from North Africa to the Middle East. From mid-1941 onwards, the white bands were shortened on either side of the "cocards" and both the fuselage ahead of the wing and the complete tail unit overpainted with alternate red and yellow bands. Further changes in 1942 deleted the fuselage roundels and white bands and added tri-colour stripes to the wing surfaces at an angle of 30o relative to the aircraft centreline. At the same time, the camouflage of newly-produced D.520's was altered to extend the clear blue paint high on the vertical flanks of the fuselage aft of the cockpit. Following the Allied landings in North Africa the D.520's reverted to a camouflage scheme closely similar to that of 1940 except for an additional thin yellow circle around the roundels similar to that used on British aircraft. D.520's recaptured from the Germans following the liberation of metropolitan France were flown initially with the Luftwaffe camouflage schemes with the traditional French markings replacing the black crosses and swastikas. At the end of August 1944 the so-called "invasion stripes" were added on the wings and rear fuselage of the GC "Dorets" D.520's. These stripes were subsequently deleted when the aircraft were handed to GC II/18." So, with that said, it was time to paint the model. First the rudder was airbrushed using Model Master Insignia White FS17875. Then Xtracolor X103 Insignia Red FS11136 and Xtracolor X124 Blue FS15109 were applied to finish the rudder stripes. Initially, I attempted to use the rudder stripe decals from Aeromaster sheet 48-094, but these decals were originally designed for the JMGT or LTD Dewoitine, and were grossly oversize compared to the Tamiya rudder.
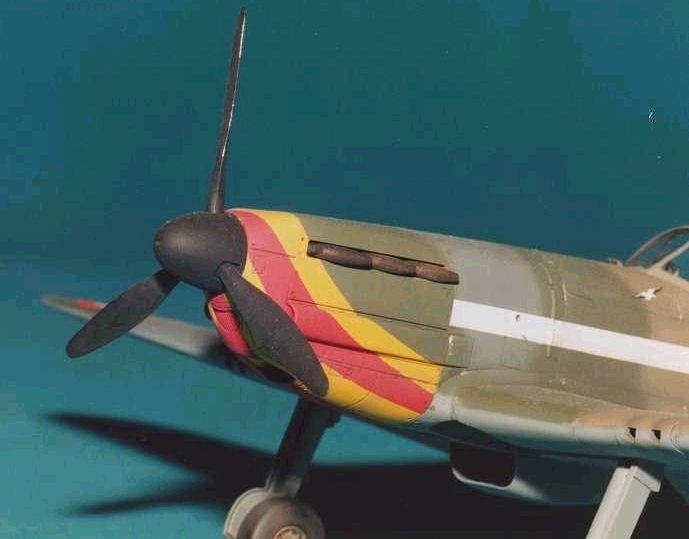
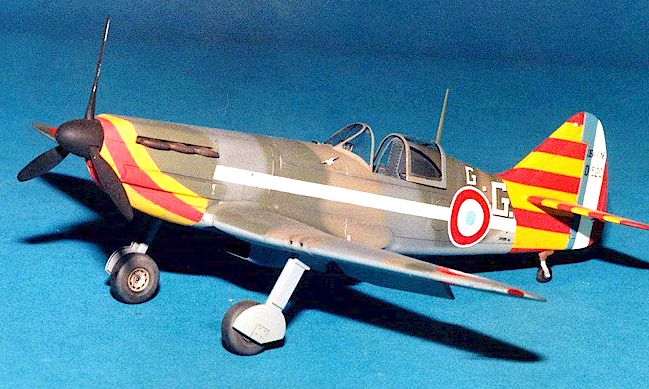
Next the nose of the aircraft was airbrushed Xtracolor X106, Insignia Yellow FS13530, while the tail was airbrushed Xtracolor X103 Insignia Red FS11136. Then the nose and tail stripes were masked off and painted with red and yellow respectively. Astute readers are probably questioning why I did not paint the tail in yellow at first. Well initially I did, but it then proved to difficult to mask off the yellow sections to allow for the red paint, and the finished product was not as good as it could have been. I found it much easier to mask over the red and then shoot the yellow, and ended up with a much neater job. So, consequently, the initial rear stripes were removed with oven cleaner and re-applied in reverse order. Next the entire nose and tail areas were masked off in preparation for the camouflage colours. First up was Xtracolor X388 WWII Gris Bleu Foncé, followed by Xtracolor X387 WWII Terre de Sienne, and finally Xtracolor X384 WWII Kaki. All of these upper surface colours are softly blended as per the actual aircraft. The under surface was finished in Xtracolor X390 WWII Gris Foncé, with a soft demarcation between the upper and lower colours. I would have to say that this was one of the most enjoyable schemes I have ever painted, and the anticipation of removing all the tape to view the finished stripes was driving me into a frenzy. One of the things I enjoy most about modelling is masking off intricate stripes and bands etc., and this model allows for that in ample measure. Next up were the decals which came from Aeromaster sheet number 48-094, Dewoitines Part 1. They were applied using small amounts of Solvaset as a setting solution and allowed to dry overnight before proceeding with the dark wash and chipping. In regard to the chipping, note how the majority of chipping is applied to the right side, as that is the side the pilot enters and exits from. Also note that no chipping is applied to the Vichy stripes as they were a recent addition to an otherwise worn paint scheme. A couple of light coats of Testors Dullcoat, and the model was ready for some chalk pastel weathering. The majority of the panel lines were dusted with a light to medium grey, while the engine cowl panels were given a black grey treatment. This completed model has to rank as one of the most photogenic models in my collection, as well as being one of the easiest to assemble. Having recently made the switch from 1/32 aircraft to 1/48, I am finding the hobby much more enjoyable. I am able to turn out nicer models, in less time with less effort, and the word "fun" is now back in my modelling vocabulary. For this I thank Mr. Tamiya for his choice of subjects and the refined engineering his kits display. For the past few years I have heard numerous 1/48 modellers complaining about the new releases, and how this is not right, or that piece has the wrong shape. Well, if this is the quality of kit they are complaining about, then their complaints are unfounded and they really are crying with their bellies full! Try building an old 1/32 kit, and you will have a much greater appreciation for what you have in 1/48.
Le Dewoitine D.520. By Raymond Danel and Jean Cuny, Docavia Publishing, France. Replic No. 62, October 1996. Published by Éditions D.T.U. Sarl, Clichy, France. Armée de L'Air, A Pictorial History of the French Air Force 1937-1945. Squadron Signal Publications, Carrollton, Texas. MSAP Camouflage Colour Chart CC-005. Ministry of Small Aircraft Production (MSAP), a Division of T-Stoff Limited, Box 94, Station "A", Hull, Quebec, J8Y 6M7 Jean Gratton, a local modeller and student of French camouflage colours.
Article, Model and Images Copyright © 1999 by Randy Lutz
|