Home
| What's New |
Features |
Gallery |
Reviews |
Reference |
Forum |
Search
Home
| What's New |
Features |
Gallery |
Reviews |
Reference |
Forum |
Search
|
|
|
Arado Ar 555-1 by Ingemar Caisander
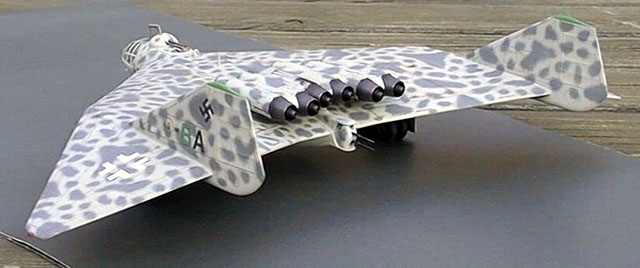
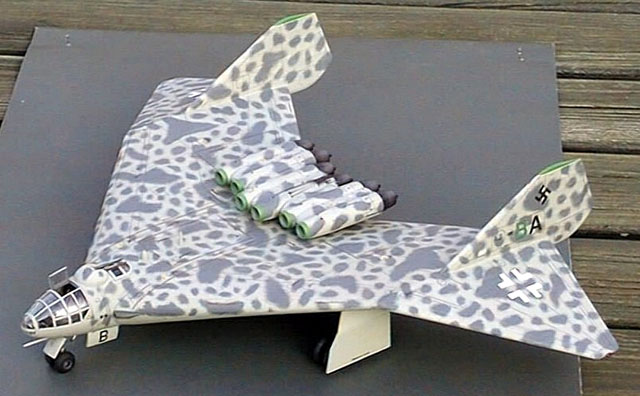
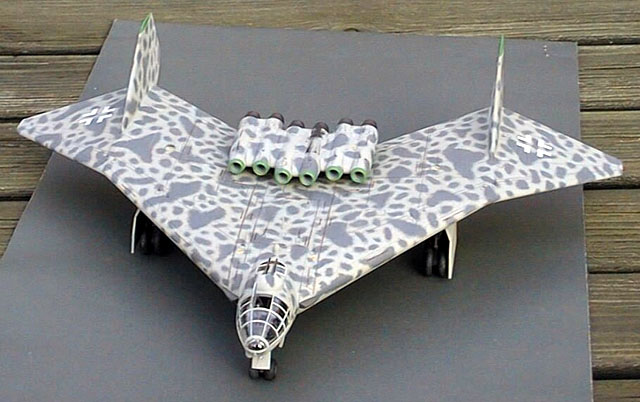
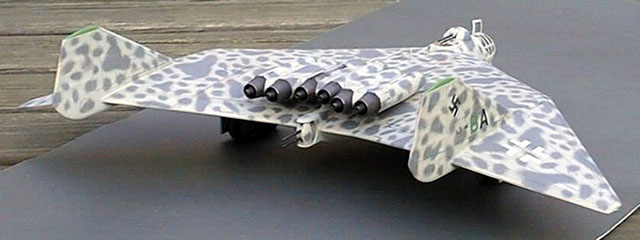
The Arado Ar E.555 project commenced in late 1943 as an all-wing design to meet the RLM requirement of a high speed jet bomber capable of carrying a bomb load of at least 4000 kg and with a range of 5000 km. The "flying wing" design with a laminar high speed profile was considered the most suitable to meet these demands and in the end a total of 15 different design studies were evaluated. The main differences between the designs lay in the propulsion layout; the first variants featured large numbers of BMW 003 or Heinkel S 011 turbojet engines clustered together, while most of the later designs were equipped with three powerful BMW 018 turbojets mounted either separately or together in different configurations.
The Arado E.555-1 was to be constructed almost entirely of steel and Duralumin. Basically it was a flying wing with a short, circular cross section forward fuselage with the crew of three housed in a pressurized cockpit and rear-facing weapon's station. The spacious internal belly bomb bay was capable of holding a bomb load of up to 4000 kg. The bomb bay doors, as well as the landing gear, were hydraulically operated. Defensive armament included two fixed 30-mm MK103 autocannons in the wing roots either side of the cockpit and two rearward firing 20-mm MG 151/20 autocannons in a remote controlled twin turret located just aft of the cockpit. A further MG 151/20 twin turret was located at the rear end of the fuselage, this turret was remote controlled via a periscope in the weapon station behind the cockpit. Power was to be provided by six BMW 003A axial turbojet engines clustered together in three twin pods in a sort of "power package" located above the rear upper surface of the wing. At sea level these engines each produced a static thrust of 800 kg at 9500 rpm. Although this was a bit less than the 900 kg thrust of the more common Jumo 004 (used on the Ar234 and Me262), the BMW 003A was about 150 kg lighter than the Jumo and hence offered a higher thrust-to-weight ratio. Unfortunately the reliability of these engines left much to be desired and this was one reason for the large number of engines fitted. In fact, the engines were probably the weakest "link" of this advanced design; during a too quick throttle change the turbojets could easily suffer a so-called "flame-out". If this happened the engine would stall and if the pilot didn't shut off fuel immediately the stalled engine would flood and thus become an extreme fire hazard. With all six engines running at full speed a top speed of 860 kph was estimated. Economical cruising speed would have been 715 kph, giving a range of 3200 km on internal fuel only. With auxiliary fuel tanks mounted in the bomb bay the range could be extended to 4800 km. Despite the promising design all work on this advanced project was abrubtly halted on December 28, 1944, following a direct order from the EHK (Entwicklungs-HauptKomission).
This Revell kit is one in a line of the so called "Luft '46" or "could have been" kits released a few years ago, depicting different advanced late-war German aircraft designs. Many of these projects were never realized, not even in prototype form, but quite a few nevertheless had great influence on later post-war designs (like the Russian MiG-15 jet fighter for instance). The kit is very nice, featuring recessed panel lines (quite impressive in 1/72nd scale), convincing detailing and a marvellous fit of parts. The latter is not quite up to Tamiya's standards but it sure comes pretty close. The clear parts are mayhaps a bit on the thick side but this is more of a nit pick than a major fault of the kit. The cockpit has a separate positionable upper entry hatch. Decals are provided for two (fictional) aircraft (of I./KG100 and Stab./KG200) and like most modern Revell decals they are very thin but still with a high colour density. A whole page of the instruction leaflet is dedicated to the stencilling alone; this is to say there are a lot of "Nicht betreten" decals! Since the kit is manufactured in Germany no swastikas are included. These will have to be borrowed from another kit or perhaps an aftermarket decal set.
Assembly typically begins with the cockpit. For a model of this small scale it is incredible well detailed. All seats have molded-on harnesses and the weapon operator's station is literally packed with various instruments.
The entire nose section is fully glazed and somewhat resembles the B-29 "Superfortress". Construction of the cockpit itself is very simple and straight-forward, the small horizontal "rib" just above the front seats has to be cut down (in order not to interfere with the seats themselves) but other than this the cockpit goes together very nicely. Don't forget to add the nose gear at this point: it will be locked in place by the cockpit floor and it might prove a bit difficult to have it added later.
The periscope for remote controlling the twin tail turret can, according to instructions, be mounted in the stowed position, i.e. retracted. I seriously doubt this would have been the case on the real aircraft, especially considering the pressurization of the crew compartment and hence the potential problem with sealing the periscope opening. To prevent the model from being a tail-sitter the instructions call out for 16 grams of ballast in either wing leading edge. I had read in an earlier review of the kit that this wasn't enough so I simply added four times that, just to be on the safe side. (with the model completed I would guess half this ballast really would have been enough, though. Add about 50-60 grams and all should be ok) The entire aircraft really basically consist of one upper and one lower wing part. The design of these halves is rather complex and I feared that cementing them together could be somewhat of a pain. It wasn't! Fit is very good and by cementing the wings together bit by bit, holding the completed joints together by masking tape, the whole process was completed quickly and easily. No putty was needed, just a little sanding here and there. Spent shell ejection chutes for both the two coaxial MK103s and the front turret mounted MG151/20s are present on the underside of the aircraft, the former of which was filled in with putty and sanded smooth. I believe the 30-mm MK103 autocannons most likely would have been removed had the aircraft entered series production. I can see no tactical justification for these fixed guns since the upper MG151 turret (either electrically or hydraulically operated) would have been quite capable of providing defensive forward firepower, perhaps even through a secondary gun sight at the bombardier's position.
The MK103s were also rather heavy beasts, each cannon weighing more than 140 kg (not including ammunition) and eliminating these guns would either have made possible a corresponding increase in the amount of fuel carried or, maybe more important, enabled some sort of radar system to be fitted. I believe the latter would have been the most likely option had the aircraft entered production; the Ar 555 was intended to be used as an "Atlantik Bomber" operating mainly over open sea and (probably) in bad weather and / or at night, making a radar system critical in order to be able to navigate and avoid enemy fighters. Besides, the Ar 555 was designed from the outset as a medium to high altitude bomber, not a low-level attack plane, and thus forward offensive firepower was probably not so important. Therefore I filled in the two ejection chutes on the underside and replaced the protruding cannon barrels either side of the cockpit with small blisters, imitating dielectric fairings over the (fictional) radar antennas. Moving on, the "engine package" was completed according to instructions. The BMW turbojets are very nicely detailed with even the frontmost disc of compressor blades replicated (despite being almost hidden half-way down the engine "tube"). The exhaust nozzles are supplied as separate pieces, I left them off for now. The belly bomb bay is also nicely detailed with the bay doors optionally opened or closed. A typical load of three 500kg SC500 and two 1000kg SC1000 (these are huge!) bombs are supplied with the kit. On my model I choosed to have the bomb bay doors closed, though. The landing gear was also completed without any problems. The gear doors themselves are supplied as two single pieces (closed) and if you want the landing gear in the down position you have to cut apart and bend the doors following the instructions. This worked fine, though, the result being an easy-to-build but complex looking undercarriage. Finally the tailfins were added, fit here is quite tight and they almost "snap" in place. All minor subassemblies such as the two twin 20-mm gun turrets, wheels and various sensors and antennas were completed but left off in order to simplify painting. The wheels were as usual sanded flat on the bottom to simulate the weight of the aircraft.
Since this type of aircraft never entered service there is no "real truth" as to how it was camouflaged nor what markings were applied, so I decided to use a slightly modified variant of the scheme suggested by Revell in their instructions. The camouflage scheme basically is a variation of the standard late-war night fighter scheme of Grauviolett 75 "mottling" over Lichtblau 76, with some of the dark grey "dots" being larger than others.
I began by painting the entire aircraft in light Lichtblau 76 (using Humbrol 121 and 175 mixed about 50/50), followed by an upper surface mottle of Grauviolett 75 (Humbrol 125). The mottling was applied with an almost dry brush in order to give the appearance of the paint being sprayed on. The wheel wells, hubs and radar blisters were finished in RLM 02 (Humbrol 111) while the cockpit and inside framework of the clear pieces (cockpit and weapon control station) were painted RLM 66 Schwarzgrau (Humbrol 32), followed by a medium grey drybrush. As my intention was to complete the model as an aircraft belonging to the Geschwaderstab I also painted the frontmost part of the engines and the tip of the vertical fins green (Humbrol 2).
After applying a layer of gloss varnish it was time for the decals. These are quite thin and easy to work with but surrounded by a lot of carrying film which has to be cut away. Be patient when applying the decals… as I mentioned earlier there are a lot of "Nicht Betreten" ("No step") markings and such so it takes some time to get them all in place. No swastikas are included in the kit (naturally, since it is manufactured in Germany) so I "borrowed" and modified a couple of Balkenkreuzes from an old Revell Ta-152H kit. With a little cutting and fiddling I got them in place and I think they look about the right size. Another clear coat to seal the decals and weathering was next. I wanted the aircraft to look relatively new and unused, mayhaps just having completed a couple of missions. All panel lines were "filled in" with an ordinary pencil (the metallic sheen of the graphite will darken and thereby nicely accentuate the panel lines when the final layer of flat varnish is applied). The areas behind some of the fuel filler caps were given subtle streaks of black to imitate slight discoloration from fuel spills; the same treatment was given to the areas behind the shell ejection chutes (20-mm) on the underside. All engine exhaust nozzles were painted in various shades of dark brown, grey and black and then heavily brushed with graphite to make them look like unpainted (and burned) metal. The gun barrels were also painted flat black and brushed with graphite. One of the engines got black sooty streaks, traces of a serious malfunction or mayhaps even an engine flame-out / fire. Finally the entire model was slightly drybrushed using light grey to blend everything in and accentuate some raised areas and details. A few tiny streaks of silver to simulate chipped paint were also added, especially on high-wear areas.
This model was a true joy to build; a nice replication of a very interesting and unusual subject. Construction is simple and straight-forward and the fit of parts close to excellent. I am also quite pleased with how the camouflage scheme turned out, especially considering it is brush painted. I think it (in combination with the unusual shape of the aircraft) makes the model look almost "organic" or at least more like some sort of exotic futuristic spaceship rather than a WW2 aircraft! Hats off to Revell for releasing great kits like this one!
Model, Description and Images Copyright ©
2000 by Ingemar Caisander
|
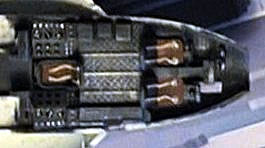 One
peculiar thing is something that appear to be throttle levers are positioned
three on either side of the rear facing weapon operator's station, there are
also clusters of six large instruments either side, the number indicating some
association to the engines. I have been unable to find any references addressing
this so it may be correct; the "real" cockpit is somewhat cramped and
the reason for having the mentioned regulators and instruments at the rear
station could be that there simply wasn't enough room up front with the pilot
and bombardier.
One
peculiar thing is something that appear to be throttle levers are positioned
three on either side of the rear facing weapon operator's station, there are
also clusters of six large instruments either side, the number indicating some
association to the engines. I have been unable to find any references addressing
this so it may be correct; the "real" cockpit is somewhat cramped and
the reason for having the mentioned regulators and instruments at the rear
station could be that there simply wasn't enough room up front with the pilot
and bombardier.