Home
| What's New |
Features |
Gallery |
Reviews |
Reference |
Forum |
Search
Home
| What's New |
Features |
Gallery |
Reviews |
Reference |
Forum |
Search
|
|
Republic
F-105D by David W. Aungst
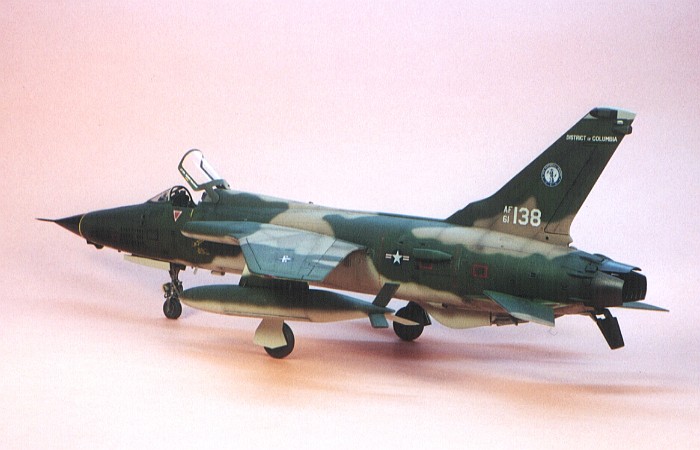
With all the fuss about Revell/Monogram finally re-releasing their F-105D, you would think that you would see more of them getting built. The hype over wanting this kit was so great that I heard stories of an original release kit going for $80 at the 1999 IPMS National Convention in Florida. The poor sap that bought that kit had to eat quite a loss when Revell/Monogram put up the banner proclaiming the kit was to be re-issued later in the year for a mere $15. On sale, you can even find it for just over $10 (which is what I paid for the extra kit I purchased for this project). Just as Revell/Monogram was re-issuing this kit, I got an e-mail from a guy living outside Washington DC asking if I would be interested in building an F-105D model for him to present to a friend that had just retired, kind-of as a retirement gift. This guy's friend had flown the THUD for the DC ANG during the early to mid 1970s. He wanted to present to his friend a nicely built display model to replace the desktop model that was destroyed by a falling picture when the friend was moving out of his office. With the availability of the new Revell/Monogram re-issued kit, I would not have to commit one of my personal kits, so I agreed to take on the project.
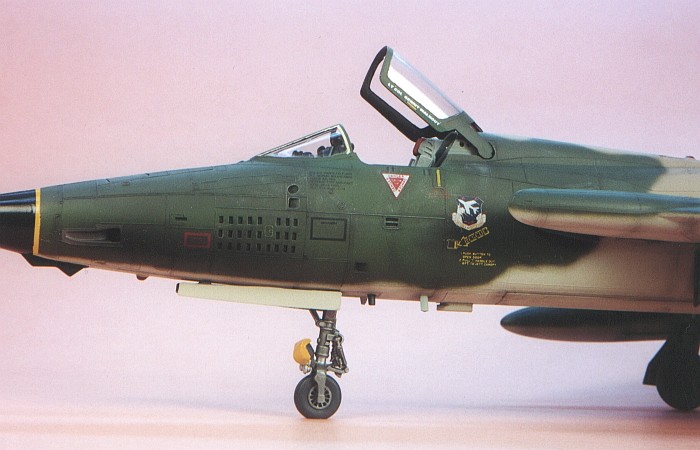
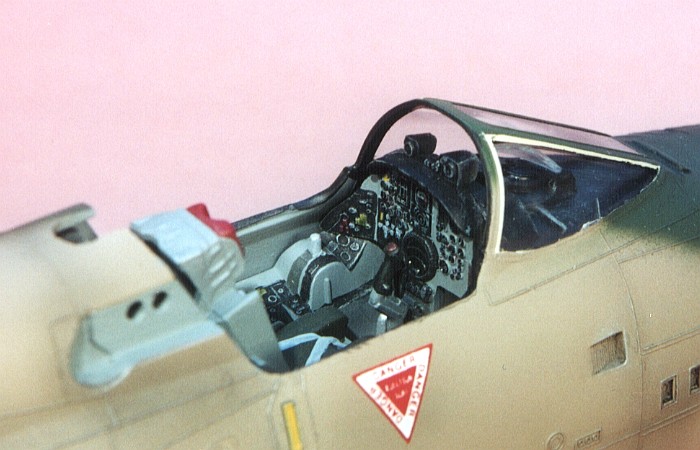
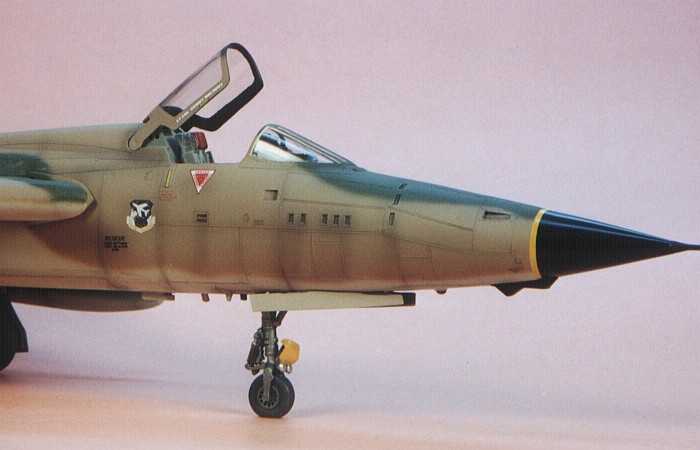
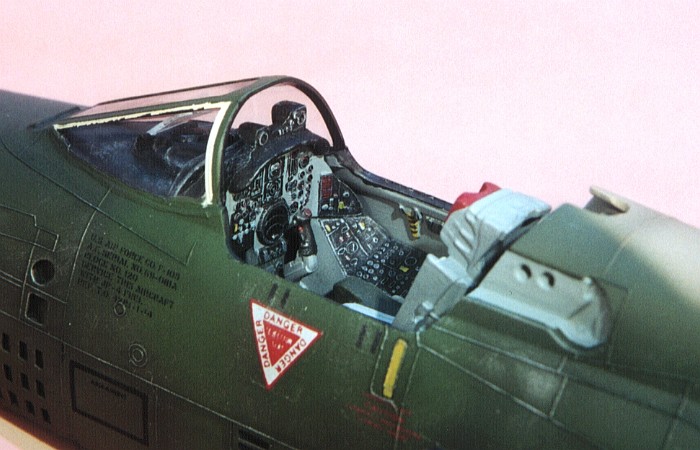
The Revell/Monogram F-105D is not a fall together kit like some of the latest Hasegawa or Tamiya releases, but is it still a very good kit. With a little care during construction, very little filling of the seams is required to make a good looking model. I actually did no filling of seams to build this model, just a touch with an X-acto file and a little sanding to dress up the places were seams occur. The kit has raised scribing that is a little overstated, but it is not too bad. The cockpit is nicely appointed with raised detailing and an adequate representation of the ejection seat.
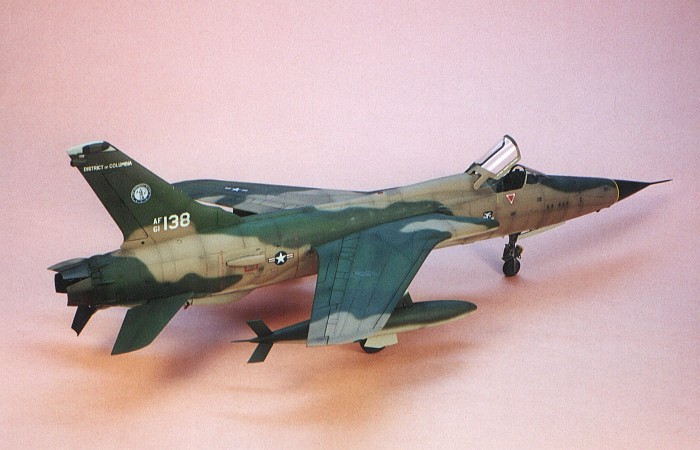
The engine exhaust is particularly nice with separate exhaust pedals, and the lower pedal is provide in the standard drooped position as it would be seen on any flight line. The landing gear and wheel wells are well molded with lots of raised detailing. The kit provides a full war load of bombs with six 750lb Mk 117 bombs on a centerline Multiple Ejector Rack (MER) and two 500lb Mk 82 low-drag bombs for the outboard pylons. Fuse extenders are present on some of the bombs. The external stores are completed by a pair of external fuel tanks. For this project, though, the customer wanted a model that was representative of what the DC ANG machines looked like, not just an aesthetically pleasing THUD in DC ANG markings. As I found almost no pictures of armed DC ANG F-105s, I elected (and was approved by the customer) to build the model without bombs. Construction of the model progressed quite fast. It took only one month to complete the project. That is really quick for me, where my average project takes about two to three months to complete. I fought the temptation to do any extra detailing to the model. After all, it was a paid job, and the guy was not looking to go bankrupt to afford it. The model would easily qualify under the IPMS rules for an out-of-the-box construction. The only changes I made to the kit were to change the decals, to fill in the holes in the lower wing where the outboard weapons pylons get mounted, and to "de-weasel" the airframe. Let me clarify that last point. The original F-105 produced by Monogram was a two seated F-105G Wild Weasel Thunderchief. The F-105G kit is very accurate and includes all the proper antennas for the Wild Weasel THUD. The F-105D kit is based on that original F-105G kit. As such, there are a few antennas present on the model that need to be removed as they were never present on the F-105D. The antennas in question are: four small triangular antennas spaced around the nose the large bulged antennas on the wing tips where the navigation lights are found the projecting stubs coming out of the front of the wing tips I removed all of these with about ten minutes worth of filing and sanding. The toughest ones were the wing tip bulges as I needed to preserve the navigation lights while still removing the antenna fairings.
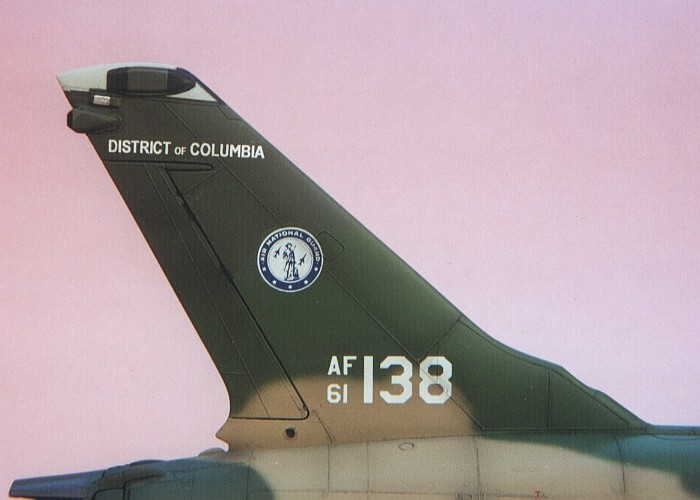
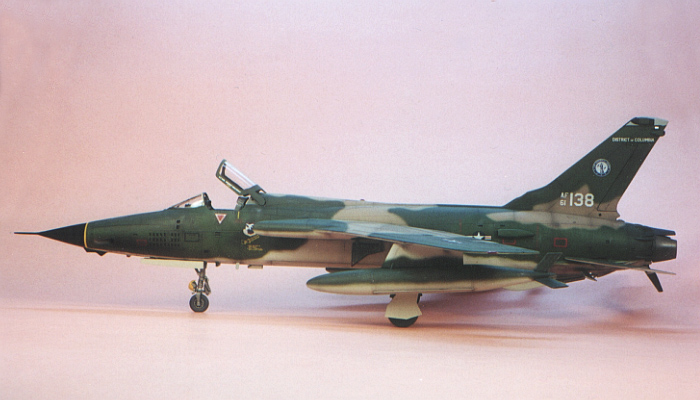
For the camouflage, all DC ANG F-105s were finished in the standard S.E.Asian scheme. This is Tan (F.S.30219), Dark Green (F.S.34079), and Medium Green (F.S.34102) on the sides and upper surfaces with Camouflage Gray (F.S.36622) on the lower surfaces. I used all Testors Model Master enamel paints. The decals were the really interesting part of this project for me. No manufacturer makes markings for the DC ANG, hence I was left with a problem to come up with the needed markings. This is where my new ALPS printer comes into play. I just purchased an ALPS MD-5000. The main reason for the purchase was to make custom decals. This project was a great test run of the printer's capabilities as the markings are rather simple and require no huge effort to create. The printer did not disappoint me.
With the camouflage and decals completed, I applied a final gloss coat to seal the decals and started weathering. I did most of the weathering using very thin black enamel paint. I applied this as a wash prior to doing the flat coat. Then I applied it as air brush shading after the flat coat. A final pass of silver dry brushing completed the weathering. After the weathering was completed, I attached the landing gear, wheel well doors, canopy, and nose pitot and declared the project complete.
This is a great kit for anyone looking for pure modeling satisfaction on a subject that is not pre-Vietnam era. I very much enjoyed building this kit and look forward to doing another one for myself in the near future. For the more adventuresome modelers looking for even better detailing, recent releases from Kendall (resin cockpit), Paragon Designs (wing flaps), and Teknics (brass landing gear) allow for plenty of extra detailing to be done to the kit. Pick up one of these kits and dig in!
Click the thumbnails below to
view images full-sized.
Models, Description and Images Copyright ©
2000 by David Aungst
| |||||||||||||||||||||||||
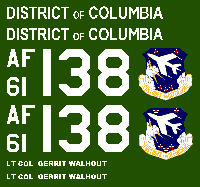 I spent about one and one half hours cleaning up artwork on my PC that I
originally scanned from some pictures of DC ANG F-105s. Then, I printed the
artwork on clear decal film and used the custom printed decals just like any
other decals you might buy. I used Solv-a-set as a decal setting solution. The
results were wonderful, as you can see for yourself in the pictures of the
completed model. To the right is an image of the artwork that I used to create
the decals. For space reasons, the artwork is one quarter the size of the image
I actually used for creating the decals. Also, to make the white markings show
up here, I recolored the background to green in this image. The ability to print
white is a BIG selling feature of the ALPS printer. The rest of the model's
decals are scraps taken from various SuperScale decal sheets for the THUD.
I spent about one and one half hours cleaning up artwork on my PC that I
originally scanned from some pictures of DC ANG F-105s. Then, I printed the
artwork on clear decal film and used the custom printed decals just like any
other decals you might buy. I used Solv-a-set as a decal setting solution. The
results were wonderful, as you can see for yourself in the pictures of the
completed model. To the right is an image of the artwork that I used to create
the decals. For space reasons, the artwork is one quarter the size of the image
I actually used for creating the decals. Also, to make the white markings show
up here, I recolored the background to green in this image. The ability to print
white is a BIG selling feature of the ALPS printer. The rest of the model's
decals are scraps taken from various SuperScale decal sheets for the THUD.