![]()
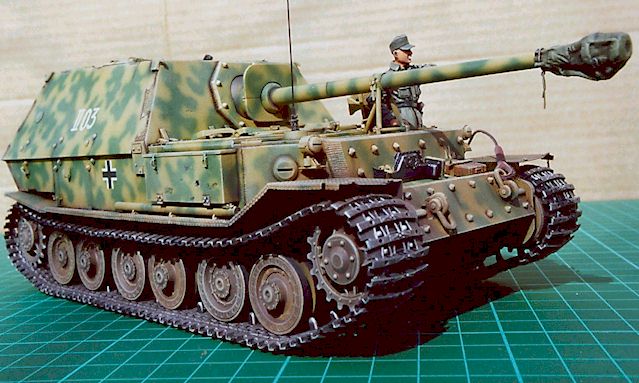
Ferdinand
Backdating the Italeri Elefant to a Ferdinand
by
Chris Leeman
photos by Barry Crook
|
Ferdinand |
| I n t r o d u c t i o n |
The Ferdinand/Elefant originally started its life as Professor Ferdinand Porsches' VK.45.01(P) design for the Tiger I tank. It incorporated many innovative ideas like two air-cooled V-10 engines that drove generators that provided power for the electric motors. These, in turn, drove the tank and drive sprockets at the rear of the vehicle - not the front like most German tanks. But the tank was considered to complicate and the contact for the Tiger went to Henschel. Porsche was so confidant that he would get that contact that he went ahead and built approximately 90 of these vehicles. When he didn't get the contact he was left with these chassis. It was decided to mount the formidable Pak 43/2 L/71 88mm gun in a rigid superstructure and turn them into tank destroyers.
91 tank destroyers were completed by the end of May 1943 and rushed into combat for the Kursk offensive by order of Hitler. They had great firepower but their breakdown-prone drive system and a lack of close in defences made them easy targets for the Russians. Many vehicles were lost and the remainders were returned to the factory for the inclusion of a commander's cupola and bow machine gun among quite a few modifications that were made. The remaining units were then used in Italy in late 1943/44 and on the Eastern Front.
Superficially the Ferdinand and the Elefant appear similar but there was a considerable host of differences between the two and I will out line these in the next few pages.
| Converting the Kit |
 The
Italeri kit (No 221) represents a late version with all the modifications
mentioned above. Considering this kit was made twenty odd years ago it holds up
pretty well against today's standards. I had originally decided to build the kit as
an Elefant but when I bought the Armada book on the Elefant ($10.00 from NKR
Models) I changed my mind. It had a very nice color profile drawing of a
Ferdinand from Kursk and I really wanted to do the kit in those colors. When I
started looking I realised that there was quite a bit of work involved in
backdating the kit. I know that some companies have released conversion kits to
do this but I thought that the work should not be too hard to do with the basic modeling
materials i.e. plastic-card.
The
Italeri kit (No 221) represents a late version with all the modifications
mentioned above. Considering this kit was made twenty odd years ago it holds up
pretty well against today's standards. I had originally decided to build the kit as
an Elefant but when I bought the Armada book on the Elefant ($10.00 from NKR
Models) I changed my mind. It had a very nice color profile drawing of a
Ferdinand from Kursk and I really wanted to do the kit in those colors. When I
started looking I realised that there was quite a bit of work involved in
backdating the kit. I know that some companies have released conversion kits to
do this but I thought that the work should not be too hard to do with the basic modeling
materials i.e. plastic-card.
I had already purchased the Aber set for the Elefant (35 020) and also the Aber fender set (35 A17) as well. I was able to use a fair bit from the detail set but I have since found out that Aber also do a set for the Ferdinand. If you were considering doing this project I would recommend you get the Ferdinand set instead. My main references for this project consisted of the Armada book (No 12) which has some good pictures and line drawings and the Darlington Publications book on the Elefant (Museum Ordnance special No 4) which has some useful detail shots. So armed with these and a couple of other reference I set about the task.
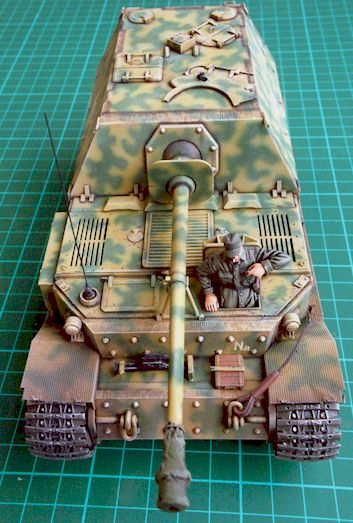
The first thing I did was to grind off the commanders' cupola on top of the fighting compartment. I did this with a motor tool and a grinding disk. You have to be careful not to damage any of the surrounding detail. While I was at it I also removed about 1cm from the curved sliding plate on top of the roof were the gun site sticks out from. Once I had ground everything off I filled and sanded it all smooth. The sliding plate doesn't have a splashguard so I fashioned a new one from 5 thou card and .10X.030 evergreen plastic strip. The new commanders' hatches were built from 40 thou plastic card, with plastic strip and rod added for the hinges. The grab handle was made from brass wire. There is a joining seam that runs between the two halves of the hatches, which I added, from lead foil. There are some very good 1/35 plans in the Armada book, which will give you a good idea of measurements for the hatches.
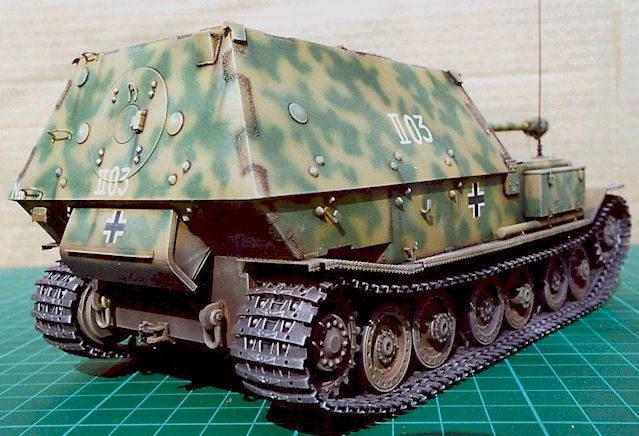
The next step was modifying the engine deck. The Italeri deck has all the necessary details for a late version. The early version is quite different from it and required a fair bit of work. I was lucky enough to have a spare engine deck from a previous project, which proved invaluable. It certainly made my job a lot easier. I firstly cut out the two outside grills from one of the engine decks with a knife. I then sanded off all the raised detail from around the openings. I then cut out the grills from the second engine deck, leaving about 1mm around the edge. I then filed the opening in the first deck until the second set of grills would fit in. I then filled and sanded around the edges until it was all nice and flush with no seam lines. There is a series of recessed boltholes around the edge of the deck, which I added with a 1mm-drill bit.
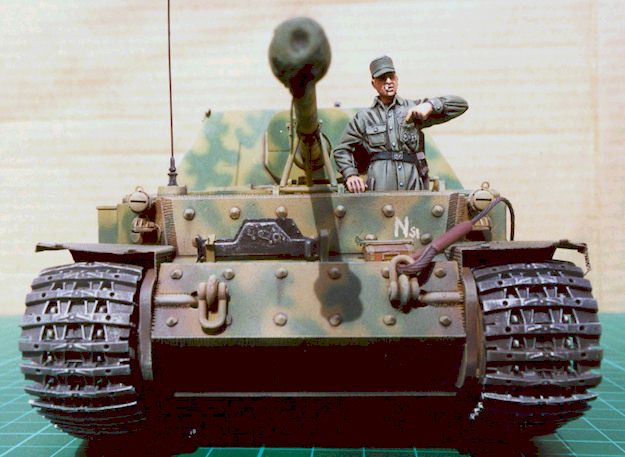
The next thing was making the new front bow plate. The difference between the early version and the late versions is the early lacks the bow machine gun. I fashioned a new front plate from three pieces of 40mm plastic-card sandwiched together and then sanded and filed to shape using the kit part (No 41) as a guide. I cut the bolts off the kit bow plate and re-glued them onto the new part. The oxy torch cut marks where done with the pyrogravure.
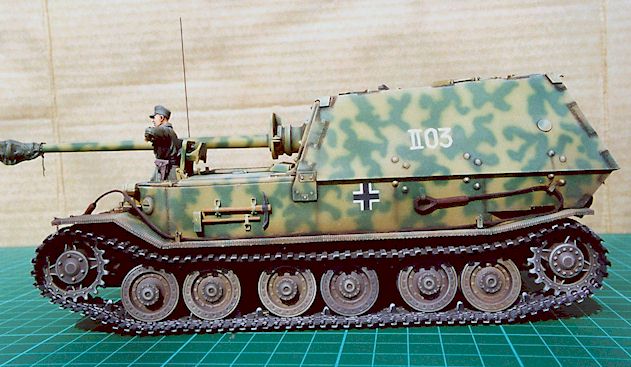
I built a new travel lock out of plastic card, lead foil and sprue. It was then detailed with bolts made with the punch and die set. The mantlet was turned around and bolts added from Grandt line set No 99(5/8" nut, 2 ˝ steel washer and 1' nut). The muzzle brake cover was made from milliput with fuse wire added for the tie cord.
The only other major work I did was the drivers hatch. Looking at pictures in the Darlington publication shows that the hatch had a prominent lip around the inside edge of it. I firstly sanded the inside face smooth. I then added plasticard in the shape of the hatch but about 1mm smaller than the kit part. I then glued a fine strip of plasticard around the edge of the kit part to give the lip. I then used the detail parts from the Aber set to finish the job. A lip was also added around the drivers opening as well. It was a lot of work but the final result certainly looks better than the kit part. If you don't have the hatch open you don't need to do any of this.
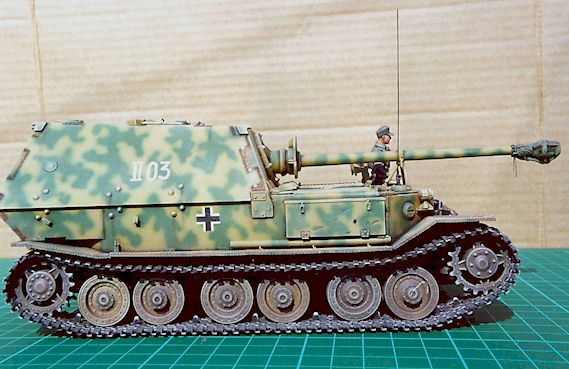
The driving lights in the kit are quite poor and really need replacing. I fashioned new mounts from plasticard. The lights and their bases came from the Tamiya MkIV on vehicle equipment set. I added the power cables from fuse wire and drilled holes in the hull and fed the wire through. The jack block was made from balsa wood scribed and detailed with parts from the Aber set. The jack itself is from the Tamiya OVE set with some details added from the Aber set. A site for the gun was added from the spare parts box. The tools on the side also came from the spare parts box. The tube under the side storage box was added from plastic rod and detailed with parts from the Aber set.
The rest of the kit was basically built as per the instructions. I won't outline what was added from the Aber sets as this would take up a page by itself. Needless to say there are a lot of bits and pieces. I love these guys! The only real problem I had was with the fenders. I had to do a bit of cutting to get the front sections to fit properly but apart from that it all went together with no problems.
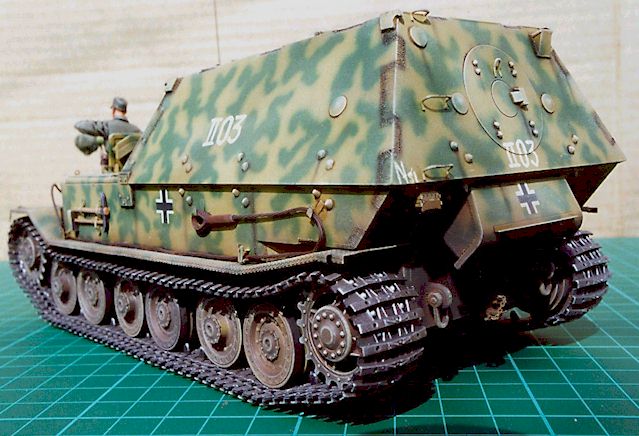
All the weld lines and oxy cutting marks were added with the trusty pyrogravure. Some weld seams are not present on the kit and will have to be added. Once again the Armada book was a godsend. All the plates where textured with a motor tool. Be careful when doing this as sometimes it can be overdone and you end up with a model looking like Swiss cheese. Three grab handles where added to the rear of the upper hull from brass wire. I dented up the side stowage box with a motor tool. The tow cable was made from brass picture wire with resin ends left over from the Verlinden Panther detail set. A new towing shackle on the rear was made from wire with small-scale chain added. The aerial is made from wire, plastic rod and lead foil with bolt heads from the punch and die set.
The tracks with kit aren't too bad but don't quite stand up to today's' standards. While I was building this model a set of injected moulded tracks were released by Link Model Workshop through Jaguar. I believe this company is from Hong Kong and I must say I was very impressed with these tracks. The detail is as good as any Model Karsten tracks I have seen but what is amazing is the price. They cost me about $16.00 US from Great Model Web Store. When compared to the cost of other after market track sets, I just hope they produce other track sets at the same price with same level of detail. Now the sharp-eyed modeler amongst you will notice that these style tracks aren't the right ones for the Ferdinand. The only proper tracks that I know of are from Accurate Armour and I wasn't to keen to pay the price, so I'm happy to turn a blind eye to this fact. They went together with no problems and really made a big improvement to the overall appearance of the model.
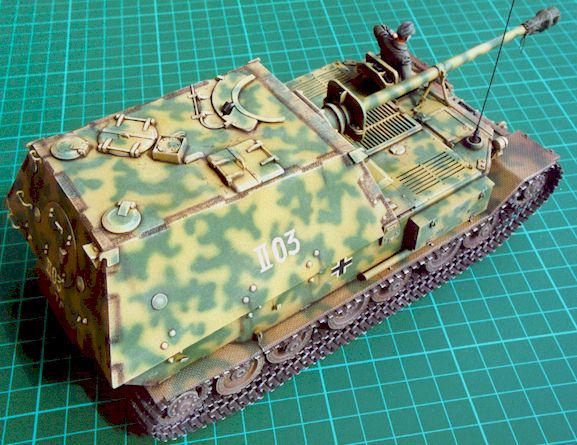
| Painting and Weathering |
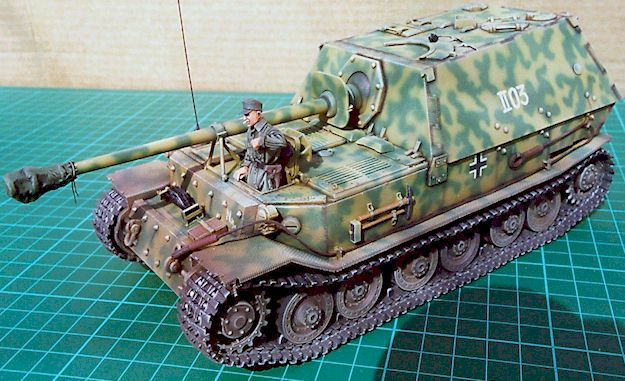
With the construction finished it was now on to the painting. The first thing I did was spray the model in Tamiya XF-60. After that I sprayed on the camouflage green. I used Tamiya XF-58. This took quite a while as the colour scheme is quite complicated. After the paint was dried I then hand painted on the serial numbers and codes and used decals for the national crosses. I then applied a wash of Van Dyke brown gouache to all the nooks and crannies. When this dried I wiped off the excess. The next step was the dry brushing. I mixed Humbrol 84 with Windsor & Newton Titanium white oil paint and applied in the usual way. The lower hull, wheels and tracks were sprayed with a shade I mixed from various colours. The tracks and drive sprocket teeth were dry brushed with Tamiya metallic grey and the insides of the road wheels were burnished with a lead pencil to give a worn steel effect. I also used the lead pencil to do worn edges and paint chipping on the upper hull.
After all this was dry the next thing was the pastel chalks. I usually just grind up pastel sticks into powder and then apply them. A little while ago I found in a shop some powders meant for railroads. They are by EF Design and are called Scenic Colours. They come in a range of colours in a 28 gram jars are great value for money. They cost me about $4.00 Aus. I used three colours, Black (SC0000), Tan (SC0002) and Chestnut (SC0003). You just scoop out some onto some card, mix to what ever shades you want and then apply them as you would with normal pastel chalks. If you see them give them a go.
The figure is from Warriors (Waffen SS tank crew, No 35096) built straight from the box then painted with enamels, acrylics, gouache and oils. After the figure was glued in the whole model received a coat of Gunze flat and it was done.
| Conclusion |
This was quite an enjoyable project and I believe not out of reach for a modeler with normal modeling skills. For those people who have been thinking of doing some conversion work, try this one. Remember if you get the Aber Ferdinand set and the Armada book (available both from NKR models) you will not have to do a lot of what I have outlined above. The tracks and fender set are just little extras that you could easily do without and still produce a nice model. Go on, take the plunge, you'll be amazed to find that its not as hard as you may think. Happy Modelling.
| References |
·
Museum
Ordnance Special No 4 – Elefant Panzerjager Tiger (P) By Thomas Jentz &
Jeffrey McKaughan. Darlington Publications
| Additional Images |
Click the thumbnail to view the
full-sized image.
Use the back arrow on your browser to return to this page

Back to HyperScale Main Page
Back to Feature Articles Index