Home
| What's New |
Features |
Gallery |
Reviews |
Reference |
Forum |
Search
Home
| What's New |
Features |
Gallery |
Reviews |
Reference |
Forum |
Search
|
|
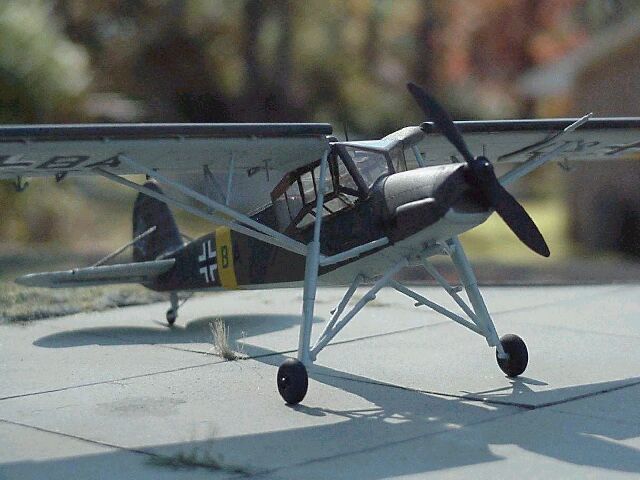
Fiesler Fi 156 Storch by Lee Rouse
The Fieseler Fi-156 Storch (Stork) was a German reconnaissance/liaison aircraft during World War Two. First flown in 1936, the Storch's ability for STOL (Short Take Off and Landing) made it ideal for crude battlefield locations. Its 46.75' wingspan, fixed leading edge slats and slotted aileron/flaps (which extended the length of the wing) allowed the Storch to take off in as little as 200 feet in a light head wind, and only needed 70 feet of runway to land. On one occasion a Fieseler Storch was stripped of all non-essential flying equipment and the motor was modified to 300 hp. During this test the Storch lifted off the ground with no ground roll. The prop blast over the wing was enough to create the needed lift. The Storch featured a greenhouse type cockpit that bulged over the sides of the fuselage, and offered good fields of vision for reconnaissance work. At only 5 feet tall, Hanna Reitsch was probably the most famous Storch pilot. In 1939 she flew a Storch in the Deutschland-Halle. This building was apparently completely enclosed, and the flight around the inside of the building was viewed by many spectators and filmed. Hanna was sent in to rescue Hitler and others with a Storch at the end of the war, and she landed in a street. Hanna was the only female German pilot to ever receive the Iron Cross for her bravery and ingenuity as a test pilot.
Academy's 1/72 scale Fi 156 Storch kit was released in the Fall of 1998. Fifty-four parts are molded in light gray plastic and arranged in three separate trees. A seven-part clear tree is included. The kit may be built as either a German Storch or a French Morane-Saulnier M.S. 500 (virtually identical to the Storch, except for the powerplant: a Renault 6Q in place of Fi.156's Argus AS 10); or a Morane-Saulnier M.S. 502 with a radial engine and no cowling. Decals are provided for the F-156 and the M.S. 500.
Cockpit and Fuselage As with most kits, I started with the cockpit. The kit cockpit consists of a floorboard, pilot's seat, observer's bench seat, instrument panel, and control stick. While this might be adequate for the typical 1/72 WWII fighter cockpit, the result in this model will be a very sparse looking cockpit. I therefore decided to use the Eduard photoetched set (72 292) which contains sidewall and overhead framing, seat belts, seat mounting hardware and instrument panel for the cockpit area, various support struts/bracing for the wings and horizontal stabs, tail wheel, and actuator links for the flaps.
The Eduard sidewall parts went in fairly easily. A with all 1/72 scale photoetched sets, you need to pay careful attention to the diagrams to make sure you are installing the parts correctly. Even so I managed on first attempt to put the right sidewall framing in backwards, and had to pull it out and reinstall it. No big deal. The seat mount/framing was attached to the bottom of the pilot's seat and then the seat was glued in place on the floorboard, along with the kit control stick and rear seat. I then glued the completed floorboard assembly to the left sidewall using a slow setting glue (Testors), and temporarily put the fuselage halves together to ensure that the floorboard was seated properly. After this had dried, I separated the fuselage halves and airbrushed the interior RLM 02. The instrument panel is a combination of photoetched metal and a photo film instrument faces, and looks much better than the original plastic part. The photoetched panel was airbrushed faded black and the film was attached from behind using Microset Krystal Kleer. Take your time and test fit the instrument panel into the fuselage. I had to do some light trimming on one side of the instrument panel to ensure a good fit. This is not noticeable once the cockpit halves are in place since the instrument panel is recessed and so small. The fuselage halves were joined and left to dry. Some light sanding was needed both on the dorsal and ventral fuselage surfaces. This is most problematic on the underside, as the resulting seam line runs right down the middle of raised detail that is apparently meant to represent fabric stitching. This stitching effect appears grossly over scale on the model, so don't worry if you have to sand it down a bit to fill that seam. There is a gap where the back of the cockpit tub does not meet the fuselage properly. This gap was too large and too precariously located to putty and sand, so I covered it with an appropriately sized piece of plastic card painted to match the rest of the interior. So far so good - minor annoyances, but nothing I couldn't live with.
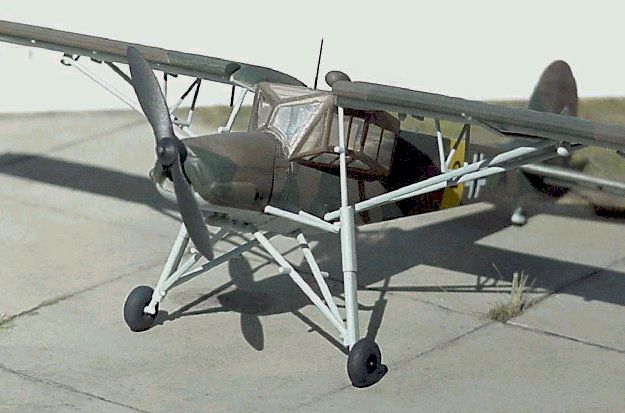
C anopy
Fortunately I usually learn from my mistakes, and the second attempt at canopy assembly went better. This time I used minute amounts of superglue placed carefully along the joint seam lines and did not get any overflow. For those of you who have the kit, I first glued part D6 (left. Side) to D1 (top). Then I glued this combination to the fuselage over the cockpit area and worked my way around, adding the remaining canopy pieces as I went. After it was on, the canopy looked pretty rough, so I polished it out with a progression of polishing cloths running from 3200 through 12000, and finished with a liquid plastic polish. One other potential problem area with the canopy-- be sure that it sits straight; i.e., the top of the canopy should sit level from side to side. If it doesn't there will be problems with the alignment and level of the wings, since each wing is joined to attachment points on the top left and right sides of the canopy. Whew! I took a breath and continued to glue the cowling halves together. I attached the cowling assembly to the front of the fuselage. The nosepiece for the cowling was attached. This piece is slightly larger in diameter than its mating surface at the front of the cowling. Consequently, sanding and then minor rescribing was needed to even things up.
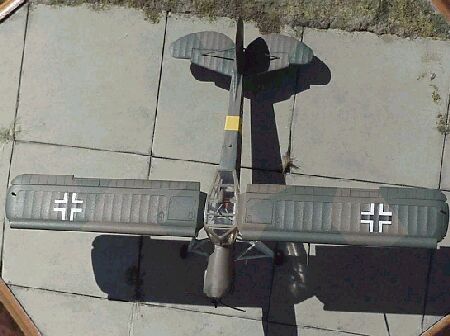
Wings The molded in flap actuators (actually nothing more than small triangular shaped protrusions) were cut off in preparation for the much better photo etched pieces from the Eduard kit. The wing halves were joined and the leading edge slats were glued into place. Eduard includes some miniscule photoetched pieces that can be used to replace the plastic attachment point for the slats. However, these were just too small for me! The slats seemed over scale in thickness, but I did not take the time to try and thin them out. The horizontal stabs were glued into place next. Be careful about their alignment. There is only a very small single tab and corresponding hole on each side of the fuselage to indicate where they set. The locator holes in each wing attach to locator stubs that protrude from the top left and right sides of the green house canopy. I test fit each wing and found that the fit was quite good. I decided to paint and weather the wings before attaching them to the fuselage, as this would make painting easier.
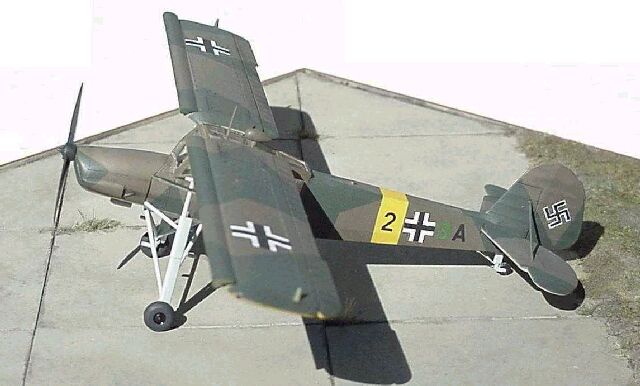
The lower fuselage was then masked off and the upper fuselage and upper wing surfaces were airbrushed RLM 71 (dark green). Note that the kit instructions call for RLM 83 (light green), which is clearly inaccurate for an aircraft based at the Eastern front in 1942. After the RLM 71 had dried I masked the appropriate areas using drafting tape. I then airbrushed RLM 70 (black green) to reproduce the splinter pattern. When the wings and fuselage were dry, the masking was removed and a gloss coat was hand brushed using Future and a soft flat brush.
Wings were next attached to the fuselage using small amounts of Testors tube glue. Be careful not to get glue on the clear parts of the greenhouse canopy. I also was careful to ensure that the wings were situated so that they were parallel to the horizontal stabs and perpendicular to the tail. Using slow drying tube glue allows you time to position the wings. When the glue was cured I dry fitted the wing struts and found that they were both too long. I shortened each one little by little at the end that attaches to the fuselage. When I was satisfied with the fit, I glued the struts in place using small drops of Superglue gel. I was not satisfied with the interplane struts that came in the kit, as they seem much too large for scale. I made a simple jig and used one of these kit pieces to create new struts with more appropriately scaled styrene rod.
The kit decals are thin and will not tolerate a lot of handling. They were also out of register which required considerable trimming both before application and after they were on the model. Additionally the kit decals appeared to have a minimal amount of adhesive on them. I found that they rapidly lost their adhesion if the decal needed to be moved around on the surface to secure the correct location. I solved this problem by placing a small pool of Future beneath each decal. The Future acted as an adhesive and also pulled the decal down into panel lines and surface irregularities as it dried. This is a great little trick that also works well for small decals that would otherwise appear silvered when dry. There were no swastikas for the tail so I used several from and old Allmark swastika decal sheet. After the decals were dry I gently washed off the model's surfaces with a dampened cotton ball. The aircraft were then airbrushed with several light coats of Polly Scale Flat. Using multiple light coats is important because if a heavy coat is used initially, it will cause the water-based wash to puddle-up and run. I next removed the Scotch tape from the canopy. To my disappointment I found that a small amount of paint had seeped under the tape in several places and created small etchings on several otherwise clear areas. I was able to solve this by carefully polishing out the areas with a plastic polish on a Q-tip. I then applied a small amount of Future to the clear areas using a brush.
The landing struts were then attached with much cursing and swearing. Each wheel strut assembly is composed of three pieces that make alignment difficult and made me wish I had at least two extra hands. Wheel hubs were airbrushed gloss black. They were then masked off with Parafilm and the tires airbrushed Testors flat black which was lighted by about 15% using flat white. Final bits and pieces such as the pitot tube and rear wheel and photoetched rear wheel bracing were attached. Some final weathering was done using black and brown pastels and lightly dry brushing the upper wing surfaces to emphasize the fabric effect.
This kit builds into and attractive model but is hampered by complex assembly requirements of the greenhouse canopy, wings and struts, and landing gear. Additionally, the decals are of less than stellar quality. I would recommend this kit to a more experienced modeler who wants to build a Storch in 1/72 scale.
Green, William. Warplanes of the Third Reich, Galahad Books, New York (1970). Viselli, Marco. Speciale Fi156 Storch. http://www.geocities.com/CapeCanaveral/Launchpad/3278/fi156.html Slepkev, John. Storch Project. http://www.datanet.ab.ca/users/jbroom/
Models, Description and Images Copyright © 1999 by
Lee Rouse
|
 Now
came the assembly and attachment of the greenhouse canopy, which is where the
real headaches began. I use the word "assembly" because the greenhouse
comprises of no less than 5 separate clear parts. Fortunately these parts are
all joined along actual seam lines and the width of the framing on either side
of the seam is such that minor overflows of cement can be hidden once the canopy
framing is painted. I used small amounts of clear, non-marring liquid cement
placed on the tip of a piece of small diameter copper wire to precisely locate
the cement. Nevertheless I managed to get enough cement on the window portions
of the canopy to render them (in my opinion) useless. So it was back to Hobbies
Plus for a second kit. It was now becoming a "me against the kit"
issue, and I wasn't about to lose!
Now
came the assembly and attachment of the greenhouse canopy, which is where the
real headaches began. I use the word "assembly" because the greenhouse
comprises of no less than 5 separate clear parts. Fortunately these parts are
all joined along actual seam lines and the width of the framing on either side
of the seam is such that minor overflows of cement can be hidden once the canopy
framing is painted. I used small amounts of clear, non-marring liquid cement
placed on the tip of a piece of small diameter copper wire to precisely locate
the cement. Nevertheless I managed to get enough cement on the window portions
of the canopy to render them (in my opinion) useless. So it was back to Hobbies
Plus for a second kit. It was now becoming a "me against the kit"
issue, and I wasn't about to lose!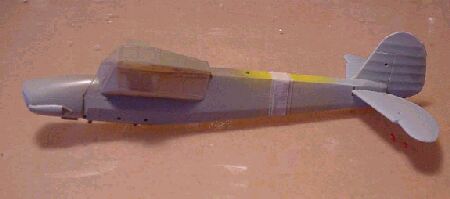 The
greenhouse canopy was masked using Scotch tape and a very sharp number 11 blade
was used to remove the tape from the framing. I first painted the rear area of
the fuselage where the yellow fuselage band was located. This was then masked
off. All paints for the fuselage and wings were lightened by about 15% using
flat white. The fuselage, wings, wing struts and landing gear strut pieces were
then airbrushed with RLM 76, which acted as both a base coat and primer.
The
greenhouse canopy was masked using Scotch tape and a very sharp number 11 blade
was used to remove the tape from the framing. I first painted the rear area of
the fuselage where the yellow fuselage band was located. This was then masked
off. All paints for the fuselage and wings were lightened by about 15% using
flat white. The fuselage, wings, wing struts and landing gear strut pieces were
then airbrushed with RLM 76, which acted as both a base coat and primer.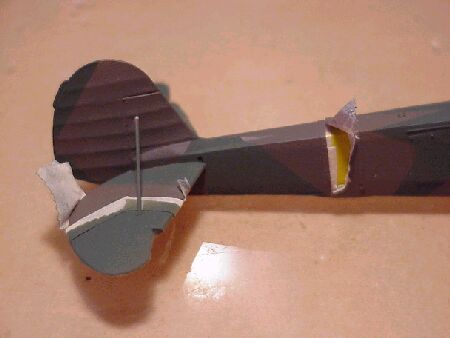 After
this was thoroughly dry (about 12 hours) I applied a wash of black artist
watercolor heavily diluted with water and a few drops of dishwashing detergent.
I have tried various kinds of washes but this is my favorite because the wash
can be selectively removed when dry using a cloth or Q-tip dampened with water
(see the February 1999 issue of Fine Scale Modeler for a good article on this
technique).
After
this was thoroughly dry (about 12 hours) I applied a wash of black artist
watercolor heavily diluted with water and a few drops of dishwashing detergent.
I have tried various kinds of washes but this is my favorite because the wash
can be selectively removed when dry using a cloth or Q-tip dampened with water
(see the February 1999 issue of Fine Scale Modeler for a good article on this
technique).