 Home
| What's New |
Features |
Gallery |
Reviews |
Reference |
Forum |
Search
Home
| What's New |
Features |
Gallery |
Reviews |
Reference |
Forum |
Search
|
|
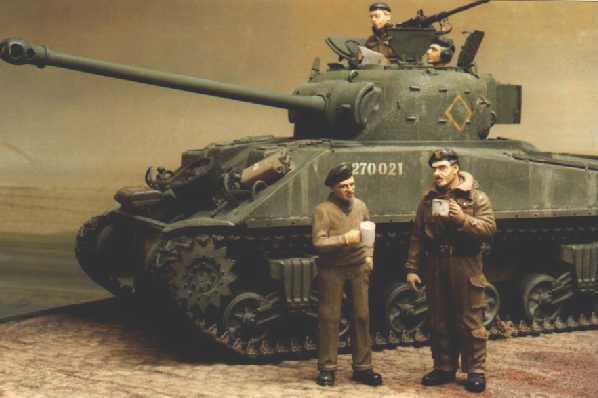
Sherman Vc
Firefly
By Brett T. Green
Paul Simon wrote that "...there must be 50 ways to leave your lover". Well, with the proliferation of new releases over the last couple of years, there must be at least 60 ways to build a Sherman! I decided to take Option 61. The October 1995 issue of Military Modelling contained an excellent article detailing how to build an accurate Sherman Firefly. I have a keen interest in Commonwealth AFVs (and American AFVs in Commonwealth markings) with the Firefly being the focus of some special attention. The "Military Modelling" article pointed out not only the shortfalls in the Dragon kit, but also the remedies. Because the problems are largely dimensional, a fair bit of surgery is necessary according to the recommended method. As a lazy alternative, I looked for existing components that were accurate in profile and dimension. Fortunately I already had all of the major components lurking in my ever-growing collection. These were:
MP's M4A4 hull features amongst the best casting, weld seams and rolled steel surface detail I have seen in plastic - and I include Dragon's best efforts for comparison. This conversion consists of separate parts for the lower hull sides, the lower hull rear, a four part bolted nose, an upper hull and some accessories.
Rear Hull
Lower HullThe MP lower hull parts, including their accurately shaped idler mounts, were assembled and allowed to dry thoroughly. Some random putty was added to the lower hull sides to represent dried mud before the Dragon (well, Italeri originally) running gear was added according to kit instructions. The only detail added was represent worn rubber on the roadwheels. I achieved this before assembly by adding a temporary axle to each roadwheel, securing it in my motor tool and, while the wheel was spinning at high speed, running the "rubber" section of the wheel against a coarse sanding board. I should have corrected the trailing return roller mounts by cutting them and re-fixing them at the horizontal, then "packing" under the rollers to compensate for the lost height. But I didn't! Owing to a minimal reserve of sanity, I opted not to use the Dragon kit tracks. Instead, I turned again to Accurate Armour Track Packs. Apart from being my only remaining use for a hairdryer, I love these resin section tracks for their simplicity and ease of manipulation.
Bolted Transmission CoverThe only construction problem with this conversion is that the assembly breakdown of the three-piece bolted nose splits this very prominent part horizontally across the middle of the front. Without filling and sanding this will leave an unsightly and inaccurate seam line. With filling and sanding you will lose all that lovely casting detail. The only answer is to join, fill, sand and restore the surface texture using either a motor tool or, as I did, a gooey mixture of putty and liquid glue.
Upper Hull
The upper hull was further enhanced with KMC brass etched tie-downs. New tool mounts and straps were added from brass and lead foil. Tools were sourced from Dragon and Tamiya Shermans. Moulded ventilator louver handles were cut off and replaced with brass strip. M4A4s have a section of additional (cast?)
armour in front of the driver and co-drivers hatches. This was built up with Milliput and,
when dry, textured with a round-headed burr and the characteristic undercut scraped out
with a fine, square cross-section file.
TurretThe casting texture on the resin turret was also very convincing. No extra texture was required. A .50 cal. machine gun was added (sourced from the old Tamiya M4A3 kit), which was detailed with Eduard brass. A vane sight was cut from styrene sheet and glued in front of the commander's hatch. I replaced the badly warped resin barrel with the Dragon kit item. The 17 pdr. muzzle brake just didn't look right, so I reshaped it to a more accurate profile. I simulated a lathe by spinning the muzzle brake in my Dremel and reshaping the plastic part with a knife blade.
The model does not represent any particular vehicle, but rather a Firefly typical of a Guards unit in northern Europe, 1944-45. A base coat of flat black was followed by Olive Drab. All paints are Tamiya acrylics sprayed with the Testors airbrush. Turret markings and star identification on rear deck are sprayed using Stencilit's brass stencils. All other markings are taken from various Verlinden rub-down transfer sets (dry decals). Chalk pastel was added after a light brown spray to represent dust on the lower hull. Rustall was painted on spare track links, water cans and track connectors only. Remember, the track blocks were rubber and the steel chevron, in constant contact with the ground, would not have the chance to get rusty. Humbrol polished steel lacquer was dry-brushed over track steel chevrons.
All figures except for the gentlemen in the jumper [sweater], who is from Italeri, are from Verlinden. The base is a one piece, pre-fabricated resin item from Verlinden. All detail is exclusively airbrushed.
"Sherman in Action", Squadron/Signal Publications "Military Modelling Magazine" - October 1995, pp 36-42 Article and Photographs Copyright © 1998 by Brett Green.
|
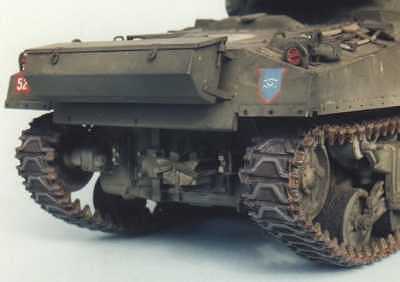 British Firefly rear hulls were full of interesting
detail. I scratch-built smoke dischargers, bumper points and towing plates on the lower
rear hull. Dragon supplies an appropriate rear stowage box that is glued direct to the
hull. However, references suggested that the box should be mounted on brackets clear of
the rear hull, and that the box was secured to the brackets with pins. I used brass strip
and wire to represent the mounts and pins. A strip of stainless steel rod represented the
hinge at the back of the box. The moulded-on latches were carved off and replaced with
brass. The rear hull was finished off with a Verlinden mesh litter guard added under the
rear upper hull.
British Firefly rear hulls were full of interesting
detail. I scratch-built smoke dischargers, bumper points and towing plates on the lower
rear hull. Dragon supplies an appropriate rear stowage box that is glued direct to the
hull. However, references suggested that the box should be mounted on brackets clear of
the rear hull, and that the box was secured to the brackets with pins. I used brass strip
and wire to represent the mounts and pins. A strip of stainless steel rod represented the
hinge at the back of the box. The moulded-on latches were carved off and replaced with
brass. The rear hull was finished off with a Verlinden mesh litter guard added under the
rear upper hull. 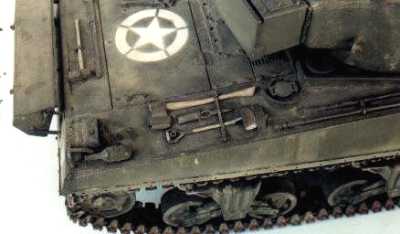 MP's strengths lie in the major components. Fine
detail is not their forte. For this reason, I ignored the MP hull fittings and replaced
them with Dragon parts or scratch-built items. I first cut off the Rear Upper Hull vents
(and grouser covers) from the MP hull and replaced them with items cut from the Dragon kit
hull. These were finished off with Verlinden mesh at the vent inlet.
MP's strengths lie in the major components. Fine
detail is not their forte. For this reason, I ignored the MP hull fittings and replaced
them with Dragon parts or scratch-built items. I first cut off the Rear Upper Hull vents
(and grouser covers) from the MP hull and replaced them with items cut from the Dragon kit
hull. These were finished off with Verlinden mesh at the vent inlet. 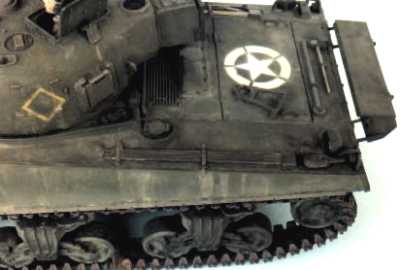 Sandshield mounts for the hull sides and rear was
fabricated from strip styrene. These were drilled with a pin vice to represent mounting
holes. After they had been attached to the hull, I recreated the weld spots. The first
step was to mask so that a narrow strip was visible above the mounts, then cutting thin
strips of Tamiya masking tape and applying them at intervals along the length of the
strip. I then trowelled Squadron White Putty over the top of the masking tape and
immediately removed the tape. This creating a very uniform weld-spot effect.
Sandshield mounts for the hull sides and rear was
fabricated from strip styrene. These were drilled with a pin vice to represent mounting
holes. After they had been attached to the hull, I recreated the weld spots. The first
step was to mask so that a narrow strip was visible above the mounts, then cutting thin
strips of Tamiya masking tape and applying them at intervals along the length of the
strip. I then trowelled Squadron White Putty over the top of the masking tape and
immediately removed the tape. This creating a very uniform weld-spot effect.