Home
| What's New |
Features |
Gallery |
Reviews |
Reference |
Forum |
Search
Home
| What's New |
Features |
Gallery |
Reviews |
Reference |
Forum |
Search
|
|
|
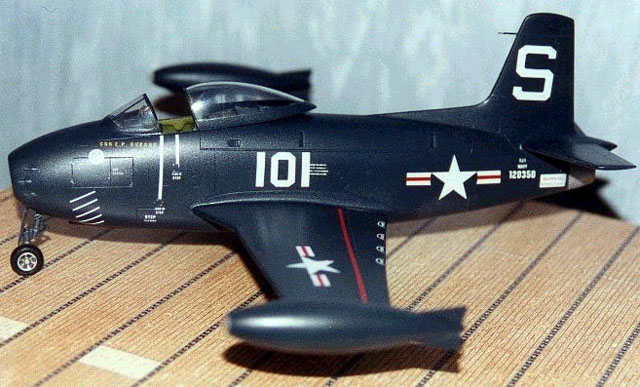
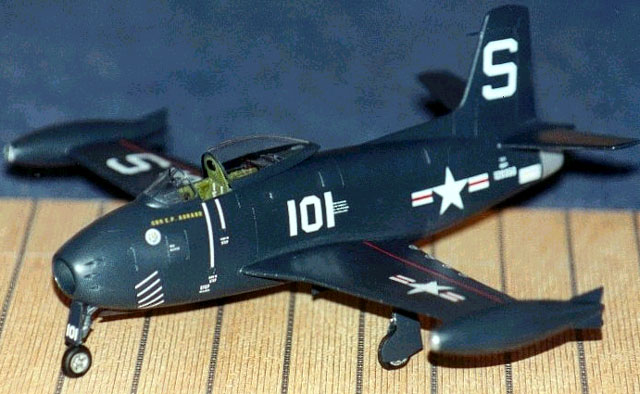
North American FJ-1 Fury by Jean Charles Roux
The North American Fury was one of the first carrier jet fighters. 33 were produced. Assigned to the VF-5 (redesigned VF-51 some months later), the Fury was critical in its role of validating operational procedures for jet aircraft on American carriers. At the dawn of the jet age the United States Navy did not trust the new swept-wing designs, fearing their shortcomings at low speeds. They preferred to stick with a straight wing design. North American Aviation was working at this time on the F-86 Sabre prototype for the US Air Force. The lines of the Fury were an amazing combination of a bulged-Sabre shaped fuselage, Sabre-like tail fins and, importantly, a straight wing extrapolated from the P-51 Mustang's wing. This combination gave the Fury an unmistakable profile. Although the Fury was an important aircraft in US naval aviation history, its operational career was less than sensational.
Plastic model manufacturers have not given us many opportunities to build a Fury in any scale. Fortunately, CZECH MODEL has recently produced a 1/48 scale FJ-1 Fury. The first challenge was to purchase the kit. The specialized press criticism was good and it seemed that everyone has bought it, but luckily I picked up the last box in my hobby store. Despite the kit's popularity, I have never seen this kit in exhibition! Very strange.
The first impression of the plastic parts is mixed. The fuselage, wings, fins are attractive but the scribed lines are too fine and must be accentuated. Small pieces (gear legs and doors, hook) are poorly detailed and quite bloated, as one might expect of a short-run kit. The vacformed canopy is in one piece. Two copies are supplied. The resin parts are beautiful but the instruments panel is too flat.
The first step of the building is to assemble the resin parts (cockpit, exhaust, air intake and forward gear bay). The main problem here is that there is no positioning reference, so you must progress slowly and dry fit parts frequently to align all the pieces correctly.
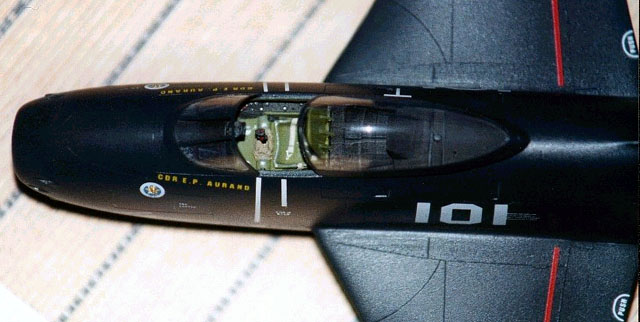
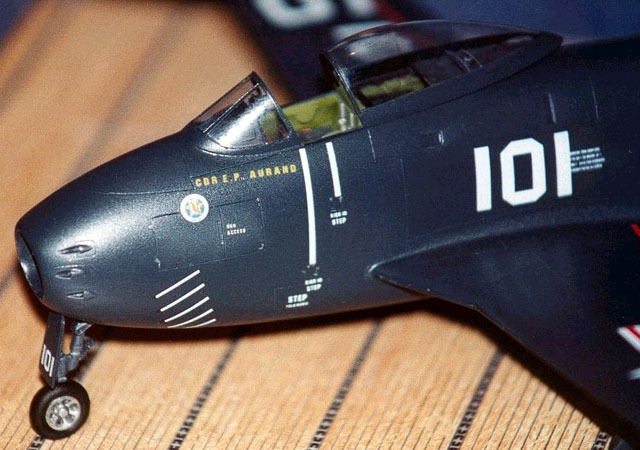
The cockpit was painted interior green with the instrument panel and lateral consoles in matt black. A drop of gloss varnish simulates the glass of the instruments. It is important to note that the back wall of the cockpit supported the headrest which extended high above the cockpit. To avoid future problems, it is recommended to cut the headrest just under the three triangular reinforcements and to re-glue it at the end of construction. Wanting to represent my bird with the canopy opened, I scratchbuilt the back of the cockpit (fuel tank and canopy opening mechanism) using plastic card and rods. All this was painted in matt black. And then began the most laborious assembly - fuselage, wings and tail fins. I began by rescribing the engraved lines, using the shallow kit detail as a guide. The fuselage and wing fit is particularly bad - lack of symmetry creates real problems. Extensive puttying and sanding was required.
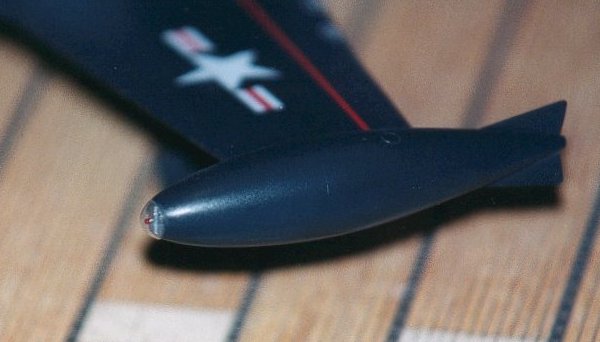
The second problem is that there is no locating point for the wings. The tail fins and their fit with the fuselage is also very bad. If you want a perfect result, there are not too many possible solutions. Here is my approach. I found Naval Fighter on the FJ-1 Fury, photocopied the front view with the correct enlargement factor and converted it to 1/48 scale (Take care of the fact that the given drawing in the Naval Fighter is not exactly in the 1/72 scale). Then I created a cardboard assembling gauge for the wings and the fins. This was fixed to the fuselage and the wings were secured at the correct angle. Miracle of the short-run, the underwings now joined correctly with the fuselage! Even after I undertook this time-consuming process, a 1mm opening appeared between the wing and the fuselage on the upper surface. Same problem with the tail fins. I filled this hole with plastic card and applied mastic to finish the join. The small parts were completely sanded and detailed with the usual materials. The gear doors must be thinned down. Because I wanted to represent the aircraft of the VF-51 Commander during the Bendix race, I had to mount the wing fuel tanks. The only problem is that the forward end of this tank contain the navigation light under a bulbous glass. This detail is not represented in the kit.
First I built and sanded the tanks. Then I used rhodoďd to thermoform the tip of the tank. I cut the forward end of the tank, put the transparent part back on it and cut it using the outline of the tank. It was very easy to do. After that I used plastic card and rods to scratchbuild the navigation light. Because I wanted to represent the canopy opened, I used both copies - 1 for the windscreen and 1 for the sliding canopy - leaving myself no room for error. Fitting the canopy with the fuselage was a little bit tricky and needed some attention because the cutting lines of the canopy don't match very well with the fuselage contours, particularly for the windscreen. The joint was filled with mastic and sanded.
I only use enamel paint and this time decided to experiment the Aeromaster brand, in this case the Glossy Sea Blue. The shade is perfect but the paint is tricky to apply, particularly when you spray a new coat over a well dried coat. The paint dries as semi-gloss instead of gloss. Decals are very thin and give a perfect result. The downside is that they are very tricky to manipulate. A semi-gloss varnish coat will protect the decals. I preferred to finish this kind of decoration with semi-gloss varnish because I think it's more accurate than a full gloss finish in this scale.
These planes were not very old at the time of the Bendix race so I took it easy with drybrushing and scratches. So here we are, the beast is finished and exhibits all the charm of the first jets. In conclusion, you can't build Czech Model's FJ-1 Fury by shaking the box, but with some patience you will have a beautiful and accurate model.
Models, Text and Photography Copyright ©
2001 by Jean Charles Roux
|