Home
| What's New |
Features |
Gallery |
Reviews |
Reference |
Forum |
Search
Home
| What's New |
Features |
Gallery |
Reviews |
Reference |
Forum |
Search
|
|
|
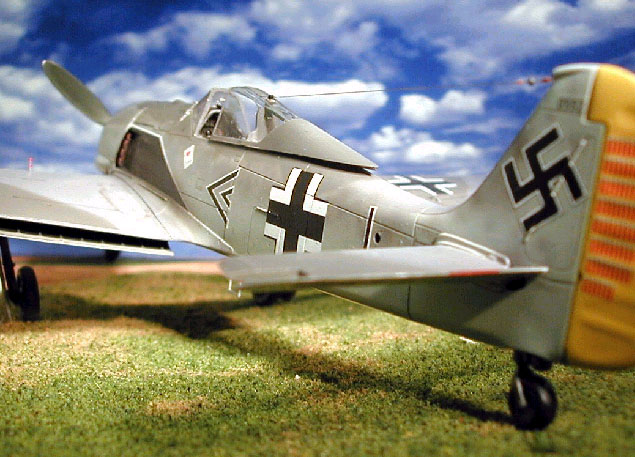
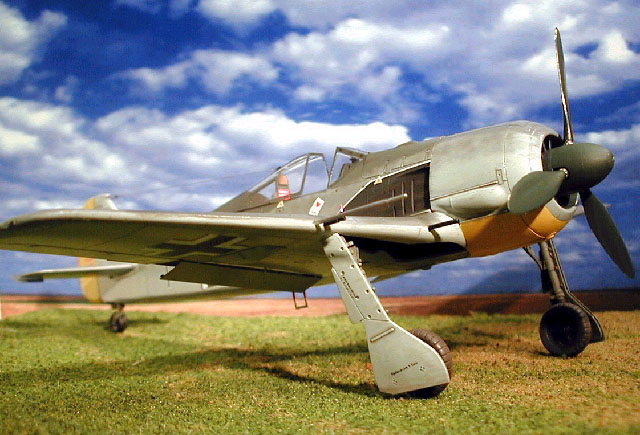
Focke-Wulf Fw 190A-3 by Fred List
This is the 1/48 scale Tamiya offering of the Fw 190A-3 finished to depict an aircraft flown by Josef Priller in August and September of 1942. References for this model were particularly confusing, and for those who have an interest in historical accuracy this may be of some interest, but not necessarily the final word. I include the following information simply to provide some clarity for others who may want to model either of the two aircraft mentioned below. My initial intent was to follow the Aeromaster decal sheet Early Butcher Birds Pt2, which has instructions for an A-3 (Wk-No 0552) flown by Hauptmann Priller on June 22, 1942, however several other reference books provided conflicting information.
The Sundin/Bergstrom book Luftwaffe Fighter Aircraft in Profile, displayed an Fw190A-2 (Wk-Nr310) flown by Hauptmann Priller on the same date with a different camouflage scheme. The John Weal book Focke Wulf 190 Aces of the Western Front contained a profile of an A-3 (Wk-No 0552) with yet a different camouflage scheme and an "as flown" date of August 1942! Checking the JG 26 webpage I found an Fw 190A-3 profile painted by Chris Thomas that matched closely with the John Weal profile although the Wk-No was not discernable. At last some agreement! Hyperscale’s Discussion Forum also yielded some valuable help when Jim P. sent me a very informative thread. Citing Ries’ Luftwaffe Rudder Markings book, Jim identified the A-2 (Wk-No 310), as being the aircraft flown regularly by Priller between April 24, 1942 and August 9, 1942, and the A-3 (Wk-No 0552), as being flown several times between August 21 – 28th. Victory number 76 was scored in this A-3 on August 21st. Anyway, to cut a long story short, I elected to use the John Weal and Chris Thomas fighter profiles of the A-3 as my guide for painting the aircraft.
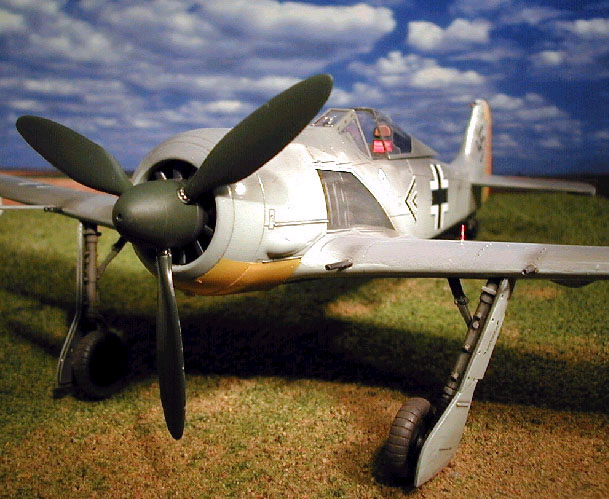
The Tamiya Focke-Wulf, like many of Tamiya’s kits, went together with little fanfare. The only notable problem was a slight (1mm) gap at the wing root which was easily fixed by superglueing a piece of sprue inside the fuselage laterally to spread it to meet the wing root. Because the gap was not severe this fix seemed a better alternative than filling with putty and sanding. Aftermarket items were limited to the Eduard PE set for the A-3 and the aforementioned Aeromaster decals. The Eduard set was nicely done, however for most of the PE items I found that the details on the Tamiya kit were its equal, so much of it was not used.
I elected to display the fighter with slightly lowered landing flaps and with repositioned elevators. The Eduard set contained 2-piece PE flaps which fit perfectly into the opening I cut into the lower wing. The kit elevators were repositioned after carefully separating them from the stabilizers with a needle and the back of a #11 X-Acto blade. Labeling tape was used on either side of the separation line and I was careful to keep the scriber at the same angle as much as possible so that the elevator front edge would be convex and the stabilizer rear edge concave. It took about 25 minutes, alternating upper side and lower side to separate the two pieces. Only minimal cleanup was needed afterward. The elevators and flaps were positioned to reflect what appeared to be the most likely arrangement for parked aircraft in the reference books I had available.
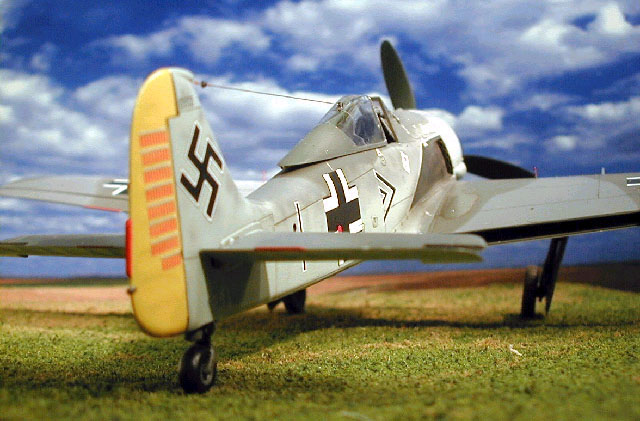
I followed the 74/75/76 paint scheme of Luftwaffe aircraft in JG 26, and used the aircraft profiles mentioned earlier as a guide for the fuselage mottling. I elected to use X-Tra Color enamel paints because in my opinion (purely subjective), they are among the most accurate in registry of RLM paints. With this choice came the burden of the paint’s own particular quirks, i.e., an 8 hour drying time and a tendency to gum up in the airbrush if not thinned enough. The X-Tra Color paint is fairly thin in the bottle and I noticed that although they’d been sitting on my shelf for months there was not the huge glob of pigment sitting on the bottom when first opened. I knew from previous experience that this paint, in spite of being fairly thin already, still needed to be thinned 50% to go on without gumming the medium tip of the Badger 200. With the compressor at 12psig (0.8bar) the paint went on very thin, so you needed two coats for complete coverage. No, I did not always wait 8 hours between coats, 2 – 3 is enough as long as you don’t touch the paint. After the basic scheme was finished the fuselage mottling was done using 60 – 70% thinned paint sprayed at 6 – 7psig (0.5 bar) through a fine tipped Badger 200.
I also used a new product I found on-line at Jim’s Hobbies. Jim’s Masking Putty. I’d always heard that Silly Putty or Play-Doh was good for making soft edge lines, but having tried them found that they either tended to flow out of position (Silly-Putty) or make marks on the model’s surface (Play-Doh). Jim’s putty didn’t do either… at first. Initially the putty was fairly hard coming in rectangular blocks about 5mm thick, but working it with your hand caused it to soften up nicely. I found that the most reliable way to mask soft lines was to make long thin "strings" of the putty and press them along where you want the line to be. Don’t press the putty down too hard. You want a diffuse edge, so you just want to be sure the putty is in contact with the surface. Once the strings of putty were where I wanted them, I filled in the side to be masked with flattened sheets of putty. I was pretty happy with the results for the most part, but sharp angles can be tricky, because the putty is fairly springy. When later reusing the putty just be sure that the paint on the putty is dry, because the lighter colors can be stained. This is particularly true when using X-Tra Color paint.
The decals were applied directly on top of the paint with no clear-coat needed. This is the other benefit of X-Tra Color paint, it dries very glossy. I followed the Aeromaster sheet with regard to decal placement. Only after they were finished did I notice that the double chevrons were slightly too far forward when compared to the positioning on the Chris Thomas and John Weal aircraft profiles. A thin coating of Future acrylic was then hand-brushed on the model to seal the decals. I purposely kept the finish fairly clean with regard to weathering. The aircraft was relatively new, it was the mount of the Gruppenkommandeur, and things had only just started to get tough on the Luftwaffe units in this sector. In addition, I have photos of JG 26 Focke Wulfs taken at this general time that showed remarkably clean and well-kept aircraft. I gave the panel lines a wash of water thinned Future tinted with a mix of Raw Umber and Gray water colors, followed by a light coating of Polly-S Flat. Finally, a light wash of Raw Umber oil color was done for those areas most likely to see dust and dirt. Lastly, I added a wire antenna of pantyhose thread and insulators of white glue applied with a needle. Incidentally, the wing "No Step" lines that are missing will have to be added later as inexplicably Aeromaster did not include them in the decal sheet even though the rest of the stencils were there. Go figure.
This wasn’t even the kit I was supposed to be working on! I was (and still am), waiting for Accurate Miniatures to send me the clear parts for the B-25B so I can finish building the B-25G! This was the model I was building to keep me busy. It was a truly fun and unstressful build that I recommend doing once in a while to keep your sanity. My thanks to everyone who answered my questions on Plane Talking with special thanks to Jim.
Click the thumbnail to view the
image full size.
Text and Images Copyright © 2000 by Fred
List
|