 Home
| What's New |
Features |
Gallery |
Reviews |
Reference |
Forum |
Search
Home
| What's New |
Features |
Gallery |
Reviews |
Reference |
Forum |
Search
|
|
Focke Wulf Fw 190A-8/R7 with “Krebs-Gerät” by Nicola Morgantini Photographs by Riccardo Di Nasso
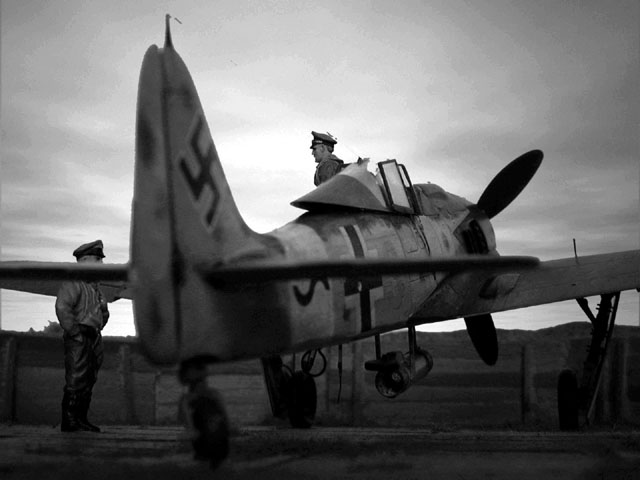
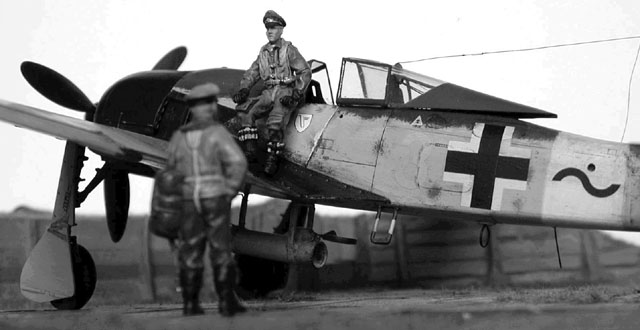
One of the strangest weapons tested on Luftwaffe aircraft to combat the 8th Air Force’s bombing raids over Germany was the “Krebs-Gerät”. This was a single rear-firing Nebelwerfer 21 cm tube installed on the bottom of a Fw 190A-8 with a specialised mount. The main problem was that the pilot couldn’t see where the target was! Tests at Ekdo 25 in the northern Germany continued for two months, from May to July 1944, then the rocket lanchers were substituted by the more conventional auxiliary tanks and the airplanes borrowed from IV(Sturm)/JG3 were sent back to their anti-bomber duty.
When I first saw this rocket-equipped Fw 190 on Peter Rodeike’s book (Focke Wulf Jagdflugzeug Fw 190A Fw 190 “Dora” Ta 152 H) I finally discovered that the nose of these airplanes weren’t in fact wine red -as it was thought once- but black with yellow trim. To realize one of the aicraft used for “Krebs-gerät” evaluations I used the “new” Revell kit (it is a re-issue of the good old Trimaster kit), and scratchbuilt the needed parts.
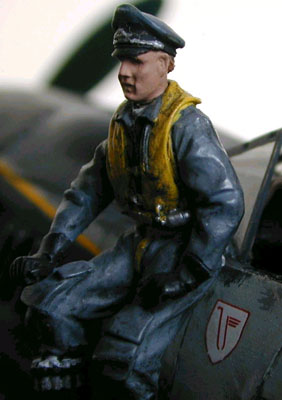
Before starting, I studied my references and corrected some panels on the fuselage and on the wings. On the lower side of these I had to rescribe the panels and scratchbuild the bulges typical of the 4 MG151 equipped planes. I added some details of the canopy opening device over the right console, a map holder and the pedals’ retention belts (which are unfortunately almost invisible after you have painted the cockpit RLM 66 schwartzgrau). The last touch was the gunsight ReVi 16 scratchbuilt from styrene and copper wire, then I closed the two halves of the fuselage. At this stage I cut the additional armour at the sides of the cockpit from thin aluminum sheet and the “scheuklappen” (the armoured glass panels on the canopy)from 0.75mm thick acetate sheet . Concerning the wings, remember to thin the upper root of the left wing (try to re-create the squared “hole” present on the right wing) to reduce the interference of the undercarriage bay and obtain the correct airfoil shape at the root. If you forget this simple (when you know it before…) operation you can’t join the fuselage to the wings correctly. Another trick to prevent your building becoming a nightmare at this stage is to dry fit the sub-assemblies and widen the lower part of the fuselage by inserting pieces of sprue under the cockpit to match the distance between the wing roots. For the undercarriage I first painted the legs RLM 02, then added the decals and the brake lines. Pay attention to their shape because they don’t run straight on the leg as you can usually see on Fw 190 models. I bulged the kit’s wheels with putty and separated the fork of the tail landing gear to represent it turned.
After the painting and decaling stages I added cannon barrels from steel tube, antennae from copper wire and finally trim tabs cut from lead foil (coming from champagne bottles…) …
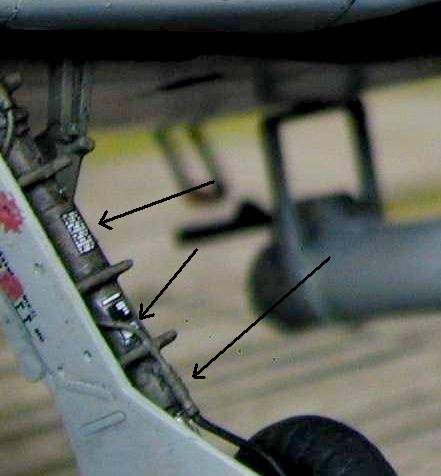
and the “Krebs-Gerät” At this point I scratchbuilt the “Krebs-Gerät” with an aluminium tube and little “L” shaped rails glued inside. The structure which supported the tube was built from airfoil shaped rods from an old SM 79 kit (!). The box on the top of it (which contained the opening device) came from styrene and the rear cover was cut from a 1 mm styrene sheet. To finish the scratchbuilding I added the missing details with copper wire and self-adhesive zinc sheet. If you want you can jump this stage buying the now available conversion kit from Eagle Productions.
I used putty to close the gun throughs -which were faired over on the real plane- and built the propeller using the wider chord wooden blades provided with the kit .
I painted my model (all but the engine compartment) with Lifecolor acrylics in the standard camouflage scheme 74/75/76 with a white band on the rear part of the fuselage. At this point, using a copy of the yellow trim decal as a template I masked the “Adlerflugel” (the black decorations used to hide the oil stains coming from the exhausts) then painted the nose with black paint. Decals and stencils come from Eagle Cals decal sheet #8. These are simply mangificent except the spinner spiral that I wasn’t able to install. To solve this problem I painted the whole spinner yellow, then without masking I painted the spiral in black using a fine brush.
My friend Riccardo Di Nasso tried to reproduce the way photographers of the ‘40s took their shots by using the same optics and angles from which they took pictures. In my opinion the results are quite convincing and at our recent model contest someone asked me if I had reproduced the aircraft represented in the picture!
Click
on the thumbnail images below to view full sized.
Model and Text Copyright © 2000 by Nicola
Morgantini
|


 Associazione
Modellistica Ir'Bastione - Pisa, Italy
Associazione
Modellistica Ir'Bastione - Pisa, Italy