Home
| What's New |
Features |
Gallery |
Reviews |
Reference |
Forum |
Search
Home
| What's New |
Features |
Gallery |
Reviews |
Reference |
Forum |
Search
|
|
|
Focke-Wulf
Fw190 D-9
By John Kerr
Tamiya’s steady output of new 1/48 scale WW2 fighters and twin-engine fighter/bombers over the past five years has been great news for aircraft modellers. In this construction article, John Kerr builds Tamiya’s 1/48 scale model of the Focke Wulf Fw190D-9 straight-out-of-the-box.
In its search for a dedicated high-altitude interceptor fighter, the German Luftwaffe hierarchy turned to the highly successful Fw190A series to fill the need. Replacing the radial engine with a powerful V-12 cylinder, liquid cooled, 1,750hp Jumo 213 engine resulted in the distinctive short nose of the 190A being lengthened considerably. To counter the change in the centre of gravity, a rear fuselage plug was inserted into the airframe just before the tail section. Development of the D-9 was long and with many difficulties. By the time the long-nosed "Butcher Bird" finally made its combat debut with the III/JG 54 "Grunherz" (Green Hearts) in September 1944 at Achmer, Germany, it was simply a case of "too little, too late" for the ever-decreasing number of combat experienced Luftwaffe pilots. Despite its short combat career the D-9 showed great potential as a potent high-altitude interceptor fighter. The Ta152, the ultimate Fw190 variant, would have been fulfilled the potential if the War had lasted longer. However, the D-9 was still arguably the best piston-engine powered German fighter of WWII.
Tamiya’s Fw190D-9 (kit no. 61041) is an all plastic affair with no photo-etched, resin or white-metal parts. It’s very typical of recent Tamiya 48th scale kits - finely detailed parts, recessed panel lines, well engineered and the overall fit is excellent. Three colourful decal options and stencil data are provided over two sheets. The kit provides a standard production D-9. The only options are a choice of two sliding canopies - the standard straight edged canopy or the later blown canopy; and the choice of either open or closed engine cowl flaps. A centreline fuselage rack with couplings and a fuel drop tank are also provided.
As with most kits, I started with the cockpit area. It is reasonably well appointed and includes some detail on the interior walls. The pilot's seat lacks the distinctive lap belts (bolted to the seat’s sides) and shoulder harness straps. As I was building a "straight-out-of-the-box" model I chose not add these items. In their more recent kits Tamiya has provided the lap belts and harness straps in decal form (eg the F4U-1 Corsair and Beaufighter). During cockpit assembly all parts were painted, weathered and dry-brushed to give the "office" that lived-in look. Humbrol’s Ocean Grey, a dark medium grey, was the main colour for the cockpit tub, instruments and rear fuselage armour plate. Perhaps not the right shade of RLM grey but it looks OK. The fuselage was tackled next. The canopy operating wheel (A17) was painted and then glued to its locating point under the coaming on the right hand fuselage before the two halves were assembled. For the long fuselage seams, as found on most aircraft, I first tack glued the matting edges sparingly with tube glue and then applied fast-setting Kibri liquid cement along the seams, capillary action did the rest. The gun panel (F16) was glued into place. The fit of the hinged gun access panel section, in front of the windshield, is "average", but so is the fit on the real aircraft. The two-part supercharger intake was assembled and glued to the right hand forward fuselage. Don't forget the small intake vent which is added just forward and above the supercharger. The highly detailed rear fuselage decking slots nicely into place, again showing off Tamiya’s engineering thoughtfulness. Once all seams were cleaned up, the cockpit tub was inserted through the vacant wing area. The tub is pushed all the way up and firmly glued into the locating points on both sides of the fuselage. The wings were tackled next. The main wheel well (A7) required part A19 (some form of linking strut I think ?) to be glued into the well’s centreline. This small sub-assembly drops neatly into locating points and recesses into the lower wing. The left and right upper wings were then added to the lower wing. Fit is very good. In cleaning up the seams I was careful not to damage or knock off the two protuding cannon barrels located inboard of each wing. The completed wings snap nicely into the fuselage. Tamiya’s excellent engineering shows up here again with the solid plastic locating area on the underneath of the fuselage. The left and right rear stabilisers simply slot into their locating plugs. The engine face, front cowl and flaps snap together and attach easily to the fuselage. The engine face was painted before placing inside the front cowl.
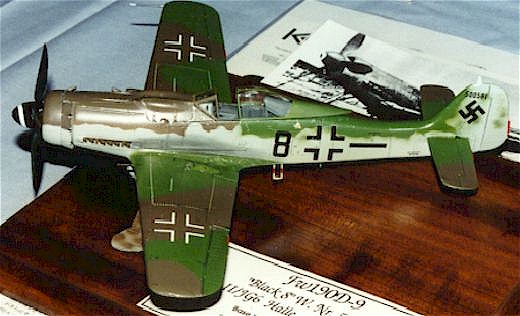
Painting instructions show three schemes finished in standard 190D schemes. As Tamiya do not have RLM matched colours in their range, the painting instructions only show Tamiya paint codes and mixing ratios for each RLM colour. Don’t fret as Luftwaffe RLM matched enamel and acrylic paints are readily available from several hobby paint producers. Even though I did not use the kit decals, Tamiya offers three options. The attractive box-art subject of "Blue 15" is the most colourful of the three, several Luftwaffe "experts" now claim this aircraft to be actually "Yellow 15". Over the past three years there have been many after-market decals released for 190Ds from AeroMaster; SuperScale; Experten; KommanDeur; ADS and Eagles Limited. All provide thoroughly researched decals and instructions. I chose "Black 8" (werk nr. 500581) of II/JG6 from KommanDeur’s set number KD4801FD. This is first sheet in the Fw190D trilogy set released by KommanDeur in late 1996. This aircraft was abandoned at Halle, Germany in 1945. Being a late war scheme it was finished in one of non-standard schemes applied to Fw190s and Bf109s, in this case, RLM 82 Light Green and RLM 81 Brown-Violet over RLM 76 Light Grey. All external colours came from AeroMaster’s Warbirds I range of enamels. The wheel wells were first sprayed RLM 02 Brown Grey and then masked off with Blu-Tak before the external surfaces were spray painted. The fuselage, wingroots and lower surfaces were then sprayed RLM 76 followed by RLM 83 Light Green on the upper surfaces, with an attempt at subtle mottling on the fuselage and tail section. KommanDeur’s superb colour instructions state this Light Green is RLM 82, however I found AeroMaster’s RLM 83 Light Green a closer match than their RLM 82 which looks a much darker shade of Green. From my research, and discussions on the internet, there seem to be differing opinions about the late-war RLM Greens. Unfortunately my freehand mottling turned out to be a tad heavier and lower down the fuselage sides than I intended, so I masked off the upper fuselage and wings and then resprayed the affected areas RLM 76. Learning from this "boo-boo", and after masking all other areas, RLM 81 Brown-Violet was sprayed onto the front upper fuselage, "splinters" on the wings and outer rear stabilisers plus some mottling on the undercarriage doors. AeroMaster’s "Warbirds I" range of pre-thinned enamels are a dream to airbrush needing only 25-30% thinner for a good airbrush paint mix. I use mineral turpentine as my thinner only because I have a huge bottle of it, however I’ve found any enamel thinner will do. AeroMaster paints dry very quickly to a very flat finish which speeds up the painting process, I’ve been known to spray one colour, mask over it and spray another colour all within a few hours. I used Blu-Tak, Tamiya Masking Tape and Post-It Notes to prevent overspray throughout the painting process (Blu-tak is also great to mask off interior areas like wheel wells and cockpit). Before preparing the airframe for decals, I applied the first stages of weathering. A finely pointed lead pencil (sandpapered to a thin wedge shape) was used to highlight the major panel lines. The kit panel lines deep enough to easily "colour in". AeroMaster’s Gloss Clear was then sprayed to give the decals a smooth surface. If you try the lead pencil method you’ll notice the lead darkens to a very dark grey - very effective on both dark and light colours. I always take a "steady as she goes" attitude to decaling, applying the larger markings first (codes and insignia) followed by the smaller stencil data. Stencil data was taken from AeroMaster’s stencil data sheet 148010 and supplemented by the light-grey stencils from SuperScale’s 48-449 sheet. The red drop tank stencils came from the AeroMaster sheet. Applying the stencil decals took quite some time but the result is worth the effort. Applying the white spiral to the spinner, which had been pre-painted black and glossed up , was a real saga. It took me four spiral decals to get it right. At the point of giving up , I used one of the kit’s spiral decals, cut it into halves which were then applied "very carefully". However I feel the difficulties with the spirals was probably more my clumsiness and lack of technique rather than the fault of the decals. AeroSet setting solution was carefully applied to each decal with a paintbrush during application. This is strong stuff so do NOT flood the decal or re-touch the decal after brushing. Allow the decal to thoroughly dry overnight before applying more AeroSet. Once all the decals were on it was time for more weathering. A thin wash of Tamiya’s Acrylic Black, applied by fine paint brush, was used to accentuate the recessed panel lines. Odd "scratches" of Humbrol’s Gun Metal and Aluminium were spot brushed and dry-brushed on to simulate scuff marks. I took great pleasure in "dirtying up" the aircraft as the model now took on a more life-like appearance. At about this stage I thought "things are going really well". Oops - I spoke too soon as disaster struck while transporting the model from the house to my outside modelling shed. The unfinished D-9 made an "unexpected night flight" onto the shed floor, in other words, I accidentally dropped it! And of course, the model had to land upside down on the tail fin which squashed the antennae attachment point. After much cursing and deliberation, the remnants were sanded off and a replacement shaped from thin plastic card . It was grafted onto the tail with superglue. The area was then touched up by hand with RLM76.
With everything painted, decaled and weathered (and repaired), it was time to add the "fiddly bits"; undercarriage gear, wheels, antennae, spinner/backing plate/propeller blades etc. I found the left and right main undercarriage legs and struts to be a real pain - the struts kept springing out of their locating hole in each undercarriage leg. Finally, "Prof. Weathers" Burnt Exhaust, a finely ground weathering powder, was rubbed on using a cotton ear-bud to simulate the fuselage exhaust stains. These powders provide even looking weathering stains which are difficult to achieve with dry-brushed paint. A couple of coats of AeroMaster Matt Clear then sealed everything. "Black 8" had the later style blown canopy which gave pilots better all around visibility than the standard straight-sided canopy. Both styles of canopies are included in the kit. The combined canopy support structure and headrest slots nicely into the canopy. The painted gun sight was attached using white glue slightly thinned with water. The fit of the windscreen was surprisingly poor, in the end I super-glued it on after a few goes with white glue thinned with water. I chose to place the sliding canopy in the open position. A dry fit in the closed position revealed a reasonable fit hard up against the windshield.
Over the past few years I’ve been expanding my modeling "horizon" to include aircraft other than Allied fighters and find I’m developing a very keen interest in Luftwaffe and other Axis aircraft. Tamiya’s Fw190D-9 is a simple and reasonably detailed kit. I would agree with those who argue it’s not as detailed as the DML/Dragon kit of the same subject, however the Tamiya kit is certainly easier to build. Given the pleasant experience in finishing the kit, and the numerous Fw190D-9 decals I now have, I’ll definitely be building more Tamiya D-9s. The KommanDeur decals are as good as any on the market while the AeroMaster Warbirds paints are, in my opinion, the best model paints on the market. After successfully building one Fw190, I now find Tamiya’s short-nosed Fw190 F-8 kit sitting in the cupboard at home whispering "build me, build me". Hopefully that will be another story for your reading.
Private photo collection and anecdotal notes (Ryle, 1996). Thanks Brown! "Fw190 D-9 Walk Around" (Ryle and Laing, Squadron Signal, 1996) "KD4801FD - KommanDeur Limited Edition Decals" (Ryle, 1996, instruction sheets)
Notes The photo at the top of the page was taken at the "S.A. Scale Model Expo" November 1997. The model was awarded a "Highly Commended" ribbon in its category. The annual "S.A. Scale Model Expo" is the South Australian open scale model display and competition, the event is hosted by SAPMA (South Australian Plastic Modeller’s Association). Model and Text Copyright 1998 by John
Kerr.
|