Home
| What's New |
Features |
Gallery |
Reviews |
Reference |
Forum |
Search
Home
| What's New |
Features |
Gallery |
Reviews |
Reference |
Forum |
Search
|
|
|
Focke-Wulf
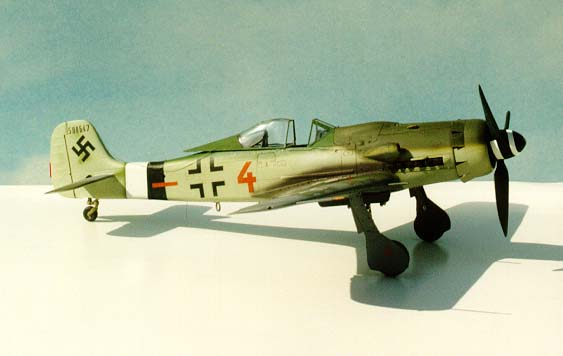
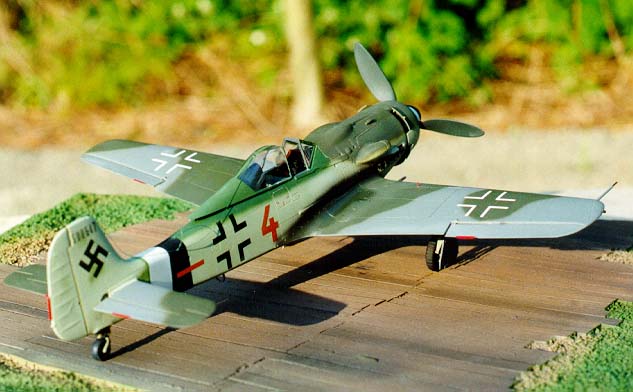
Fw 190D-9 by Mike Millette
When Eagle Editions released Axle Urbanke's "Green Hearts, First in Combat With the Dora 9" I was immediately captivated by the profile of Brown 4, the Ta 152 tailed Fw 190D-9. It had all the elements I look for in a model subject - nice looking aircraft and unique paint scheme. It had other element that take a nice, easy to build kit and makes you wonder later "what was I thinking?" Fortunately, in this case, Jerry Crandall came to the rescue (at least partly) with the issue of not only Eagle Cals # 4 with full markings for Brown 4 but also Eagle Parts # 3 , the Ta 152 tail conversion for the Tamiya kit. KommanDeuer also makes a decal sheet which has markings for this aircraft. Since so little of the aircraft is visible in the few pictures that exist of this aircraft, and typical of many late war Luftwaffe subjects, some of the paint scheme is subject to speculation. The KD sheet shows some variation in the paint scheme as opposed to the Eagle Cals sheet. I chose to work with the Eagle Cals.
This is the 1/48 scale Tamiya kit. For those who haven't built it yet, it is one of the easiest to assemble kits out there. If I hadn't I messed with it, it would have pretty much fallen together on its own. The basic construction sequence was cockpit, fuselage, engine installation, big tail mod, wing/wheel well mods, horizontal tail, gear, canopy, exhausts, and finally antennas.
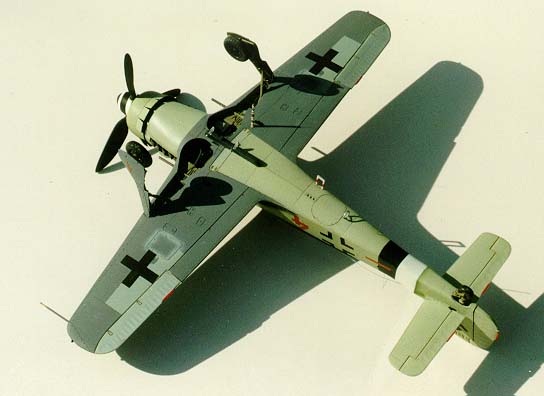
Since the Ta 152 tail replacement problem was solved, I decided I needed something else to add a little tension to this project. Actually, my thinking at the time was more along the line of, "...well, the new tail takes it out of the 'Out Of The Box" category, let's see what else needs to be done?" Unfortunately, Eagle Parts #4 which corrects the gun cowl, spinner, prop and wheels wasn't available yet, (those will go on my next D-9) so that eliminated that addition. One incorrect feature of all of the D-9 kits that I have seen is the retention of the waffled panels, in the inboard portion of the wheel wells. This is a carryover from the A models. These panels are not present in any of the D models or the Ta 152s. They had to go. That meant I needed an engine to fill in the empty space.
Engine I found a beautiful Aries Jumo engine and decided that, that would be just the thing to fill the empty space above the open wheel wells. It turned out not to be quite as easy as I thought. The Aries engine is exactly the right size when displayed with the cowling removed.... which is to say that installing it in an enclosed cowling means it's a little too big. Time to break out the sandpaper and the Xuron shears. In order to place the engine in the correct location relative to the firewall, it was necessary to sand off some of the nose of the crankcase as well as the lower forward portions of the cylinder banks. The engine is also too tall to fit in the "engine compartment". This is not a dimensional inaccuracy in the engine, it's just that Tamiya didn't design the kit to have an engine in there so there is an "overhead" that needs to be removed or the top of the engine needs to be ground off. Not that you can see it once the whole thing is put together, but opted for the full height engine and used my Xuron shears to cut the "floor" out of the gun bay. The back sides of the indentations that support the exhausts also needs to be thinned a bit to allow the engine to fit. The engine was built and plumbed as described in the instructions (and with lots of review of my reference materials) and installed. Unfortunately, as stated above, you can't really see much of the engine once the whole assembly is installed, but it certainly does a lot to give the wheel wells the proper look.
Cockpit While the kit cockpit is not perfect, I felt it did a pretty decent job. I would have prefered to incorporate one of the very nice aftermarket cokpits, but could not seem to find oneanywhere. (Since then of course, I have located several) As such, only a few items were added to spruce it up. I added Eduard rudder pedals and seat belt buckles as well as a canopy release tab on the right side of the cockpit. The gunsight was another item that I though could use a little work. Using a piece of the clear sprue, I sanded the reflector lens to shape. This was then painted silver on the bottom. Then using some very thin acetate sheet, I cut out the two reflectors and superglued them in place. The amount of superglue was small enough that it didn't fog any of the clear parts. The whole assembly was then glued in place using liquid glue. The cockpit was painted RLM 66 lightened with RLM 02 and then given a wash of Aeromasters Tire Black thinned with mineral spirits. High spots were drybrushed and high wear areas were lightly hit with silver. The seatbelts were made from masking tape and left their natural tan color.
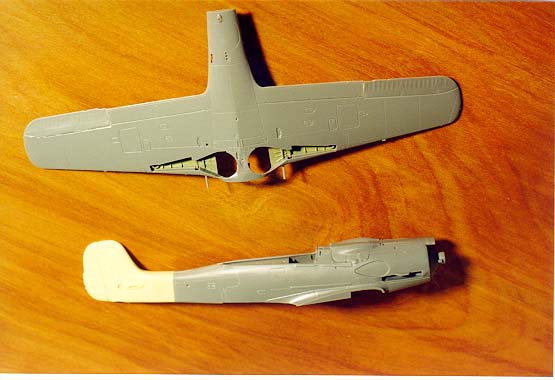
The Big Tail This is the most obvious modification to the kit and fortunately the tail is a perfect fit. I have no idea if it will fit the Trimaster/DML/Italieri D-9's but it works wonderfully with the Tamiya kit.
I assembled the fuselage with engine and cockpit installed before I cut the tail off. A razor saw was used to remove the kit tail. Much care must be taken at this point to ensure that the cut is perfectly straight, as I discovered later. It does not take much of an off angle cut to pitch the new tail sideways. My cut was off only a degree or two which wasn't really noticeable until I had pretty much assembled most of the kit and applied a base coat of "RLM 84". It was then that I noticed that my D-9 had just a bit too much left rudder. My choices were to live with it or break the fully assembled tail off and reset it. I chose to remove the tail and reattach it. This could have been disastrous, but with considerable luck I managed to separate the tail without damaging anything else (whew!). A little shimming with 5 thou plastic sheet, gap filling superglue and putty and Ta-Da! a nice, straight, big tailed D-9!
Wing and Wheel Well
I had also wanted to deflect the ailerons, but looking at the wing parts it became obvious that if I cut them off before the wing was assembled I ran the risk of misaligning the wings. After the wings were assembled I ran an Xacto blade down the groove between the aileron and the wing until I could flex the aileron into it's new position. The control stick is also deflected to the left to harmonize with the ailerons.
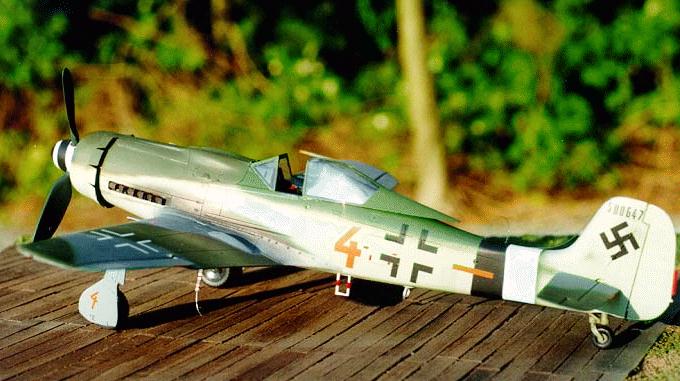
Bits and Pieces The canopy was drilled to accept one end of the Fug 16 antenna support. The antenna itself is attached to this line and goes straight into the fuselage. There is no pulley on the antenna support line so it sags if the canopy is in the open position. I have built a couple of late model 190s and have experimented with a variety of different sagging antenna techniques including invisible thread, fine electrical wire and stretched sprue. So far I have found stretched sprue to be the most effective. Before the sprue is attached, it can be "trained" to take a curved shape. This is done by passing the stretched sprue over the back of an Xacto blade. Some practice is required to determine the exact amount of pressure to use. My girlfriend does this with ribbon and scissors for her projects (I get my techniques where I can find 'em). The Trimaster family of 190s all have a couple of features that contribute to their overall look that I wanted to incorporate into this kit. These include navigation lights and gear retraction flags. To make the navigation lights I used some of the clear sprue and stretched it very slowly so that I could get a thicker cross section. I then cut off the Tamiya lights and drilled out the locations to accept my new lights. These were then pained with Tamiya Clear Red and Clear Green. The Tamiya kit also comes with gear retraction flags molded in. These are much more robust than the ones on Trimaster family of kits, but somewhat less realistic. Again I shaved them off and then drilled out the locations to accept more stretched sprue painted red.
This project also allowed me to try out another new item, the Moskit exhausts. These are beautiful little parts but very fragile, so considerable care must be taken when installing them. They were actually attached after the kit had been completely assembled and painted and once installed look very realistic! The only problem with them is that they are evenly spaced. The real exhausts are staggered a bit to allow two thin structural sections to tie the side cowling together. I couldn't figure out how to modify the exhausts without trashing them, so I decided to live with it. The exhaust stains were applied using several passes with different colors of paint. I first started with a Burnt Sienna, thinned to about 70% thinner and 30% paint. Then Aircraft Gray is applied over the top of that followed by Tire Black both thinned to the same proportions. These are applied very lightly with the airbrush pressure set to about 15psi. The last two colors applied are Metalizer Burnt Iron and Exhaust. The chipped paint was applied using a silver quilters pencil (another technique courtesy of my girlfriend) and was applied with a very sharp pencil using repeated short strokes. The Fw 190 used a cable attached to a post on the right upper main gear leg to operate the tail gear retraction system. The cable was made using a very thin section of stretched sprue and the post was made using a slightly thicker piece. The gun camera port, upper deck guns and cabin air vent and armament collimator vent (the tiny little hole in the leading edge next to the camera port) were all drilled out and after the painting the gun camera was filled with a dab of Crystal Clear. The wing guns and pitot probe were removed and replaced with short lengths of stainless steel tubing.
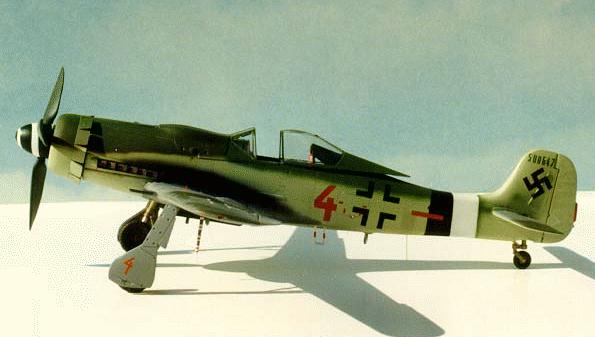
I really like the Aeromaster enamel paints so these were used throughout. As stated above there is some difference of opinion as to how this aircraft was painted exactly (this is, after all a Luftwaffe subject!) I used the Eagle Cals and followed the instructions for the most part. The Eagle Cals show a blue-green "RLM 84" lower fuselage with the upper fuselage segmented in RLM 82 Bright Green and RLM 83 Dark Green (Aeromaster reverses these designations) with light RLM 83 mottling on the tail. The upper wing was painted with RLM 75 Gray Violet and RLM 83 Dark Green.
The lower wing is also the subject of some speculation. The Eagle Cals instructions show two possible schemes, one where the RLM 75 wraps around the leading edge and then the trailing edge is unpainted with the bottoms of the ailerons in RLM 76 White Blue. The other scheme has the RLM 75 wrap around all the way to the trailing edge, again except for the bottom of the ailerons and a bare metal adjourning panel. After reviewing the photos in the "Green Heats..." book it looked to me like the underside is all RLM 75 except for the ailerons and the adjacent panel. This panel appeared to me to match the RLM 76 of the aileron as well as a sprayed border around the edges of the outboard under-wing gun close-out panels. The Gear doors also appear to be painted in RLM 75 with some chipped paint along the leading edge. Once painted, the whole kit was sprayed with Aeromaster's Clear Gloss.
The Morane antenna proved to be one of the more challenging aspects of the paint scheme. According to the Eagle Cals instructions and Jerry Crandall's color profile in "Green Hearts.." the Morane antenna is RLM 75 with red and white stripes. After some thought, the most reasonable approach seemed to be to spray the entire antenna white, mask off the white stripes and spray the gray. The masking tape was then removed and the thin red stripes were painted by hand. Well, that was the sequence that worked finally. The decals were then applied. All the superlatives apply. The decals are thin, opaque, perfectly in register and disappeared after a clear coat. When you add the fact that the subject aircraft are about as thoroughly researched as you can get, you just can't get a better deal. The decal sheet provides all of the relevant maintenance markings, but the few pictures that are available of this aircraft don't show any, so none were applied. That's OK, they'll just end up on my next project. Panel lines were lightly weathered using a wash of thinned Burnt Umber. Unfortunately this was applied in such a subtle manner that most of it is lost in the photos. A final coat of Clear Flat was used and then the paint was "chipped" using the silver pencil.
This was a fun project all in all, despite the crooked tail. Spotting it early on would have been a preferred option, but as it ended up straight without too much effort I can't really complain. The wheel wells look a lot better opened up. I can't wait to try this with my next D-9 in addition to all the upgraded parts in the Eagle Parts #4 set and a nice resin cockpit set.
Green Hearts, First in Combat with the Dora 9 * 1998 by Axle Urbanke Aero Detail #2 Focke-Wulf Fw190D * 1990 by Shigeru Nohara Focke-Wulf Fw190D & Ta152 * 1989 Model Art Fw 190D Walk Around * 1997 by E. Brown Ryle and Malcolm Laing Monogram Close-Up #10, Fw 190 D * 1986 by J. Richard Smith & Eddie J. Creek Focke-Wulf Jadfflugzeug, Fw 190 A, Fw 190 "Dora", Ta 152 H * 1998 by Peter Rodeike
Model, Images and Article Copyright
© 1999 by Mike Millette Back to HyperScale Main Page Back to Features Page |
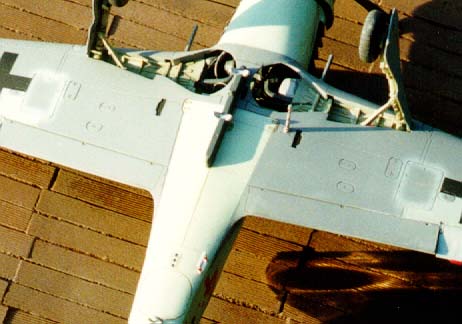 The wing
was pretty much assembled per the kit instructions with a couple of exceptions.
As stated above, the inboard sections of the wheel well had to be removed.
Examining the Tamiya kit & the Trimaster family of 190s indicates that this
is much more easily accomplished on the Tamiya kits (I lucked out again). The
inner panels were removed using a razor saw keeping in mind not to remove the
bottoms of the ammo boxes at the back of the wheel well. Thin sheet plastic is
used to build up the rest of the boxes and what was left of the tops of the
wheel well were then thinned so that a scale edge was visible. Once this was
attached to the fuselage the back of the engine, accessories and plumbing is
nicely displayed.
The wing
was pretty much assembled per the kit instructions with a couple of exceptions.
As stated above, the inboard sections of the wheel well had to be removed.
Examining the Tamiya kit & the Trimaster family of 190s indicates that this
is much more easily accomplished on the Tamiya kits (I lucked out again). The
inner panels were removed using a razor saw keeping in mind not to remove the
bottoms of the ammo boxes at the back of the wheel well. Thin sheet plastic is
used to build up the rest of the boxes and what was left of the tops of the
wheel well were then thinned so that a scale edge was visible. Once this was
attached to the fuselage the back of the engine, accessories and plumbing is
nicely displayed.