 Home
| What's New |
Features |
Gallery |
Reviews |
Reference |
Forum |
Search
Home
| What's New |
Features |
Gallery |
Reviews |
Reference |
Forum |
Search
|
|
|
Focke-Wulf Fw 190F-8 "It's a Small World After All..." by
Brett T. Green
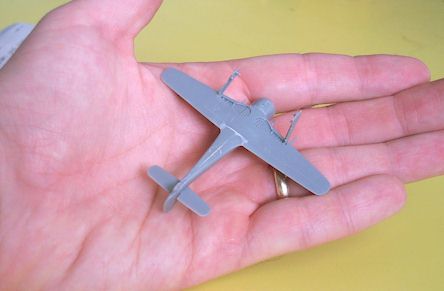
I picked up Eduard's 1/144 scale Focke-Wulf Fw 190F-8 purely out of curiosity. How far could injection moulding technology stretch? Was it possible to make something this small look even somewhat convincing? The model is presented in a small box. The contents are even smaller. 17 grey plastic parts are attached to one sprue; and two clear parts are packed in a small, separate bag. The quality of the plastic is a credit to this limited-run Czech company. It is smooth and free of sinkmarks (which is just as well in this scale). Engraved detail is reasonably fine but a little soft. Options include:
The wing is supplied as one piece. There has been an attempt to depict the dimpled gear well cover inside the gear bay "opening". Different Wurger variants may be depicted by removing or shortening the appropriate gun barrels moulded onto the leading edge. Detail parts are delicately depicted. I was particularly impressed with the one-piece propeller assembly. Despite the small size of this model, the dimensions scale out very close to the real thing. The kit is the scale equivalent of around 10.6 metres wingspan and 9.2 metres length; compared to the actual dimensions of 10.506metres span and 9.1 metres long. The outline of the aircraft is generally good, although the rear fuselage looks a little long and skinny to me. Many characteristics of the Fw 190 are either grossly simplified or omitted. For example, the cowl bulges are vague; and the cannon fairings and ejector chutes are missing.
There are no locating pins. I gave the mating surfaces of each fuselage half a light sanding to ensure a good fit. All major parts fit together positively with few gaps. The biggest issue was a gap at the join between the back of the wing and the lower fuselage. Hairline gaps were also present on one wingroot and the starboard side of the cowl ring. A tiny quantity of Squadron White Putty corrected these problems. There is no indication for the location of the centreline rack. I checked my references to fix this part in the correct position. The two-piece drop tank does not have any mounting points, so I used superglue to tack it quickly in place. The undercarriage legs mount into holes in the gear bay but the angle is vague. I used superglue again to tack the legs at approximately the correct angle and flowed liquid glue to reinforce the join. The propeller pushes onto the front of the model without the need for glue.
Eduard's instructions include two 1/144 scale painting diagrams. I used one of these painting plans to make masks for the camouflage. I stuck the adhesive section of a yellow "Post It" note over the diagram and traced the pattern. This was then cut out.
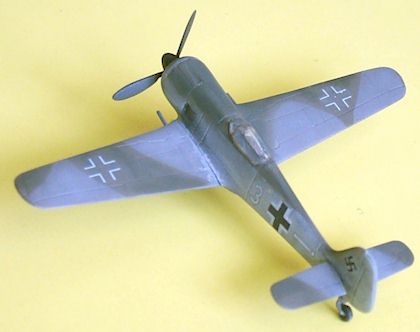
The "Post It" masks were laid down and RLM 74 was applied. The pattern looked okay and the demarcation was acceptable using this method. The exhaust panel was masked and sprayed Tamiya German Grey. I thought black might look too stark on this little aeroplane. This colour was also used for the tyres and the inside of the cowl ring. Wheel hub detail was picked out by brush in semi-gloss black. The spinner received a coat of Tamiya RLM 70 Black-Green. Finally, a thin mix of dark grey was sprayed along the fuselage side to represent the typical sooty exhaust stain often seen on Focke-Wulf 190s. The canopy was added after painting. A few gaps around the forward section were dealt with using Gunze "Mr Surfacer".
Markings are supplied for two aircraft. The tiny decals have their good points and their bad points. The main markings are the size of a 1/48 scale stencil, and even fuel triangle stencils are supplied! Swastikas are provided in halves to circumvent European laws. The decals are good because they are in perfect register, they are very thin, quite opaque and free from silvering. They are bad because they do not want to move once they hit the surface of the model. I used generous quantities of water and setting liquid but still managed to destroy three essential decals. I had to buy a second kit to replace the lost markings! I made the mistake of applying a black oil wash. This looked too dark heavy-handed so I removed it before it dried. Tamiya Silver enamel was painted on the wingroots to simulate chipping, followed by a few thin coats of Gunze Flat to finish the job.
Eduard's 1/144 scale Focke-Wulf 190F-8 is inexpensive, generally accurate in outline, fits together well and has attractive markings. It is only let down by some missing detail and temperamental decals. I completed this model in a short time and with very little effort while listening to the Cricket. This simple Wurger represents a radical departure from some of the bigger, high-tech offerings available. I found that this quick project was a tonic after a year of building complex models. Recommended
Models, Description and Images Copyright ©
2000 by Brett Green
|
 The
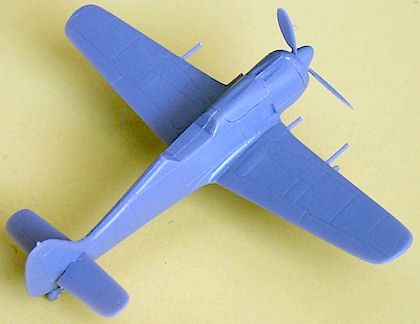
fuselage comprises two halves and a cowl ring with moulded cooling fan detail.
The gun cowl is a separate part. Not surprisingly, there is no cockpit detail.
For that matter, there is no cockpit - the opening is covered over. The tiny
tailwheel is moulded on one fuselage half. This is particularly well done,
capturing the complex shape of the tailwheel strut perfectly
The
fuselage comprises two halves and a cowl ring with moulded cooling fan detail.
The gun cowl is a separate part. Not surprisingly, there is no cockpit detail.
For that matter, there is no cockpit - the opening is covered over. The tiny
tailwheel is moulded on one fuselage half. This is particularly well done,
capturing the complex shape of the tailwheel strut perfectly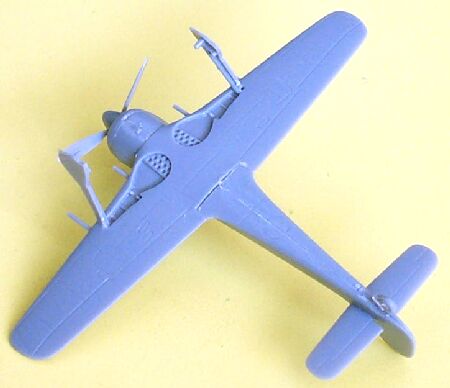 It
took me about twenty minutes to build this kit.
It
took me about twenty minutes to build this kit.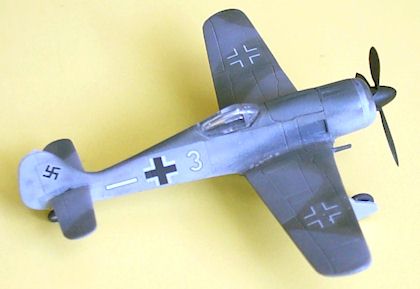 I
commenced by spraying a very lightened mix of Gunze RLM 76 over the whole model.
I then masked the lower fuselage and tail, and sprayed lightened Gunze RLM 75 on
the wings, horizontal tailplanes and upper fuselage.
I
commenced by spraying a very lightened mix of Gunze RLM 76 over the whole model.
I then masked the lower fuselage and tail, and sprayed lightened Gunze RLM 75 on
the wings, horizontal tailplanes and upper fuselage.