Focke-Wulf
Fw190F-8
by Brett Green
|
Focke-Wulf
Fw190F-8
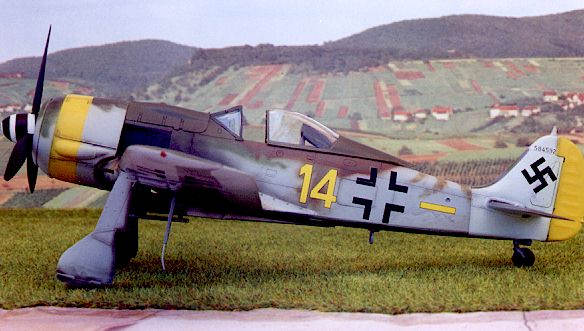
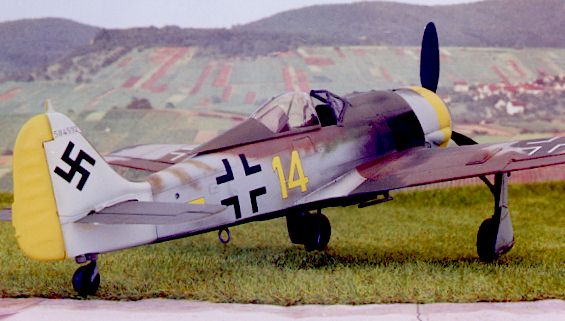
Believed to be SG2 or SG10, Neubiberg Germany, 1945
(Aircraft photographed on scrap heap, Sept/Oct 1945) |
I was fortunate to receive an early copy
of KommanDeur's latest three decal sheets which included this fascinating aircraft. Thanks
to E. Brown Ryle III for access to his reseach and the decals.
A combination of supply-line breakdown, increasingly defensive warfare and poor
communications led to some strange interpretations of late-war Luftwaffe fighter
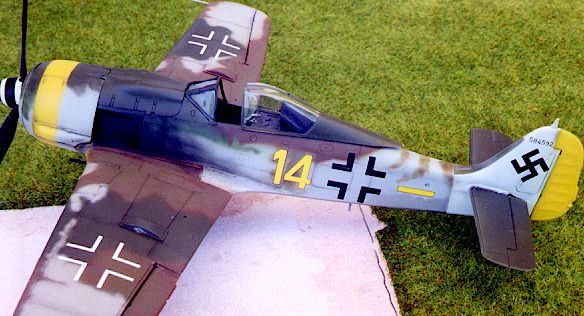
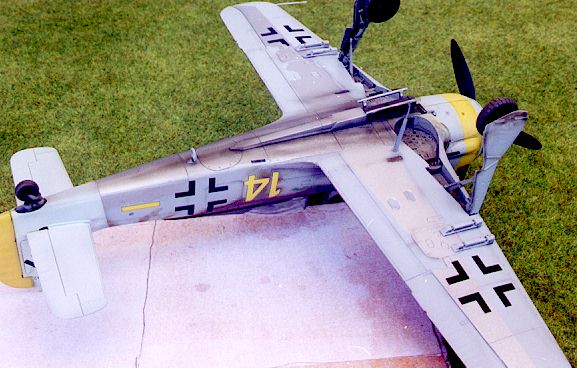
camouflage orders. "Yellow 14" is a classic example.
This hybrid scheme includes yellow theatre markings, large areas of bare metal,
variations of standard RLM colours and the apparent use of primer as a camouflage
component.
This fascinating aircraft is one of the subjects on KommanDeur's recent decal sheet,
KD4805Fw "Wurger - A & F".
I have heard and read a lot about Tamiya's 1/48 scale Wurgers but this was the
first that I had built.
Tamiya’s Focke-Wulf Fw 190F-8 is moulded in their customary medium grey plastic.
Surface detail is second to none – beautiful engraved panel lines and raised features
where appropriate. A choice of standard and blown canopies is supplied, as is a variety of
ordnance including rockets, bombs and a centreline drop tank. The propeller is secured
with a poly-cap to simplify painting (and to cater for the "closet dogfighters"
out there!).
The undercarriage is the only area that lets the kit down. The gear legs are noticeably
short and the main wheels are too small.
There is very little to say about the construction of this kit. It built up so fast
that I was almost embarrassed. The engineering of the kit ensures that the important
assemblies are perfectly aligned. As a result, the fit is excellent – no filler was
required. I was concerned that the simplified engineering may result in a compromised
model, but Tamiya’s attention to detail is really quite superb.
The only deviations from the standard kit were a replacement resin seat with moulded
harness from Ultracast, gun barrels drilled out and wheels flattened.
P a
i n t i n g a n d D e c a l s |
By contrast, the paintjob was quite complex.
 I started with
the nose and the tail. These units featured a much lighter shade of RLM 76 White-Blue than
the rest of the aircraft. I first sprayed the yellow for the noseband and rudder using
Gunze RLM 04. The band and rudder were then masked with Tamiya tape and sprayed with
Aeromaster acrylic RLM 76. With the masking still in place I sprayed the camouflage
colours on the upper nose deck, and on the leading edge of the vertical tail. I started with
the nose and the tail. These units featured a much lighter shade of RLM 76 White-Blue than
the rest of the aircraft. I first sprayed the yellow for the noseband and rudder using
Gunze RLM 04. The band and rudder were then masked with Tamiya tape and sprayed with
Aeromaster acrylic RLM 76. With the masking still in place I sprayed the camouflage
colours on the upper nose deck, and on the leading edge of the vertical tail.
To my horror, the Aeromaster RLM 76 started to craze on top of the Gunze yellow. I had
to sand the White-Blue back, then re-spray the nose using a lightened mix of Gunze RLM 76.
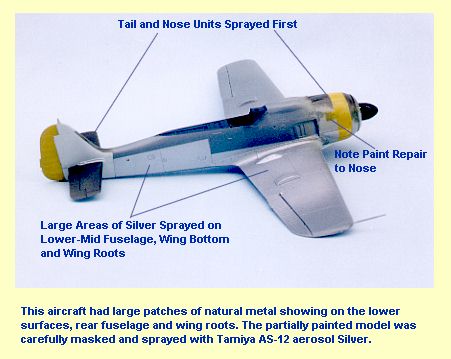
The bottom of the wings, the lower fuselage and wingroots of the subject aircraft
exhibited large areas of natural metal. To achieve the natural metal effect I use Tamiya
AS-12 Silver from an aerosol can. I really like the subdued finish offered by this option
(besides, I don't like running lacquers or enamels through my airbrush). Some variety can
be achieved by polishing individual panels or overspraying sections with a smoky paint
mix. I masked the nose and tail, plus the upper fuselage to avoid excessive overspray,
then sprayed the model straight from the can.
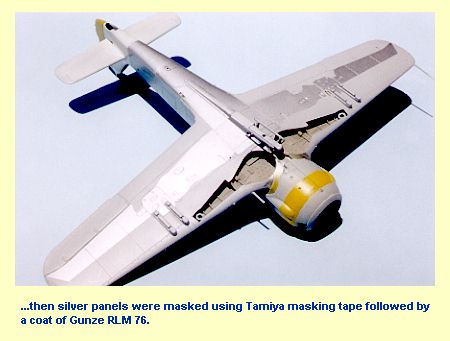
 The aerosol paint
dries quickly. I masked the silver panels with Tamiya tape then applied the camouflage
colours commencing with the RLM 76 for the fuselage and wing bottoms. The aerosol paint
dries quickly. I masked the silver panels with Tamiya tape then applied the camouflage
colours commencing with the RLM 76 for the fuselage and wing bottoms.
I started the complex camouflage pattern on the upper wing with a base coat of Gunze
H332 "Light Aircraft Gray" for the RLM 77, followed by Aeromaster Acrylic 1031
"RLM 81 Braunviolett" and finally Gunze H423 "RLM 83 Dark Green". The
upper surface camouflage for the wings and the upper fuselage deck were sprayed freehand.
I used True Details "Fast Frames" for the blown hood. A few drops of
detergent were added to a small bowl of warm water. The frames are not sympathetic to a
lot of repositioning, but can be "fine tuned" while still wet. I was happy with
the result.
 The decals were everything I
have come to expect from KommanDeur. Excellent side and plan view colour diagrams and
notes accompany the letter-sized decal sheet. All of my decals were in perfect register.
Care is required in application as the decals are thin, but they site down beautifully on
the surface of the model and they are perfectly opaque when dry. The decals responded well
to Super Set. The decals were everything I
have come to expect from KommanDeur. Excellent side and plan view colour diagrams and
notes accompany the letter-sized decal sheet. All of my decals were in perfect register.
Care is required in application as the decals are thin, but they site down beautifully on
the surface of the model and they are perfectly opaque when dry. The decals responded well
to Super Set.
The yellow of the decals was richer than the Gunze paint I used for the rudder and
noseband. I mixed up a new batch of yellow, mixing a few spots of red with the Gunze paint
to achieve a match with the decals.
A final coat of Gunze Flat blended the decals with the paintwork.
Weathering comprised a chalky charcoal-coloured mix for the exhaust stain and a light
overspray of panel lines with a thin mix of Tamiya semi-gloss black. Silver pencil was
employed for light chipping of walkways and leading edges.
KommanDeur's decals provided the source of inspiration for this enjoyable project. The
quality of the decals matched the originality of the subject.
Tamiya's Wurger is a terrific little model. With some work on the undercarriage and a
few extra details it can be made even better. It is without doubt the best engineered
model I have built so far.
Model, Text and Photographs Copyright © 1999 by Brett Green
Page Created 03 May, 1999
Last Updated 26 July, 2007
Back to HyperScale Main Page
Back to Features Index
|
 Home
| What's New |
Features |
Gallery |
Reviews |
Reference |
Forum |
Search
Home
| What's New |
Features |
Gallery |
Reviews |
Reference |
Forum |
Search