Home
| What's New |
Features |
Gallery |
Reviews |
Reference |
Forum |
Search
Home
| What's New |
Features |
Gallery |
Reviews |
Reference |
Forum |
Search
|
|
|
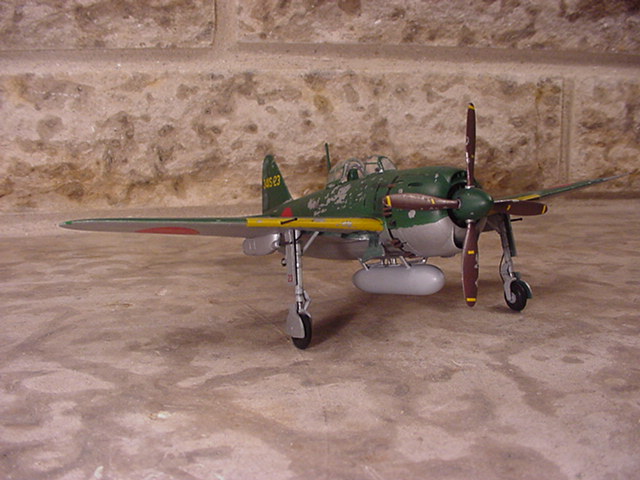
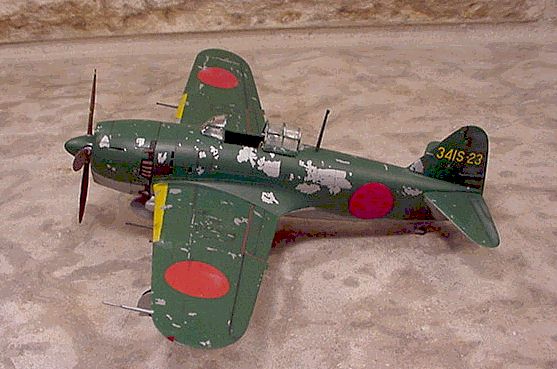
N1K1 Shiden (George) by Graham Hunter
This model represented three firsts for me. First time using photo-etched detail parts, first time using acrylic paints and first time doing a Japanese aircraft.
Otaki's 1/48 scale Kawanishi N1K1-J Shiden "George". I found this kit to be a diamond in the rough. Mouldings were well detailed with recessed panel and rivets. The kit includes a beautiful full colour scale (1/48) drawing of the aircraft which serves as an excellent detail reference. Decals were bad so I did not use them.
The instructions are in Japanese so I just used them for their pictorial reference.
Tip: I have found for polishing clear pieces that ordinary paper works very well. Paper with printing polishes plastic even better. Other detailing included: Airscrew hub detail added - spinner openings for blades enlarged and collars added to blades. Exhaust ports drilled out and shaped (ovalized). Air intakes on cowl opened (using Dremel tool). Added brake lines to main landing gear (used wire painted black). Added rudder control actuator. Cut and sectioned the canopy. Stretched sprue antennae wire added. The kit went together quite well with only a small amount of filler required.
For the cockpit I used an under coat of Testors Aluminum and Steel. For the over coat I mixed Testors Model Master interior green, grey and white to make the "bamboo green" for Japanese cockpits. The metal under coat makes it easy to create a worn and chipped look. The entire aircraft is airbrushed with an under coat of Testors aluminum for the natural metal finish under surface. The upper surface is airbrushed with Aero Master Kawanishi green. I used the masking tape and pull method to get the chipped paint effect. Aero Master decals for N1K1-J are used. A coat of acrylic clear gloss was applied prior to putting decals on. I used both Aero Set and Sol with good results. All other weathering was done with conte pastels.
The markings are for the 402 Hikotai, 341 Kokutai - Philippines 1944
Model, Text and Photographs Copyright © 1999 by
Graham Hunter
|

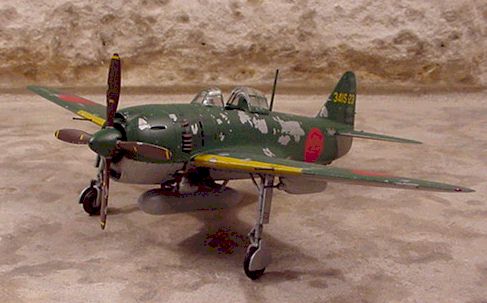 I dry
fitted all pieces prior to final construction. The instrument panel in cockpit
caused the fuselage halves to 'split' when fitted together, so some filing was
required to get a good fit. I used Re-Heat photo-etched detail parts for the
upgrading of the cockpit. This included seat, seat belts and rudder pedals. This
being the first time I used PE parts I took considerable time on getting the
right look. I removed the moulded throttle controls and scratch built a
replacement. The moulded controls were to flat. I also scratch built the
gunsight.
I dry
fitted all pieces prior to final construction. The instrument panel in cockpit
caused the fuselage halves to 'split' when fitted together, so some filing was
required to get a good fit. I used Re-Heat photo-etched detail parts for the
upgrading of the cockpit. This included seat, seat belts and rudder pedals. This
being the first time I used PE parts I took considerable time on getting the
right look. I removed the moulded throttle controls and scratch built a
replacement. The moulded controls were to flat. I also scratch built the
gunsight.