|
Heinkel He 178V-1 Prototype |
Heinkel He 178V-1
by
Floyd S. Werner, Jr.
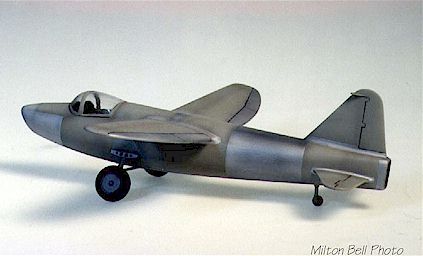
images by Milton Bell
|
Heinkel He 178V-1 Prototype |
B a c k g r o u n d |
The He178V1 was the first jet of the Third Reich. It was designed by Ernst Heinkel in 1938
and flew on 27 August 1939 as a test concept proof of jet aviation. The fuselage was
metal, the wings were wood and it had retractable landing gear, but these were locked down
for the V1. It flew about 12 flights in all before being retired to Berlin Air Museum
where it was destroyed by American bombers in a 1943 bombing raid.
T h e C o n d o r K i t |
This little kit was released a few years ago as a limited run injection kit. It didn't come with any decals, because none were required. The basic kit comes with injection molded parts, photo etch fret from Eduard and one slightly clear canopy. As there wasn't a lot of research material available the kit was relegated to the top shelf. As a tour in the California Desert known as the National Training Center (NTC) loomed in my future I started thinking of a kit that I could take that didn't have that many parts and could be easily built in the lull periods. The He-178 seemed to fit the bill. So with my trusty travel box and the small amount of reference materials I prepared to attack the OPFOR and the Heinkel.
C o n s t r u c t i o n |
I didn't start with the cockpit because it was mostly photo etched. I went right to the fuselage halves. They fit typical for a limited run kit and benefited from dry sanding on the piece of glass that I brought. Hey, I said I was going to the desert not the moon, plus RHIP (Rank Has It's Privileges). The fit for the front blanking plate was so bad that I had to super glue and putty the thing several times to get the fit correct. This blanking plate fits the front of the cockpit area so any gap would be noticeable. This required that the front and back of the plate be smooth. I would have preferred something that looked a little bit more like a turbine and ducting (are you listening Seamless Suckers?). The tail cone and exhaust were put in place. After getting these things as best I could and the available light would let me.
Picture this if you will - a bald guy sitting on his cot over his foot locker, wouldn't want a part to fall in the sand, with a Mag light between his teeth at 2100 hours (9PM).
 The wings were next.
Attach the top wing first and get the alignment correct, I think mine is off. And then
attach the bottom two halves.
The wings were next.
Attach the top wing first and get the alignment correct, I think mine is off. And then
attach the bottom two halves.
These parts benefit from sanding the trailing edge to thin them. Be careful because the kit has the fairings in the fuselage and they don't line up real well if the wing trailing edges are too thin. I don't know if this is a kit problem or the actual airplane had a thick wing.
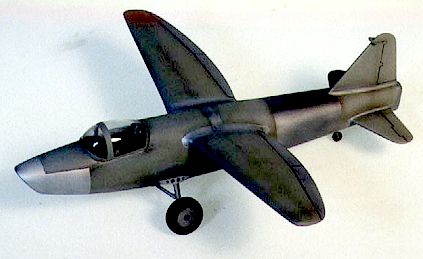
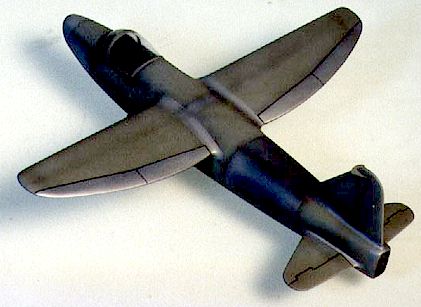
The tail planes fit real well but require pinning to attach them securely. Now was the time my friends thought I was weird. I would "fly" my model over to them and show them how I had progressed and of course make the "whoosh" sounds that an early jet would make. I also finally had a chance to see a 3D creation of this airplane and realizedthat this airplane is ugly. Cigar shaped fuselage and short stubby wings. Obviously the Rodney Dangerfield of German airplanes.
I thought I would be slick and drill out the lighting holes in the landing gear legs. Big mistake. The legs are put inside a piece of photo etch that has less holes. Well that played hell getting them close to correct back home. Now was a good time to clean up the little parts. Like the tires.
After re-deploying back to Ft Hood I played with the landing gear. I finally got it to the point that I liked it. I also started putting on the photo-etched parts on the external surfaces. This was unique in that you had to saw a place for the balance weight on the rudder. Be careful and saw it straight and on the rudder hinge line.
The interior consists of an injection seat, stick and pedals plus photo-etched left and right consoles and instrument panel. It is nice but the fit is very tight. I ended up sanding the side of the seat so that it would fit.
P a i n t i n g a n d F i n i s h i n g |
Now I painted the whole thing, inside and out RLM 02. Weathering the interior with burnt umber and a dry brush of white brought the interior alive. Next dip the canopy in Future and let it dry two days I masked it with Bare Metal Foil and attached it with Elmer's Glue. Now is a good time to evaluate the surface, which must be flawless for the silver.
 Before painting the
silver I quickly sprayed the canopy and then coated the entire model with Future to obtain
the flawless finish. I painted the silver Model Master Metalizer Aluminum on all control
surfaces and magnesium on the fuselage center section. After everything dried I realized
that this model is uglier painted than unpainted. It lacked lots of life. Weathering
should be kept to a minimum because it was a brand new airplane. I decided it needed panel
fading to bring it to life. I airbrushed Tamiya Smoke on the panel lines. This did it
along with a wash and Rapidograph pen for the control surfaces. After a coat of Polly-S
Flat I finally had the look I wanted.
Before painting the
silver I quickly sprayed the canopy and then coated the entire model with Future to obtain
the flawless finish. I painted the silver Model Master Metalizer Aluminum on all control
surfaces and magnesium on the fuselage center section. After everything dried I realized
that this model is uglier painted than unpainted. It lacked lots of life. Weathering
should be kept to a minimum because it was a brand new airplane. I decided it needed panel
fading to bring it to life. I airbrushed Tamiya Smoke on the panel lines. This did it
along with a wash and Rapidograph pen for the control surfaces. After a coat of Polly-S
Flat I finally had the look I wanted.
C o n c l u s i o n |
Entering in the civilian category was something different as is seeing something so ugly and out of proportion amongst beautiful shiny airliners. I can recommend this kit for people just starting out on limited run kits and first time photo ethers. It is different.
Maybe bigger isn't better.
Back to HyperScale Main Page
Back to Features Page