Home
| What's New |
Features |
Gallery |
Reviews |
Reference |
Forum |
Search
Home
| What's New |
Features |
Gallery |
Reviews |
Reference |
Forum |
Search
|
|
|
Heinkel He 219 by Mikhail Poutnikov
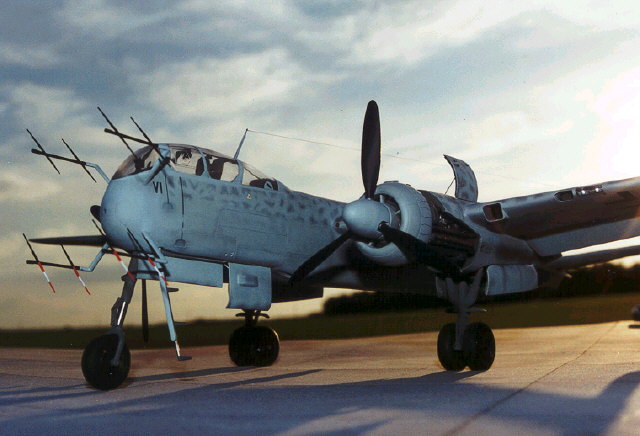
Potentially one of the Luftwaffe's most effective night fighters, the Heinkel He 219 "Uhu" (Owl) was an aircraft that suffered from the poor judgement of senior members of the government and the Luftwaffe high command (principally, in this case, Generalfeldmarschall Erhard Milch, Inspector General of the Luftwaffe). Although the aircraft had proved itself a match for British bombers, including the de Havilland Mosquito, Milch succeeded in having the program abandoned in favor of the Junkers Ju 388 and the Focke-Wulf Ta 154. A total of 274 aircraft including prototypes were produced. Despite the relatively small number available the He 219 night fighter was remarkably effective. Altogether 111 enemy aircraft were shot down by He-219s between 12 June 1943 and 25 June 1944. The He 219 was, without a doubt, an excellent all weather airplane but flight tests conducted at Farnborough after War showed that Heinkel fighter's reputation was somewhat overrated. In fact, the most of produced aircraft were DB-603A and E powered, while series production of DB-603 G engines had run into serious problems. Without the installation of more powerful engines, the He 219 could not reach performance levels comparable with those of the British Mosquito. Indeed, the maximum speed of the He 219 aircraft equipped with DB 603A engines, SN-2 antennas and flame dampers was 585 km/h. Nevertheless, for aircraft historians and modellers the He-219 is a favorite object for discussion, and in common with many modelers, I love this machine.
It was a formidable adversary, the world's first operational aircraft equipped with ejector seats and also the first aircraft with nose wheel tricycle landing gear to achieve operational status with the Luftwaffe.
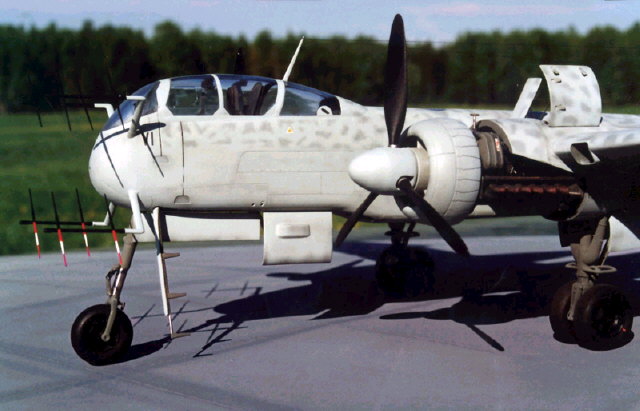
I've seen different building reviews and they pretty much cover the main features of the kit, so I will not go over the subject again. Suffice it to say that the Tamiya kit is molded with their typical engineering qualities - nice details and engraved panel lines. The kit doesn't have any serious "problems" so I want to focus on areas of improvement. As usual, I started by studying references. I decided to build aircraft Werknummer 310189 (D9+CL) from NG1. This Uhu was captured by the British and happened to be an extremely well-photographed airplane. I found a good reference material of this aircraft but many questions remained. Tamiya are mistaken about the 310188 number on the decal sheet and the Third Group decal sheet helped me to correct this error. The main questions were connected with the type of this certain aircraft and its weapon configuration. Unfortunately, references disagree with each other in several ways. Some sources insistently refer to this aircraft as the He 219V11 prototype. In my opinion this is incorrect, because the real He 219 V-11 had a Wr. number of 190011 and it crashed in a landing accident at Wien-Schwechat. It seems very odd that V11 was rebuild after crash and received new Wr. number. According to production list the aircraft with number 310189 has to be an A-2 sub-type and is featured with the following armament: two MK151 cannons in the wing roots, two 30mm MK108 in ventral tray and a further pair of obliquely forward-firing 30mm cannons in a "Schrage Musik" installation. The upward-firing "Schrage Musik" weapon system on the He 219 aircraft was another interesting aspect. Some references noted that this system was ineffective and was not installed on the serial production aircraft. I wanted to clear up this question and tried to find as more information on this matter as possible. In the Ronald Remp's "Der Nachtjager Heinkel He 219" book was noted that all "Uhu" aircraft were factory equipped with the "Schrage Musik". I can agree with that but on the other hand night fighter aircraft with the "Schrage Musik" installation must have the upward-aiming gun-sight. The type of aircraft doesn't matter, I know for sure that Ju -88G had this gunsight mounted on in front over the head of the pilot. In the ProfilePublication He-219 book (ref 5 page 204) I've found the following information:
So there is only one problem: I studied all published photos of the He-219 aircraft and couldn't find upward-firing gunsight. In the Ronald Remp's book I came across of a note that the "Schrage Musik" was deleted by the airfield crew because they had structural problems in the rear fuselage (cracks in the fuselage ribs caused by the heavy recoil). This was news to me. I was sure that the main reason for deleting the upward-firing cannons was the reduction of weight. That was not a bad explanation and I continued my research. The only survived "Uhu" aircraft is stored at the NASM and it has two openings on the top of fuselage for "SchrageMusik" cannos (see photos at "Scale aviation" Vol.1 magazine page 33) and a bracket on the top of canopy frame (Ref.2 page 36). Perhaps it is a bracket for upward-firing gun-sight. I started this discussion not out of idle curiosity. In my opinion, if you are going to build the He-219 model with "SchrageMusik", you must install additional gun-sight, otherwise you have to close openings on the top fuselage surface. Regarding the aircraft Wr. 310189, a couple of good quality photos at the Eric Brown's book Wings of the Luftwaffe (page 141 and 144) clearly show that this machine didn't have gun-sight on the canopy frame but all photos were made at Farnborough and it was possible that gunsight and cannons were dismantled during trial test. Another detail attracted my attention in these photos - a small block located between the pilot and operator head rests (note, on the photos aircraft was without ejection seats). I've seen this block on the NASM photos. It was mounted on the canopy frame near the bracket for upward gun-sight (Ref. 10, page 31). I'm not sure but I think it was a part of the "Schrage Musik" weapon system. I came to my final conclusion when I noticed a heavily worn area on the fuselage side around the cannon access hatches. It was a good indication that "Schrage Musik" was installed, so I would have to add the upward gun-sight on my model. I would like to take this opportunity to thank all modellers and aircraft researchers who helped me find answers to many questions regarding this aircraft.
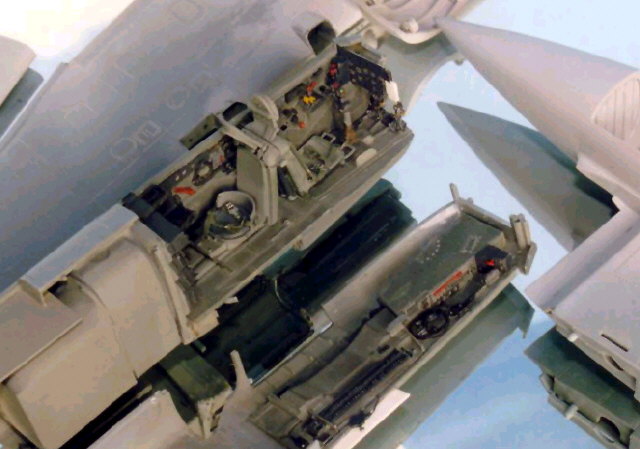
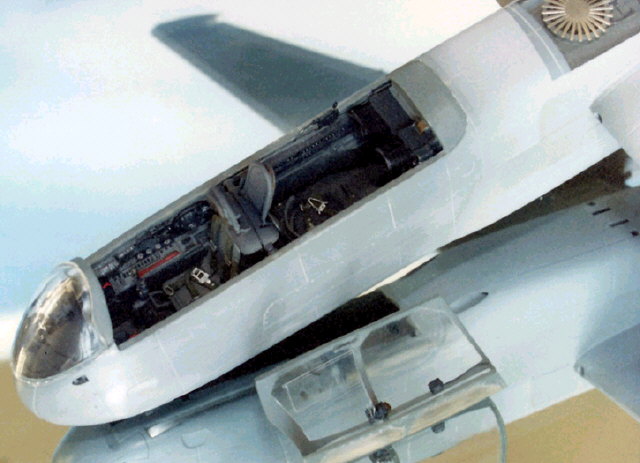
I started construction with cockpit area. The detail level of the Tamiya's kit cockpit is quite good. One interesting feature is the metal ballast supplied as an integral part of the cockpit tub and nosewheel well. Although this is a helpful innovation to avoid a tail-sitting model, it looks rather crude in my opinion. I therefore decided to replace the metal part and improve the detail of cockpit and nosewheel interior. The AIRES firm offers two excellent resin sets (cockpit set 4046 and Super Detail set 4042). The cockpit is replicated with the floor detail (with correct wheel interior on the back side of detail), both sidewalls and radar equipment rack. The moldings are in a light tan resin and are beautifully cast with sharp detail. The detail level is marvelous. Everything is included: instruments, levers, throttles, armored seats, Revi16 gunsight and different small details. It is one of the most beautiful resin sets I've ever seen. The etched plate contains details for instrument panels with photo film dials, seat belts, rudder pedals, various levers, handles and... I only added a few scratch built details and installed weight behind the cockpit area instead of the Tamiya's ballast detail.
Painting of the cockpit was the next step. It is the favorite subject for discussions. Generally on a late war production fighter you would expect to find RLM66 for the cockpit interior. Tamiya's instruction recommend to use TS-48 paint for finishing cockpit. This paint looks like slightly lightened RLM66 color. That seems correct, but on the color photos of the He 219 cockpit from NASM interior paint looks like RLM02. Based on my available references, it would appear that both RLM66 and RLM02 colors were used for painting cockpit interiors up to the end of war. One must also assume that this late in the war that some factories might not have followed the RLM standards. I thought that RLM02 color was perfect and used it for finishing cockpit. I painted electrical panels, radar equipment rack and instrument panel with RLM66 Black Gray. Worn and chipped look surfaces were replicated using metal undercoat paint and dry drybrushing. Nothing unusual really - this has become normal practice for many modellers. I used thinned Dark Gray paint, airbrushed to create a "shadow effect". Some cockpit areas (shadow places) should be a bit darker. I think that a "Shadowed" cockpit looks more realistic and I'm going to use this artist paint effect for all my future model projects. As for my "Uhu" model, I spent well over a week just painting the interior and adding different small details and enjoy the result. At the back of my mind I understand that something in my cockpit might have been better but "...the road not travelled ...". The final assembling of fuselage was without any surprises or problems. I recommend installing the resin cockpit sidewalls first and then fix the floor detail, instrumental panel and other resin details. At this stage I cut off the FuG 220 antennas (in order to avoid damage), opened the shell ejection ports and scribed a slot for boarding ladder. Tamiya designers tried to replicate the recessed Direction Find aerial with clear plastic detail but I replaced this detail with etched part and vacuum formed transparent cover. In my opinion, it looks better. The canopy parts were masked and sprayed with RLM02 color to replicate the frames visible from the interior. Once the paint dried and the masking was removed they looked quite convincing.
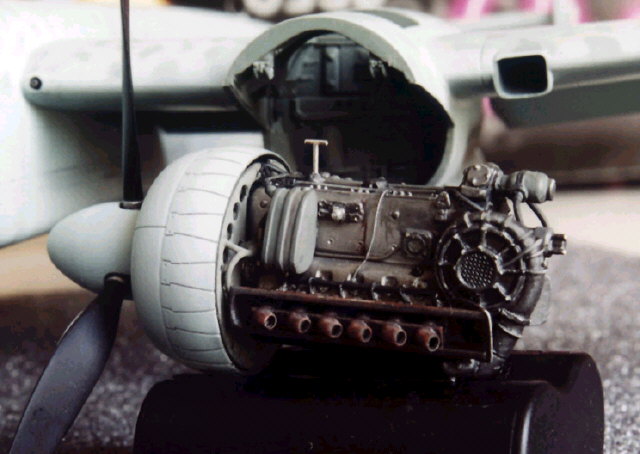
I improved the main landing gear bay interior. Installation of the AIRES details was the best way for replicating correct internal structure of gear bay with a lot of electrical and hydraulic equipment. Resin details allowed me to improve interior of gear bay without any problems and spending mountings of available time. Before putting the wings details together I opened the supercharger and heating intakes and fashioned new plastic details to replicate the air ducting. The fit of wing parts is almost perfect with the only slight problems that requires a little including filling and sanding at the aft end the engine nacelles, correcting the nacelle cross section (squared) and rescribing some of missing panel lines. The AIRES super-detail set provides detail for building this model with opened engine bays, weapons bays (ventral tray and wings bays), detailed electronic bay on the top of fuselage and some other outstanding features. I didn't want to spoil elegant appearance of Heinkel's aircraft and tried to find the best compromise between saving clean shape of aircraft and my tendency to strip model. I decided to show the opened up left engine and left wing gun hatch. The Aires resin set contains two beautiful DB-603 engines. The four-point engine mounts on the He 219 had some very interesting features and the AiRes resin kit correctly replicates the integral structures build into the upper engine nacelles. I used the reference photos and applied different shades of metallic paints for finishing the engine block, also adding a lot of small details and wiring. It took me some time and a lot of scratchbuilding experience but the finished engine doesn't look too bad. AiRes kit is certainly worth the money and I highly recommend it for modellers.
Another area that really needed improvement at this stage was the wing and navigation lights. I installed new lamp frames with metal reflectors, bulb details and clear lenses in to wing light bay. A new crystal clear cover was vacuum formed from thin transparency plastic sheet for replacing the kit detail. I also decided to add navigation lights to the wing tips. They were made from transparent red and green plastic. After removing the corresponding section from the kit wing, I dry-fitted the clear plastic block into the space, drilled a hole into each wing tip detail to represent bulbs. As usual, new clear plastic details were glued and the tip lights were sanded to match the original wing contour and polished with Tamiya polish compound. A cutter was the ideal tool for cutting through the ailerons and tail plane elevators. The molded on solid plastic trim-tab actuators on the tailplanes and ailerons were replaced with more realistic scratchbuilt items. Note that the aileron on the right wing should not have a fixed trim tab.
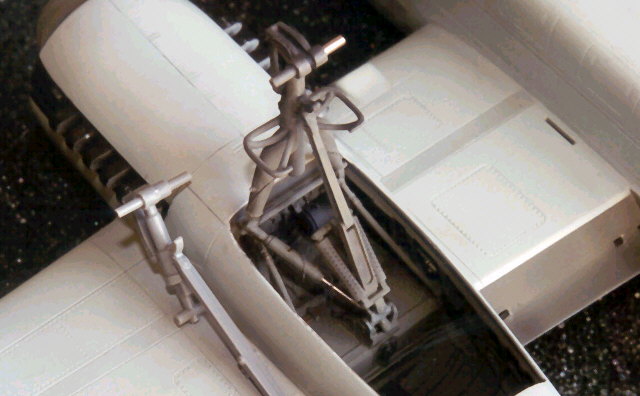
The rest of the kit went together very well, with excellent fit. I should however draw attention to the landing gear details. Armed with reference photos I modified the gear. Improvements included installation of new retraction struts, torque scissors links, drag braces and brake lines. The main gear leg drag brace on the He 219 aircraft had a rather complex design. I rebuilt this detail using H-shaped plastic profiles, etched and scratch details. The assembled landing gear was given a coat close to RLM02 with Dark Gray wash and dry-brushed.
The gear doors had some ejector pin marks but this wasn't a problem. The gear door actuating linkages were added. The tires were airbrushed with combination of Testors Flat Black and Rubber paint and then were dry-brushed by various shades of Gray paint. On my last assembly stages I fitted all the various antennae and external small detailing. I an not a big fan of plastic antennae because they look rather crude and they are a magnet for damage. I therefore installed a new metal D/F loop, and FuG-25A (IFF) aerials. Note that this particular aircraft was not equipped with the FuG16 aerial. Pilot tube and some other small details also were made from metal. The main problem and real headache for me was the FuG 220 SN-2d antennas. I managed to find a line drawings of the FuG220 antenna dipole and soldered five H-shaped elements from fine metal tubes for replacing plastic details. True detentions (diameters) of this element was 26/20/16 mm. I would like to inform all night fighter fans that Russian Model Point firm announced a new product FuG 220 antennas. As in my project, the Model Point antennas are soldered from metal tubes. They look realistic and I hope this product will help modellers finish their projects.
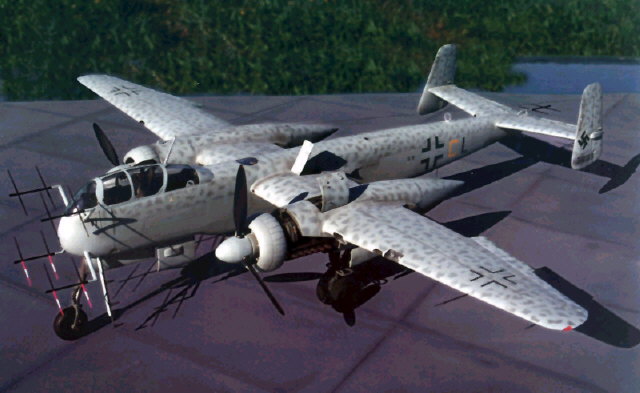
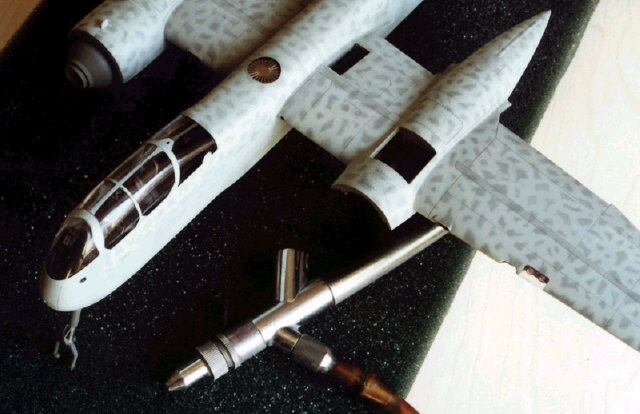
With all the major components assembled, it was time to paint the model. I checked with reference photos illustrating the style of camouflage and overall appearance of the certain aircraft. The upper surface appeared to have first received a solid coat of RLM 75 Gray-Violet, with a very tight, uniform "squiggle" of RLM 76 White-Blue. This created the impression of a Gray-Violet mottle. This "reverse mottling" method of application was described at the Brett Green's articles devoted to camouflage painting of the Luftwaffe night fighters. I just want to note that the camouflage colors have to be slightly lightened for achieving a "scale effect". I've tried to reach right shade of RLM color by adding small amount of white paint. Additionally, I want to point the following details of paint the He 219 Wr. 310189 aircraft:
Painting this RLM 76/75 mottled finish was a real challenge. I've never applied mottled camouflage on such a large surface. I tested different paint tricks and technologies on scrap models. This particular He219 aircraft had rather small camouflage spots and in my opinion, freehand painting the RLM75 dots over RLM76 color was the best way for painting model. Before painting I prepared my airbrush for a fine job. I used my usual double action airbrush and just improved the nozzle detail, sharpened and polished needle. Extremely thinned paints and low air pressure were used as to allow me to work with my airbrush like with fine brush. I painted, repainted and corrected shape of every spot. After finishing this rather mundane task, I sprayed Dark Gray paint along the panel lines and applied several coats of highly thinned RLM 76 to reduce the contrast between camouflage colors.
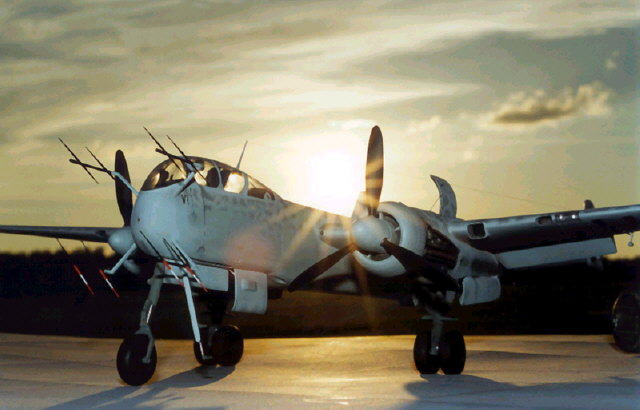
This well-worn gray camouflage paint of the "Uhu" aircraft gave me plenty of scope for weathering. I replicated the streaks and exhaust stains added different shades of RLM76 paint (it provide some eye-catching contrast). [photo M_21.jpg]. A medium gray wash was flowed into panel lines, while a black wash was applied to the access panels and around engines. I tried to find the best compromise between the model accuracy and ragged appearance of real fighter. I prefered a slightly weathered look - not too heavy, but heavy enough to be noticeable without being obtrusive. The spiral son the spinners were recoated with very thin RLM76 to achieve the repainted effect. The exhaust flame suppressers were painted Gun Metal paint, then coated with Matt Black and weathered with different shades of brown and rust. On the whole my photos of He219 show heavy exhaust staining on the engine nacelles, wings and tail fins. I used black, gray, and brown paints for simulating very extensive staining from the DB 603 engine. The nacelle panels and engine block received a further dark wash of diluted black and small areas of brown paint simulating oil stains and leaks. I managed to find the Three Geese decal sheet for my model project. The TG firm produces a good He-219 decal with thin clear film and very interesting notes about correct style of fonts and size of crosses and swastikas. I found the only photo of Heinkel aircraft with Wr. number 130189 with crosses and swastikas and want to note to following details of the certain aircraft stenciling:
[photo 31189d.jpg] Important note: this photo was dated by 1946 year but I suppose that was mistake because in August 1945 aircraft received British insignia. I replaced fuselage crosses and swastikas with spares from different decal sheets. Finally the model was sprayed with Matt Varnish coat and the decals ended up looking like paint.
There are only a couple of minor areas where I believe criticism is justified. Even so, these minor points don't detract from otherwise exceptional kit that reasserts Tamiya's status as the leader in kit design and production.
I had a lot of fun building the He 219 model and studing history of creation and development of this very interesting aircraft. In my opinion this kit is good for building it straight out of the box or providing the advanced modeller with a great base for the masterpiece. I recommend this kit to modellers of all skill levels.
Click the thumbnail to view the
image full size.
Text and Images Copyright © 2000 by Mikhail
Poutnikov
|