 Home
| What's New |
Features |
Gallery |
Reviews |
Reference |
Forum |
Search
Home
| What's New |
Features |
Gallery |
Reviews |
Reference |
Forum |
Search
|
|
Heinkel He 280 by Fred Hocker
Eduard's Heinkel He 280 in 1:48 scale
I have to confess to being afflicted with a pair of interests that are combining to fill my shelves with plastic. The first is a fascination with oddball designs, prototypes, and developmental dead ends from the 1930s and early 1940s. This period of revolutionary change in aircraft design saw a wealth of intriguing ideas turned into metal (and wood and fabric), and a surprising number of them actually got off the ground. So rather than the fighters of famous aces, my shelves are inhabited by the likes of the Fokker D.XXI, Fw189, Bv141, etc. I think it is great that Tamiya is producing the Do335. The second fascination is with the products of the Czech model kit industry. These companies, many of them descended from or related to the Soviet-era resin kit producer MPM, seem to have a direct channel to my wish list. They cover subjects that the Big Boys cannot make money on, and their products often combine high quality with low prices (at least here in Europe). The leader in kit quality is Eduard, which is perhaps better known to the WWII modelling community as a producer of photo-etched accessories but has produced a series of respected kits of WWI subjects. In recent years they have switched from the traditional low-pressure, resin-mould technology typical of short-run production to a method that produces injection mouldings similar to the high-pressure products from Hasegawa et al. In addition to their own kits and brass, they also make components under contract to other firms, such as MPM and Classic Airframes. In the resin aftermarket, some of the best value is provided by companies like Aires and CMK, who make cockpits, engines, and other details under their own name as well as for kits by other manufacturers. The better Czech kits often include the resin and etch bits that would have to be purchased as extras for a mainstream kit. The down side of this twin addiction is that except for Eduard, most short-run companies do not produce very high-quality injection mouldings. Engineering tends to be relatively poor, pieces are very thick, sprue attachments are heavy, moulding flaws abound, and mould alignment is often a problem. These kits are still worthwhile for their subject matter, but require more in the way of old-fashioned modelling skills than the newer "shake and bake" engineering marvels from Japan. I do not mind this, as I am a scratchbuilder at heart, but these kits are not for the impatient or timid. Fortunately, Eduard's new He280 is an example of just how good these kits can be.
Heinkel's He280 was designed in response to an RLM specification for a fast fighter powered by gas turbine engines then in development. Although Messerschmitt's Me262 was the faster aircraft and has justly received the lion's share of the glory from Germany's efforts in jet aircraft design, Heinkel's He280 was actually the first to fly, in April 1941, and thus was the world's first functional jet fighter by more than a year.
Although the aircraft originally flew with the Heinkel engine, this item refused to respond to attempts to improve it and other powerplants were tried. In addition to the HeS 8b and the BMW 003, the Jumo 004 was tested on several prototypes in 1943, after it finally became available. One prototype was even modified to carry four pulse jet engines (as used in the Fi106 "buzz bomb"), mounted in pairs. Prototype V2 was fitted with armament for gunnery trials, three MG 151 cannon in the nose, but the basic design was doomed. The German aircraft industry was forced to focus on production of a limited number of designs in increasingly difficult conditions, the Me262 had shown itself to be the better (faster) aircraft, and the RLM pulled the plug. A total of eight prototypes were built, of which two were converted to gliders for aerodynamic testing. Top speed achieved at altitude was 817 kph, using the Jumo engines with 900 kg of thrust, and handling characteristics were very favourable.
I have seen the future of aircraft model kits, and I think its name is Eduard. Combine injection moulded plastic that rivals Tamigawa in quality with fine resin details, photo-etched doodads, two canopies, and a cast nose weight, then sell it all for less than $30.
You get 93 injection moulded styrene parts on three trees in two separate bags. These are in a dark grey plastic with minimal to no flash, excellent mould alignment, and even a couple of locating pins on the fuselage halves and tabs on the wings and horizontal stabilisers. Unlike typical short-run kits of the past, this kit is engineered to a pretty high standard (no narrow edge joins or locating small parts on featureless expanses of plastic) and very carefully moulded. The surface detail is excellent, with panel lines evenly and crisply engraved, but more to scale than the trenches on a Tamiya kit. Parts are thin and of even thickness. The surface finish is very smooth, even on inner surfaces, and small parts, like landing gear actuator arms, are of even diameter and circular section. The parts include all necessary items to make either a Heinkel- or Jumo-engined prototype (which means two complete sets of engine cowlings and intake/exhaust ducting, but no interior engine detail or opening cowl panels). The arrangement of sprues is cleverly engineered to make it easy for Eduard to offer two different base versions of the kit, with either the Heinkel or Jumo engines. You do not get a gun nose to make the armed version, and the engineering of the kit does not suggest that this is planned as a future release (the nose weight goes in the gun bay).
You get a steel photo-etched fret that includes the belts, control knobs, landing gear details, and instrument panels, in typical Eduard quality. The instrument faces are on a sheet of clear film. One mark of the quality of this kit is that the instruments moulded on the face of the styrene instrument panel are of nearly equal detail and crispness to the photo-etch - the main reason to use the photo-etch is to avoid having to paint the instrument faces. You get two canopies, in clear injection moulded styrene, giving the option of making the model with canopy closed or open without any surgery. These parts are crystal clear and reasonably thin. You get a cast metal nose weight, nicely fitted to the inside of the fuselage that keeps the finished model properly poised on its wheels. You get decals printed in Poland, offering marking options for three prototypes, V2, V3, and V8. As V2 carried Heinkel engines early in its carrier and Jumos later, this actually gives four options (now, if they only had the V-tail for the V8 glider conversion and the pulse-jet motors…). Of course, since all were painted in a uniform RLM02 grey, the options all look the same unless you are a radio code freak. The marking instructions are dated, so that one V2 option is for March of 1943 and the other for July. In short, just using the stuff in the box, you can build nearly half of all the He280s ever made. You get a set of Eduard's Express Masks for the canopy and the wheels. The canopy masks do not provide complete coverage of the clear parts, only the edges against the framing. You will have to cover the rest of the glass with Maskol or something similar. You get an instruction sheet clearly printed in two colours (black and blue) and five languages. This has the traditional panel of parts inventory with numbers (even though the styrene parts are numbered on the sprues, just like the Big Boys), very precise painting and assembly instructions, and two panels of marking instructions. Negatives? Well, the detailing is pretty minimal, with fairly rudimentary undercarriage and absolutely no detail in the wheel wells, and the turbine blades just barely visible in the engine intakes and exhausts are a little crude. As for accuracy, that is not easy to establish, given the limited documentation available, but the parts scale out very close to the published dimensions. There are some surface details missing, especially on the engine covers. The resin seat is a very close match to a surviving example in the Deutsches Museum and is probably patterned after it. This kit is also available in two non-ProfiPack versions, without the resin or etch and with only one choice of motor. This sells for only 150 kroner or so (well under $20, once you knock off the Danish VAT), and this might even be a better deal. There is sufficient detail in the styrene that the resin and photo-etch are really just icing on a very good cake.
The cockpit is a tub made up of four pieces (floor/back, two sides, instrument panel) that, although simply arranged, fit positively with minimal cleanup. The centrepiece of the cockpit is the ejection seat, which is injection moulded as a separate pan, back, and grab handles. The resin item is a single piece with the mould block on the bottom. A small amount of very light flash is present around the tiny handles, and it is important not to break these off while cleaning up the bottom. The resin is soft and cuts very smoothly, so cleanup is a breeze. I did not bother to hollow out the bottom between the rails as it is not visible once assembled.
Cockpit painting is a snap - nearly everything but the seat, belts and instruments is shown as RLM02. I used Humbrol enamels throughout, but mixed my own shade of RLM02. Humbrol suggests their no. 92 for RLM02, but it is much closer to RLM66. The seat is bare aluminium (Humbrol MetalCote) with leather pads (the instructions say black, the box art shows brown, the preserved example in the Deutches Museum is black - I went for brown, H-62, mostly to provide some relief from the grey/black monotony of the rest of the cockpit) and black handles. I chose to embellish a little by adding coloured knobs on the throttles (accuracy questionable), etc. The belts were done as buff canvas (H-103) with leather lap pads. I chose to leave the nickel finish of the etch plain for the buckles. Weathering was minimal, with a wash of black to give a little depth and some shading/highlighting of the pads and belts on the seat. I also added a little scuffing (dark brown drybrushed) and chipping (aluminium flecks) to the floor in front of the pedals. After the cockpit and nose wheel well are assembled, the fuselage goes together quite simply. Cockpit and wheel well, along with a few judiciously placed locating pins, keep the two halves aligned pretty well. The cast metal nose weight fits nicely over the wheel well and is smoothly finished, so it can be superglued in place to keep it from rattling around. After seam cleanup only the barest amount of filler was required, on the bottom between the wings (and I could have avoided this with a better clamping arrangement). The weight high in the nose does give the assembled fuselage a slightly annoying habit of rolling over onto its upper surface whenever you set it down, so it is a relief to get the wings on. The wings are simple upper-and-lower assemblies with wheel wells moulded into the lower half. A short tab then locates in a slot on the fuselage side. Not the most positive of joints, but superior to the typical short-run engineering. The trailing edges of the wings need a little thinning, which is complicated by the kink at the engine, and the appropriate holes must be opened in the wings for the engines being used. Wing fit to the fuselage can be improved by some adjustment of the mating surfaces, but this is a little tricky. I opted for some carving of the surface to eliminate the gap on the topside and filled the bottom. Due to the short tab, dihedral set is not automatic, so some care in clamping/blocking is needed here. Because the fuselage is completely round in section and there is no central tail fin for referencing, I found it difficult to get the dihedral of a single wing correct. Instead, I attached both wings and then adjusted dihedral before the cement set. The twin tail assembly is just three pieces: solid stabiliser/elevator plus two rudders, which join with a tab and slot. Trailing edges need to be thinned, and then the trim tabs rescribed. Once complete, the horizontal stabiliser locates with a tab-and-slot onto the top of the fuselage. Once again, referencing the angle is difficult (thank you, Heinkel, for all those pretty curves), so I waited until after the wings were dry and set the empennage to match. At least that way the wings and tail agree with each other, even if the fuselage ends up rolled to one side relative to them. The engines are also simple assemblies, basically left and right halves with blanking plates showing the first and last turbine blades plus intake and exhaust spikes. The pieces all mate up perfectly and with minimal cleanup. Once the engines are together, they are a near perfect fit to the complex curves of the wing; I used no filler. Not so on the two little fillet pieces that go on top, to fair the engine into the upper wing surface. These are nice mouldings, but unless you get the engine in exactly the right position, there will be some filling and sanding to make the fillets match up. I chose an He8-engined aircraft, but the Jumo 004 motors seem to go together in the same way. The instructions call for the intake compressor turbine to be aluminium and the exhaust steel, but the inner surface of the casing is shown as RLM02 at both ends. I cannot imagine that this lasted long in the exhaust, so I painted that with the darkest MetalCote shade, which does a nice impression of blackened metal. The undercarriage makes up out of simple bits to give an overall impression of greater complexity. The nose gear is an oleo/fork with actuator arm plus an etched oleo link, but the main gear on each side is composed of the main oleo, an inboard actuator and a second actuator next to the oleo, plus the etched link. It is not entirely clear where the second actuator meets the oleo leg, but the assembly is otherwise easy to assemble. Here is one place Eduard's new moulding technique really shows off. On most short-run kits, the cylindrical parts of the undercarriage are a nightmare to clean up, with misaligned moulds producing elliptical sections or offset halves. Eduard's oleos and actuators are crisp, round, and with virtually no flash. Bravo! On the other hand, the wheel wells and gear doors are devoid of detail, and simply have one edge of the door cemented to the fuselage or wing surface next to the opening. This is a curious lapse in kit design, as wheel well detail is currently a hot topic among the kind of modellers who buy the ProfiPack type of kits (recall the discussion over the ProModeler Me410 wells and the eager anticipation with which Aires' detail set was awaited), and Eduard make some excellent etched details for wheel wells. This is one area on this kit where I considered adding scratch-built detail, but try to find any information on what should be there! The wheels and tires themselves are fine and easily prepared. I chose to use the flattened and bulged resin wheels, but the injection wheels (in halves with locating studs) go together well, too. The tire profile on the resin wheels needs to be adjusted, as there is a prominent central ridge or crest that has to be sanded off and the transition from the flattened portion back to the round part of the tire does not look right. About 15 minutes work took care of all three wheels. Holes have to be drilled in the hubs of the resin wheels to match the axle stubs on the gear legs. The canopy comes in two versions, either a single piece or split at the right place to pose it open. The latter choice is complicated by the narrowness of the canopy, which does not want to fit over the fuselage behind the cockpit. This problem is difficult to correct, so I settled for setting the canopy loose in the closed position.
This part is easy. The whole airframe is RLM02, inside and out. There is actually a challenge to making a single-colour scheme on an airframe with minimal wear look interesting, an exercise in subtle creativity. On the other hand, a single colour shows off the contours of the fuselage and wing very well - luckily the He280 is a pretty shape. I brush paint, so non-mottled finishes have a practical appeal! I used two coats of Humbrol as a base, and then a top coat of Model Master RLM02, which has a very nice eggshell finish. It does not cover well from the brush (it seems to be formulated for airbrush application) and is virtually impossible to recoat with a brush (each coat dissolves the one beneath), but over a suitable flat base it gives a great effect. It was also possible to provide some subtle variation by painting groups of panels individually and accentuating the edges of those panels that were removable and thus fit less snugly. The canopy mask idea seems like a good one, and I was eager to try the Express Masks. Unfortunately, this gimmick only works if the masks actually fit the glass. In my case, two of the five masks left large gaps, so I ended up freehand painting much of the framing. Where they did fit, they produced a crisp edge as advertised.
A little bit of wash combined with fine drafting pencil accentuated the control surface joints and the lines around opening panels. I left most of the other lines alone, to give the appearance of a new, highly finished prototype. A last touch was the running lights and the red highlights on the latches on the panel in front of the windscreen.
When was the last time you built a short-run kit Straight Out of the Box? This kit was a quick build with no significant problems. The level of relaxing satisfaction was at least equal to that from the Tamiya Spitfire that preceded it on my workbench, and I feel better about the final product (decal problems with the Spitfire rather spoiled the end of that project). On the basis of my impressions of this kit, I have purchased two other Eduard releases, both WWI biplanes, and I can recommend the He280 to modellers interested in the subject or in a pleasant experience with minimal painting challenges! The only real disappointment was the lack of interior surface detail to match the exquisite seat, but the modeller wishing to add this should have no problem fitting it in. I believe that Eduard and other Czech kits are somewhat more expensive outside Europe, but the better ones would still be good value.
The model was photographed with a Nikon FM2 and Nikkor 55mm macro-focusing lens on Kodak Elite Chrome 160T (tungsten) film. Lighting was two household reading lamps with 60 watt white bulbs. Exposures were generally 1 second at f11 to f16. The images were scanned on a Nikon SilverFast slide scanner at 300 ppi. The combination of tungsten film, these lamps and my computer produces a slight blue cast in the image. This was corrected in Adobe Photoshop 5.0, using the Color Balance option, with the values -15/0/-25 or -10/0/-25. Text and Images Copyright © 2000 by Fred
Hocker
|
 Heinkel's
pioneering work with jets (their He178 had been the first jet aircraft of any
kind to fly, in 1939) gave them something of a lead over Messerschmitt in the
competition to produce a workable fighter, and one of the He280 prototypes
successfully defeated an Fw190 in a mock dogfight, but a combination of inspired
design and fortuitous engineering decisions gave the performance edge to the
graceful Schwalbe. The He280 was partly handicapped by Heinkel's insistence on
developing its own powerplant, the HeS 8, and partly by political
considerations. The use of their own engine had originally been an advantage, as
Messerschmitt was kept waiting for the Jumo 004, expected to be the production
engine, but the HeS 8 (in both a and b versions) was less powerful than the Jumo
and prone to overheating. The aircraft did include several advanced features
that made their way into later aircraft, such as tricycle landing gear,
pressurised cockpit and an ejection seat (proven in an unplanned
"test" when one of the prototypes crashed in January, 1942).
Heinkel's
pioneering work with jets (their He178 had been the first jet aircraft of any
kind to fly, in 1939) gave them something of a lead over Messerschmitt in the
competition to produce a workable fighter, and one of the He280 prototypes
successfully defeated an Fw190 in a mock dogfight, but a combination of inspired
design and fortuitous engineering decisions gave the performance edge to the
graceful Schwalbe. The He280 was partly handicapped by Heinkel's insistence on
developing its own powerplant, the HeS 8, and partly by political
considerations. The use of their own engine had originally been an advantage, as
Messerschmitt was kept waiting for the Jumo 004, expected to be the production
engine, but the HeS 8 (in both a and b versions) was less powerful than the Jumo
and prone to overheating. The aircraft did include several advanced features
that made their way into later aircraft, such as tricycle landing gear,
pressurised cockpit and an ejection seat (proven in an unplanned
"test" when one of the prototypes crashed in January, 1942).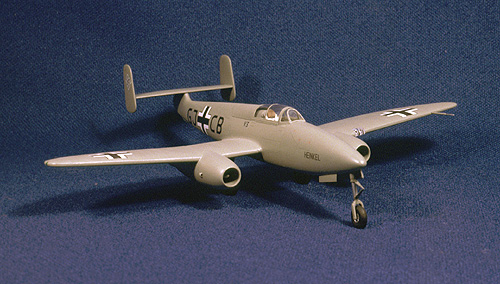 So what do
you get for your 238 kroner? First, you get interesting subject matter. The
He280 was a significant aircraft in the early history of jet aviation, even if
it did not make it into production, and it was also pretty, with the balanced
proportions, rounded curves and smooth surfaces that characterised many of
Heinkel's efforts. It is highly unlikely that any of the major companies will do
a kit of this aircraft, not while there is still a sub variant of the Bf109 to
be covered. On the other hand, R-M did do the Ta154, an even less successful
(and less attractive) design, so you never know....
So what do
you get for your 238 kroner? First, you get interesting subject matter. The
He280 was a significant aircraft in the early history of jet aviation, even if
it did not make it into production, and it was also pretty, with the balanced
proportions, rounded curves and smooth surfaces that characterised many of
Heinkel's efforts. It is highly unlikely that any of the major companies will do
a kit of this aircraft, not while there is still a sub variant of the Bf109 to
be covered. On the other hand, R-M did do the Ta154, an even less successful
(and less attractive) design, so you never know....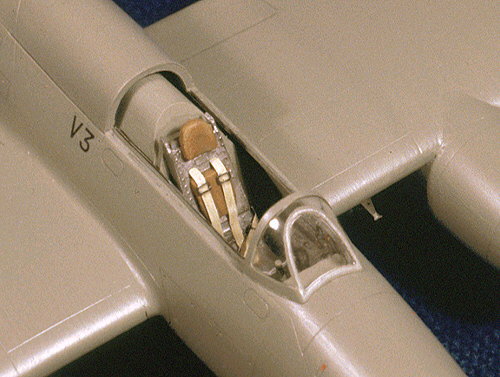 You get
four resin items: the three wheels, nicely flattened and bulged (you can use the
un-flattened styrene parts if you prefer, they are equally detailed), and the
ejection seat. This is a jewel, but needs care to get it off the mould block and
clean it up without breaking off the delicate loops at the knees. Oddly, the
resin seat is distinctly different in form to the injection-moulded seat (which
makes up out of five crisply-moulded pieces). That is a little disturbing.
You get
four resin items: the three wheels, nicely flattened and bulged (you can use the
un-flattened styrene parts if you prefer, they are equally detailed), and the
ejection seat. This is a jewel, but needs care to get it off the mould block and
clean it up without breaking off the delicate loops at the knees. Oddly, the
resin seat is distinctly different in form to the injection-moulded seat (which
makes up out of five crisply-moulded pieces). That is a little disturbing.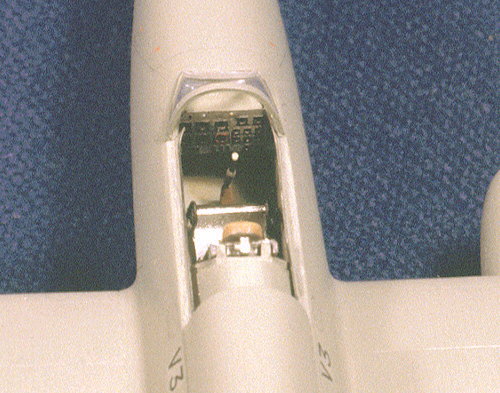 Photo-etched
panels replace moulded detail on the instrument panel and the left side console
and etched pedals replace the moulded parts. The left console panel is a bit too
wide, and has to be sanded down after attachment, as the cockpit as assembled is
an excellent fit in the fuselage. I suggest aligning the panel with the inboard
edge of the tub side and then sanding away the outboard edge. A forest of levers
is grouped in the left console as well, and so you get to watch these fly all
over the workbench and carpet as you put the cockpit together. Etched belts
adorn the seat, and there is a switch panel on the right side wall above the
console made up of two layers of etched panels. These details are all very nice,
but the surfaces they cover are smooth and bare, including the cockpit floor,
and I have to imagine that there was a little more in the way of panel seams and
exposed wiring on these prototypes. As the interior of this cockpit is
relatively easy to view in the finished model, it would have been nice to see a
little more relief here, but a recent posting regarding this problem on
HyperScale indicates that there may not be any information on which to base a
more detailed cockpit and that the Eduard offering as is may be a little
fanciful.
Photo-etched
panels replace moulded detail on the instrument panel and the left side console
and etched pedals replace the moulded parts. The left console panel is a bit too
wide, and has to be sanded down after attachment, as the cockpit as assembled is
an excellent fit in the fuselage. I suggest aligning the panel with the inboard
edge of the tub side and then sanding away the outboard edge. A forest of levers
is grouped in the left console as well, and so you get to watch these fly all
over the workbench and carpet as you put the cockpit together. Etched belts
adorn the seat, and there is a switch panel on the right side wall above the
console made up of two layers of etched panels. These details are all very nice,
but the surfaces they cover are smooth and bare, including the cockpit floor,
and I have to imagine that there was a little more in the way of panel seams and
exposed wiring on these prototypes. As the interior of this cockpit is
relatively easy to view in the finished model, it would have been nice to see a
little more relief here, but a recent posting regarding this problem on
HyperScale indicates that there may not be any information on which to base a
more detailed cockpit and that the Eduard offering as is may be a little
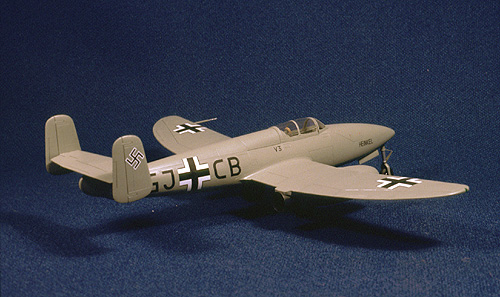
fanciful.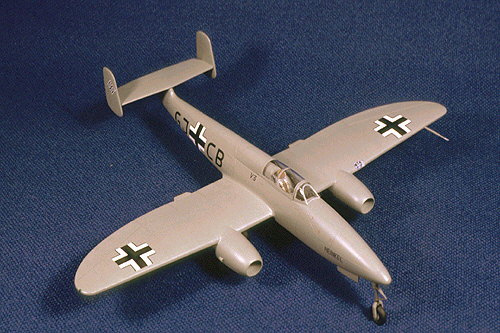 I chose
V3 as my subject, with codes GJ+CB. The decals are minimal, providing only
Balkenkreuze for the wings and fuselage, radio codes for the lower wing surface
and fuselage, small "HEINKEL" lettering for the nose, "V3"
by the cockpit, and swastikas for the tail (in halves). The few pictures of
He280 prototypes suggest that this was all the marking there was. Had the
aircraft gone into production, there would doubtless have been a host of
stencils. I used Humbrol DecalFix to snug the decals down to the surface, and
this worked fine except for a couple of the code letters, which had large areas
of carrier film. I believe I will cut future decals to eliminate this. A coat of
Humbrol satin varnish sealed the decals and matched their gloss to the Model
Master paint very nicely.
I chose
V3 as my subject, with codes GJ+CB. The decals are minimal, providing only
Balkenkreuze for the wings and fuselage, radio codes for the lower wing surface
and fuselage, small "HEINKEL" lettering for the nose, "V3"
by the cockpit, and swastikas for the tail (in halves). The few pictures of
He280 prototypes suggest that this was all the marking there was. Had the
aircraft gone into production, there would doubtless have been a host of
stencils. I used Humbrol DecalFix to snug the decals down to the surface, and
this worked fine except for a couple of the code letters, which had large areas
of carrier film. I believe I will cut future decals to eliminate this. A coat of
Humbrol satin varnish sealed the decals and matched their gloss to the Model
Master paint very nicely.