Home
| What's New |
Features |
Gallery |
Reviews |
Reference |
Forum |
Search
Home
| What's New |
Features |
Gallery |
Reviews |
Reference |
Forum |
Search
|
|
|
F/A-18D Night Attack Hornet by Mark S. Shanks
The McDonnell Douglas F/A-18D "Night Attack" Hornet was originally intended as a (relatively) low-cost, reconfigurable upgrade to the B-model trainer version. One requirement was for cockpit lighting that would not affect the sensitive Night Vision Goggles (NVGs) worn by the crewmembers. The Night Attack Hornet, both the single-seat C model as well as the two-seat D, would have special NVIS-compatible floodlights mounted on the cockpit sidewalls, and the actual displays, including the HUD, would be modified to be NVIS-compatible. Beginning with D-model aircraft 163986, the aft cockpit was supposed to be reconfigurable from a trainer version, complete with stick and throttles, to a dedicated attack aircraft, replacing the throttles with two side console-mounted "hand controllers" for sensor selection and slewing and display management. In this configuration, the stick would be removed, and the rudder pedals would be disconnected from the controls linkage. The original requirement was for the aft cockpit to be reconfigured from trainer to "Night Attack" in less than eight hours. This proved to be wildly ambitious; in actual practice, it has been nearly always been the case that "once a Night Attack, always a Night Attack". Other changes to the aft cockpit included rearrangement of the CRTs on the main instrument panel so that all three are in the upper half of the panel, the addition of the digital map reader to the center pedestal of the main panel, a much larger handhold with "dispensables" (chaff and flares) switches is mounted on the aft cockpit glare shield, and the inclusion of an NVG stowage box on the left rear side console. The latter is intended as a safe place for the crewmember to place the NVGs in the event of ejection, as the crew cannot eject safely with the NVGs attached to their flight helmets.
The Kaiser AN/AVQ-28 HUD was designed with a holographic element allowing video from the Hughes AAR-50 FLIR to be displayed. This FLIR was known to the engineers at McDonnell as the "Navigation FLIR", or NAVFLIR, while the Navy and Marine pilots are more familiar with it as the "Thermal Imaging Navigation System", or TINS. Also, aircraft 164196 and up are fitted with the Martin Baker SJU-17 Navy Air Common Ejection Seat (NACES). Externally visible modifications to both the C and D versions of the Hornet include provisioning for the AN/ALQ-165 "Airborne Self-Protection Jammer", or ASPJ. This system has added several noticeable white dome antennas on the dorsal fuselage and nose of the aircraft. Finally, the expensive cast grillwork just aft of the pitot tubes on both sides of the nose (designed to clear gun gasses out of the bay) has been replaced by a much simpler perforated screen. The first Night Attack Hornet took off from Lambert Field in St. Louis on May 6, 1988. To date, there are six Marine squadrons of F/A-18Ds operating in the all-weather and night attack roles.
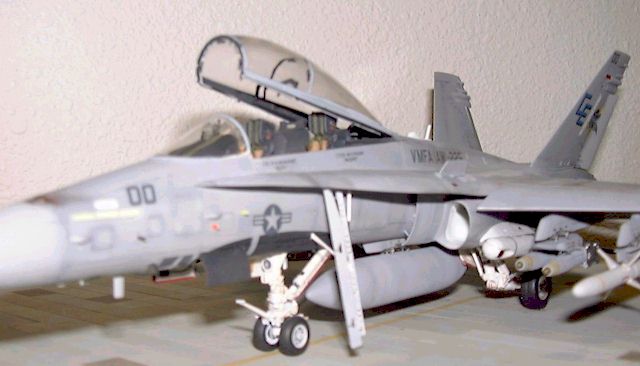
Building an accurate F/A-18D Night Attack from the 1/48th scale Hasegawa kit involves only a few corrections and some modifications. The canopy has the correct "blown" cross-section, and therefore has a prominent seam running down the middle. I removed this seam by first scraping with the back of a new #11 blade, then sanding with increasingly finer grades of Flex-I-GritŇ. When satisfied, I polished the canopy with Bare-Metalâ plastic polish, and to finish, I dipped the canopy in Futureâ floor polish. Some sources refer to the Night Attack canopies being "tinted" gold. There is an electrically conductive coating on the canopies, but reproducing the extremely subtle effect is hardly worth the probability of over-doing it or worse, damaging the part. The canopy interior was detailed with a section of photoetched detail from Airwavesâ F/A-18 canopy set (# 484018), fine solder representing the pressure seal, mirrors from Eduardâ, and the kit's canopy frame was treated to a hefty number of holes being drilled in it to match the lightening holes in the original. Correcting the gun-gas grillwork is not as difficult as it is fussy. I used a Dremel tool and carbide ball to grind down the area behind the grills (the inside of the kit fuselage). I judged when I was getting "close" by holding the ground area in front of a strong light; the translucence of the plastic will let you know if you are grinding in the right place, and just how thin the plastic is getting. When you judge you are almost there, use a dead-sharp #11 blade to cut away the grill. (Taking a knife to a $70+ kit is one of those thrills in modeling I can do without....). Be careful not to cut too much away - it's a lot easier to file/sand away the final parts than it would be to build back an over-trimmed area. After squaring off the resulting holes, frame them in with .005 sheet styrene. This will give the mesh something to adhere to without falling into the nose. The material I used for this mesh was a discontinued etched steel hex-pattern mesh from Trimaster; similar products are available from ABER, Part, and On-The-Mark. (Screen, because of its woven texture, isn't a good substitute.) While you're at it, there are several other areas in the lower nose where you should also substitute mesh for the kit's molded grillwork.
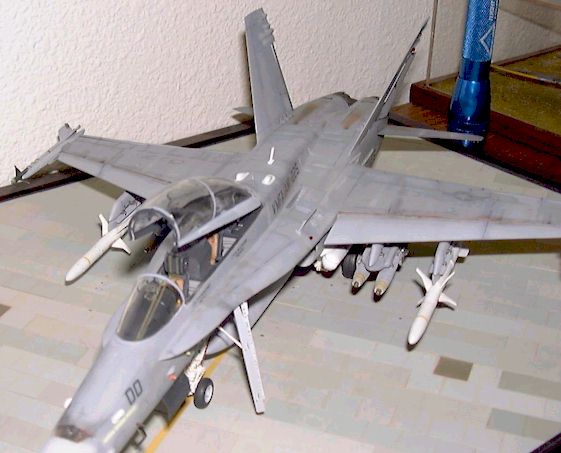
The kit seats are basic moldings of the Hornet's original Martin Baker SJU-5 seat. I replaced them with True DetailsŇ 48407 SJU-17 seats. I ground off the molded harness detail, replacing it with straps made from sheet lead from a wine bottle. Harness details came from Reheat's set (RH-03). The aft cockpit is inaccurate for a Night Attack aircraft. It is representative of the trainer version. The main instrument panel needs to be completely redone. Refer to the photographs in the "Detail and Scale" book (Volume 45) or similar references for the new layout. A method I have found to be extremely effective in modeling the CRTs in modern cockpits is to use the photoetched frames from Reheat, True Details, Eduard, etc. After painting them a very dark gray, I glued the frame to a bit of appropriately tinted developed color film negative, and then glue this assembly to a thin sheet of styrene. Trim all the way around the resulting "sandwich", touch up the edges with dark gray, and you have (nearly) instant CRTs! You can use the same basic technique to overlay the CRTs in the front cockpit: just omit the sheet styrene and glue the frame/film negative right over the kit's molded-on CRTs. The aft cockpit "hand controllers" on the side consoles were made using the kit's sticks with some added sheet stock for their "base". (The stick and throttle for the front cockpit were taken from the Monogram F/A-18 - more accurate than that provided by Hasegawa!) One of the kit's more serious shortcomings is the total lack of intake detail; the intakes end less than an inch from their opening and leave the entire fuselage interior exposed. Fortunately, Seamless SuckersŇ has a set of resin intakes that duplicates the original, including an engine face (should anyone care to shine a light in there to check!) The pylons and bomb ejector racks were detailed with small bits of plastic card and stretched sprue. Hasegawa here forces the modeler to go pick some dollars off the handy money tree: NO external ordinance is included, not even 'winders!! Although not a "probable" load-out, I wanted to show something a bit different on this model. I used Mk-82s Snakeyes from VerlindenŇ, and added the rough-textured anti-thermal coating by first painting the bombs with automotive "wrinkle-finish" paint, then airbrushing them light gray. (Olive drab bombs are being phased out.) On the outboard pylons, I used the AGM-88 HARM missiles from Cutting EdgeŇ. AIM-9s on the wingtips were from Hasegawa's A/A set, with the seeker head being simulated by drilling out the nose of the missile, painting the resulting hole a blue-silver, and adding a generous drop of 5-minute epoxy for the "glass" lens.
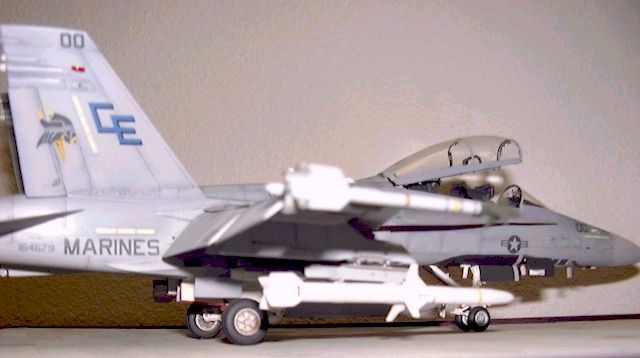
After construction and priming with Gunze Sangyo's "Mr. Surfacer 1000", all panel lines were airbrushed with a dirty gray-brown mixture. The camouflage grays were applied over the pre-shading, allowing the darker color to show through, toning it down as necessary. I used Humbrol 127 for the FS 36375 Ghost Gray Light and Gunze Sangyo 307 for the FS 36320 Ghost Gray dark. I paid extra attention to those access panels that see heavy use, such as the single-point refueling receptacle, electrical access, the gun ammo-loading door, and the avionics bays on both sides of the forward fuselage. The quick-release latches were airbrushed with a slightly lighter color than the main camouflage to represent the flight-line touch-ups so typical of these aircraft. Additional lighter-color highlights were added along random panels on the upper surface to give a sun-baked look to those areas. The "false canopy" was painted on using the Hi-Decal marking (sheet 48002) provided as a pattern for the masking. Although the Royal Canadian Air Force false canopies are a dark gray, those applied by the U.S. Marines are frequently black - I used Floquil "Grimy Black" on this model. After a coat of clear gloss (Gunze Sangyo H030) was applied to the entire model, thinned Payne's Gray (a bluish-gray oil paint) was applied to all panel lines, allowing capillary action to draw the mixture along the lines. Any mistakes were cleaned up immediately using a brush dampened with turpentine. The Hi-Decal decals settle down very well, but tend to stay, and I mean STAY, where they first touch the model, so I'd recommend "floating" them on with some Super SetÓ or similar "mild strength" decal solution. After cleaning up any decal setting solution residue, the model was airbrushed with a clear matte. I prefer Humbrol #28 - it is a dead matte finish, and doesn't seem to have the "frosting" effect that I've experienced with so many other clear mattes. The gun safety (Day-Glo red) and chaff/flare safety (Day-Glo yellow) indicators on the forward port fuselage were added using plastic rod. Pastel chalks were used for the final weathering, including the area around the cannon muzzle and where the air- and ground crew walk on the Leading Edge Extension (LEX). As a final "textural" touch, I touched each of the rivet depressions on the wing tops with a small amount of medium gray pastel, taking care to not grind it in. After a row or two had been treated this way, I blew the dust off from the front, and then carefully brushed the wing top front to rear with a broad soft brush. Although it isn't immediately obvious, it gives a very realistic impression on closer inspection.
The model base is a simulation of the "Expeditionary Airfield" AM-2 planking now used by the Marines and in place at the combat exercise airfield at Twentynine Palms, California. This runway, taxiway, and parking area material comes in twelve-foot by two-foot interconnecting aluminum planks made up of six 2-foot square tiles. The tiles are covered with an epoxy non-skid surface, and are originally olive drab (FS 35352), but quickly weather to faded shades of gray-green. Since much of this material has been in place at Twentynine Palms for over twenty years, some areas are quite chalky-looking! Replacement tiles are obvious by their contrast. I made the base by simply cutting scale strips of sheet styrene (three inches by one-half inch), scribing the squares, and painting in five different basic shades, plus some "replacement" tiles. The resulting "planks" were glued to a sheet of acrylic, and the entire assembly was mounted on a hardwood base. Model, Text and Images Copyright ©
2000 by Mark S. Shanks
|