 Home
| What's New |
Features |
Gallery |
Reviews |
Reference |
Forum |
Search
Home
| What's New |
Features |
Gallery |
Reviews |
Reference |
Forum |
Search
|
|
|
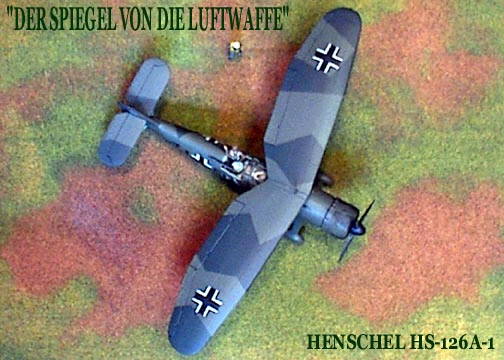
Henschel Hs 126A-1 by Caz Dalton
Model Subject: Henschel Hs 126A-1 Kit Used: ITALERI Kit Number 109.
Developed in early 1936 from the Hs 122, the parasol-winged Hs 126 was a thoroughly sound machine. It was very much like its contemporary, the British Westland Lysander, in character, though more conventional in its layout. The crew of two sat below and behind the wing in a capacious tandem cockpit with the pilot's portion being enclosed.
The model represents one of twelve Hs 126A-1s, which served with 2 Aufklärungsgruppe (H)/10 at Tannernburg and Neuhausen during the early stages of World War II. Hs-126s served with impunity during this period due to their close air support from Luftwaffe fighter squadrons, unlike their British contemporary, which was shot out of the sky due to lack of proper fighter support. The plaque's title means "THE LOOKING GLASS OF THE AIR FORCE".
Interior: ITALERI's interior detail was pretty good. I added cut pieces from sheet styrene to cover the wing strut openings on the interior. I installed photoetched rudder pedals from True Details and cut the pilot's harnesses and belt from masking tape using True Details photoetched buckles, which were cut from the photoetched belts and super glued to the masking tape. The kit's instrument panel was enhanced with Waldron-punched disks of white decal film and Reheat Models Instrument decals. The interior was painted Polly-Scale RLM 02 with radio and camera equipment painted semi-gloss black. A Reheat Models control decal was applied to the radio front. The pilot and observer's seats were dry brushed in flat aluminum, as were the rudder pedals and floor.
There was a mold mark just to the rear of the pilot's seat, that proved impossible to clean up, so I simply made a flight log clipboard from sheet styrene painted hull red and some generic flight papers from white trim decal and generic stencil decal. The clipboard's clip was done with clear decal film painted graphite. This little object was white glued over the unsightly mold mark in the final assembly. I replaced the observer's MG 15 machine gun's barrel with some left over perforated barrel material I bought from Meteor Productions four years ago and a section of 25 gauge hypo needle. I also drilled out the port for the fuselage mounted MG 17 and super glued a section of 25 gauge hypo needle here also. The breech for this gun was made from sheet styrene and attached to the cut out section of the kit's instrument panel. Ring sights for the fuselage gun and observer's gun came from a TECNICS photoetched set in 1/72 scale. Sight beads were done with cut pieces of aluminum beading thread.
Engine:
Exterior: Other than adding the aforementioned fuselage gun, ring and bead sight, and cutting replacement exhausts from non flux solder, the exterior was built out-of-the-box. I added aerial wiring in the final assembly from smoke-colored invisible thread. Insulators were done with small beads of Krystal Kleer painted graphite once the glue had set up. Navigation lights were likewise done in the final assembly using bright silver paint, Krystal Kleer beads, and painted clear red, clear blue. and clear white as per reference.
After masking the canopy with Bare-Metal Foil and the open cockpit area with masking tape, I gave the canopy a couple of coats of RLM 02.
The main airframe (cowling, fuselage, and main landing gear), parasol wing, horizontal tails, all struts, steps, bomb mount, rear wheel, and external generator were primed in Polly-Scale RLM 65. After sanding out a few areas and repriming, I masked the lower surfaces of the wing, cowling/fuselage, horizontal tails, and wheel struts (not the spats) and gave the upper surfaces two coats of Polly-Scale RLM 71 Dark Green. Camouflage patterns were enlarged to scale on a copier from the kit's instructions and areas for the RLM 71 were cut from the photocopies and transferred to masking tape. The were traced out, cut, and applied to their proper locations. I had to speculate a bit on the starboard side, but was able to find a color photo in one reference showing this side in the RLM 71/70/65 color scheme, so it should be somewhat close. After masking, I gave the upper surfaces two coats of Polly-Scale RLM 70 Black green. The propeller was painted RLM 70 at this time also, but the spinner and backplate were painted flat black at the same time as the wheels. Once all masking was removed, with exception of the canopy, cockpit opening, cowling opening, and wheel openings, the wing, fuselage, and horizontal tails were given two coats of Polly-Scale Clear Gloss. Kit decals were used for all unit markings and National Insignia. I had to get the swastikas and fuel and coolant triangles from a leftover SuperScale sheet. I cut the distance sight lines on each fuselage side from white, red, black, and yellow trim film decals. The kit's decals required much work and finesse to eliminate air bubbles under the raised panel lines. They dried to a matte flat finish, but I was able to eliminate this with a thin coat of FUTURE over the decals before the finish gloss overcoat. All control recesses were treated to wash of india ink applied with a technical pen and wiped lightly with a damp cotton cloth before applying a sealing coat of clear gloss.
Italeri's Hs 126 was not a bad model for the four dollars I paid for it. Fit was as good as it gets, but due to the lack of suitable attachment pegs for small parts and the difficulty in attaching and aligning the wing, I would only recommend this kit to someone with a little modeling experience under their belt. Text and Images Copyright © 2000 by
Caz Dalton
|
 Typical
photographic, radio, and light bombing equipment was carried, and the aircraft
proved to have excellent STOL capability and the ability to take substantial
punishment. Altogether about 802 were delivered, maintaining the
Aufklärungsstaffeln (Reconnaissance Squadrons) at a front-line strength of
around 280 aircraft. By June 1941 virtually all were on the Eastern Front, in
the Balkans, or in North Africa. A few survived until 1944-45 in operations
against partisans in the Balkans, but most had been replaced during 1942 by the
Focke-Wulf Fw-189 and used for towing gliders. Nearly 200 combat veterans flew
them in Nachtschlacht (Night Ground Attack) wings using a variety of armament
schemes meant more to harass moral than to cause actual damage.
Typical
photographic, radio, and light bombing equipment was carried, and the aircraft
proved to have excellent STOL capability and the ability to take substantial
punishment. Altogether about 802 were delivered, maintaining the
Aufklärungsstaffeln (Reconnaissance Squadrons) at a front-line strength of
around 280 aircraft. By June 1941 virtually all were on the Eastern Front, in
the Balkans, or in North Africa. A few survived until 1944-45 in operations
against partisans in the Balkans, but most had been replaced during 1942 by the
Focke-Wulf Fw-189 and used for towing gliders. Nearly 200 combat veterans flew
them in Nachtschlacht (Night Ground Attack) wings using a variety of armament
schemes meant more to harass moral than to cause actual damage.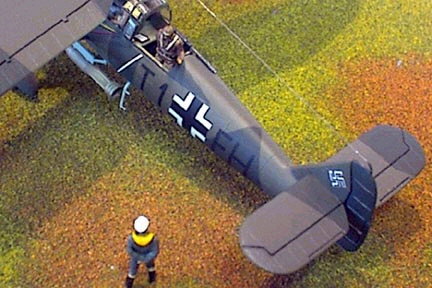 All three
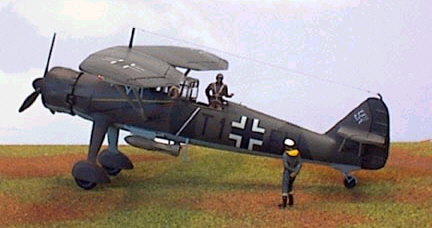
figures came from a Preiser set of World War II Luftwaffe figures in 1/72 scale.
They were primed in medium gray and hand painted with acrylics. After painting
and giving the figures a coat of clear gloss they were given ink and pastel
washes to shadow the recesses. Once the washes had dried, I rubbed out the
highlights with a damp cotton cloth wrapped around a blunt toothpick and gave
the figures a finish coat of clear flat. Goggles were picked out in bright
silver, followed by a coat of clear smoke. I had to cut the pilot's seat mounts
flush to the floor mount so that the pilot's head would not interfere with the
canopy's fit.
All three
figures came from a Preiser set of World War II Luftwaffe figures in 1/72 scale.
They were primed in medium gray and hand painted with acrylics. After painting
and giving the figures a coat of clear gloss they were given ink and pastel
washes to shadow the recesses. Once the washes had dried, I rubbed out the
highlights with a damp cotton cloth wrapped around a blunt toothpick and gave
the figures a finish coat of clear flat. Goggles were picked out in bright
silver, followed by a coat of clear smoke. I had to cut the pilot's seat mounts
flush to the floor mount so that the pilot's head would not interfere with the
canopy's fit.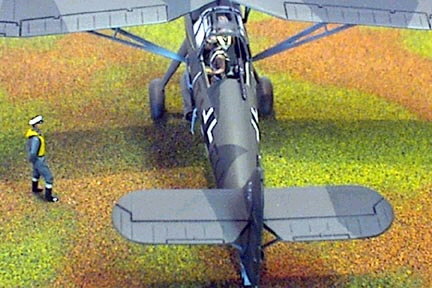 The
engine was painted Poly-Scale Oxidized Aluminum and given a coat of clear gloss
to protect the fragile metalline paint from the subsequent india ink wash.
Pushrods and gear housing were brushed in flat black and given a coat of
semi-gloss clear after sealing the ink washes in clear flat. The engine was set
aside for installation in the final assembly.
The
engine was painted Poly-Scale Oxidized Aluminum and given a coat of clear gloss
to protect the fragile metalline paint from the subsequent india ink wash.
Pushrods and gear housing were brushed in flat black and given a coat of
semi-gloss clear after sealing the ink washes in clear flat. The engine was set
aside for installation in the final assembly.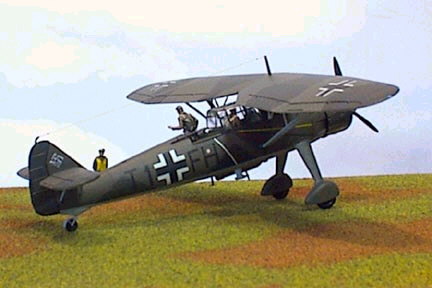 The
cowling interior had previously been painted RLM 02 and it was masked with an
index card mask cut from a drafting circle template and masking tape. Likewise I
prepainted the wheel spat interiors RLM 02 and reengineered the wheels, so that
I could paint them and install them after the spat halves had been cemented and
cleaned up. The wheels were painted flat black, the tires given a coat of tire
black, and the wheel centers a coat of semi-gloss clear. The wheels were
cemented into the spats after painting them and card masks were cut to seal them
from the painting of the main assembly. The horizontal tails fit so well that I
was able to paint them separate from the main airframe, which was more
realistic, as these aircraft did not have their horizontal tails flared into the
main airframe, and should appear with an appearance of a joint. Horizontal tail
struts had to be dry fitted and cut to match their location points on the tails
and fuselage. I added a small piece of 34 gauge wire to each strut, which was
placed into predrilled holes on the fuselage, and simplified their placement in
the final assembly.
The
cowling interior had previously been painted RLM 02 and it was masked with an
index card mask cut from a drafting circle template and masking tape. Likewise I
prepainted the wheel spat interiors RLM 02 and reengineered the wheels, so that
I could paint them and install them after the spat halves had been cemented and
cleaned up. The wheels were painted flat black, the tires given a coat of tire
black, and the wheel centers a coat of semi-gloss clear. The wheels were
cemented into the spats after painting them and card masks were cut to seal them
from the painting of the main assembly. The horizontal tails fit so well that I
was able to paint them separate from the main airframe, which was more
realistic, as these aircraft did not have their horizontal tails flared into the
main airframe, and should appear with an appearance of a joint. Horizontal tail
struts had to be dry fitted and cut to match their location points on the tails
and fuselage. I added a small piece of 34 gauge wire to each strut, which was
placed into predrilled holes on the fuselage, and simplified their placement in
the final assembly.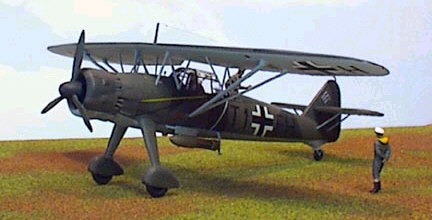 After the
gloss had dried, I gave the wings, fuselage, and horizontal tails two coats of
Polly-Scale clear flat. Masking was removed from the canopy, cockpit area,
cowling opening, and wheel openings. The canopy was polished with Meguire's
Mirror Glaze #3 and given a coat of FUTURE, as were the two under wing
landing/search lights. The engine was install into the cowling opening with the
cowling face white glued in place after the engine's attachment. Exhausts and
collector ring were painted Gunze Burnt Iron, followed by a wash of Pactra Rust
and the cowling was simply placed on the fuselage with no glue required (I did
this all through the painting stages also). The propeller was simply slid into
its mount on the engine and may be blown if one wishes. Exhaust stains were
lastly added using powdered black pastel. The bomb was first painted RLM 02 and
given a dry brushing of graphite, and a light rust wash. It was attached with
gel type super glue in the final assembly. The wing fit as well as one could ask
for in a parasol configuration. Personally I think parasol-wing models are more
difficult to attach and align than biplane models, but this one (though
tedious), fit very well and I only managed to fracture two small cabane struts
in the attachment and alignment. These were fortunately not completely broken
and rather easy to repair and touch up. Lastly I attached the antenna and aerial
wiring and my Hs-126 was completed.
After the
gloss had dried, I gave the wings, fuselage, and horizontal tails two coats of
Polly-Scale clear flat. Masking was removed from the canopy, cockpit area,
cowling opening, and wheel openings. The canopy was polished with Meguire's
Mirror Glaze #3 and given a coat of FUTURE, as were the two under wing
landing/search lights. The engine was install into the cowling opening with the
cowling face white glued in place after the engine's attachment. Exhausts and
collector ring were painted Gunze Burnt Iron, followed by a wash of Pactra Rust
and the cowling was simply placed on the fuselage with no glue required (I did
this all through the painting stages also). The propeller was simply slid into
its mount on the engine and may be blown if one wishes. Exhaust stains were
lastly added using powdered black pastel. The bomb was first painted RLM 02 and
given a dry brushing of graphite, and a light rust wash. It was attached with
gel type super glue in the final assembly. The wing fit as well as one could ask
for in a parasol configuration. Personally I think parasol-wing models are more
difficult to attach and align than biplane models, but this one (though
tedious), fit very well and I only managed to fracture two small cabane struts
in the attachment and alignment. These were fortunately not completely broken
and rather easy to repair and touch up. Lastly I attached the antenna and aerial
wiring and my Hs-126 was completed.