 |
Ilyushin
Il-2m3 Stormovik
281st Assault Division, 14th Air Army |
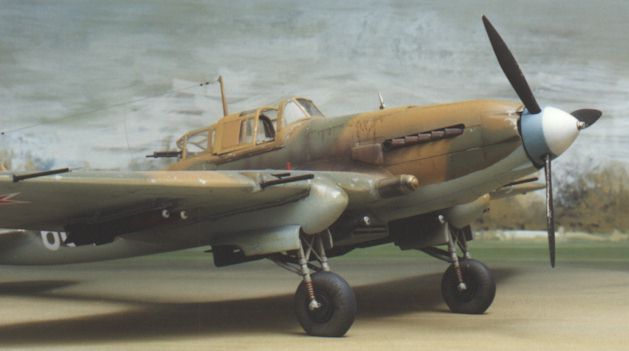
The Ilyushin Il-2 Stormovik was a heavily armed
and armoured Soviet ground attack aircraft. The original version had a crew of one, but a
rear gunner’s position was added following horrific losses in the first months after
Operation Barbarossa. The Il-2m3 was the definitive version of the Stormovik. It could be
distinguished from earlier versions by the 15 degree sweep of the wings. This
reconfiguration of the wing was required to compensate for the shift in the centre of
gravity due to the second crew position. The Il-2m3 type entered service late in 1943.
It is interesting to compare the Il-2m3 Stormovik
with German aircraft designs in the latter part of World War Two. At a time when the
Luftwaffe was introducing such groundbreaking technical features as radar, ejection seats,
jet engines and remote guided weapons; the Stormovik was crude by comparison. In fact, by
any standards the Stormovik was an unsophisticated aircraft. Creature comforts were non
-existent - the rear gunner was not even supplied with a seat. He (or she) simply rested
against a strap!
Nevertheless the Stormovik was a tough,
manoeuvrable aircraft which was extremely well suited to its ground attack role. It could
be equipped with a variety of weapons including rockets, bombs and anti-tank guns capable
of killing even the fearsome Tiger tank.
Comparison of strategies also reveals fundamental
differences. German fighter pilots saw themselves as "knights of the sky". Air
to air combat was the only honourable activity. German fighters continued to down Soviet
aircraft in staggering numbers right to the end of the war, but Luftwaffe ground attack
units were used in a relatively uncoordinated manner.
 Stalin,
on the other hand, considered that the Stormovik was as fundamentally important to the Red
Army as bread. He personally intervened to ensure that nothing prevented the
mass-production of this essential aircraft. The priorities of the opposing sides may be
summarised by examining the production figures of specialised Soviet and German ground
attack aircraft to 1945. For example, the Henschel Hs 129 (the standard German
tank-busting aircraft from 1942) totalled 869 aircraft; while a total of over 36,000
Stormoviks were produced!
Stalin,
on the other hand, considered that the Stormovik was as fundamentally important to the Red
Army as bread. He personally intervened to ensure that nothing prevented the
mass-production of this essential aircraft. The priorities of the opposing sides may be
summarised by examining the production figures of specialised Soviet and German ground
attack aircraft to 1945. For example, the Henschel Hs 129 (the standard German
tank-busting aircraft from 1942) totalled 869 aircraft; while a total of over 36,000
Stormoviks were produced!
In the end, the Soviet strategies of
standardisation and mass-production overwhelmed Germany’s high technology weapons.
Accurate Miniatures’ Stormovik looks good in
the box. The medium grey parts feature fine engraved panel lines and an impressive level
of detail. A number of options are supplied including the choice of flattened or standard
tyres, three different rear canopy configurations, optional bombs, rockets and 37mm cannon
gondolas.
.
There are no sinkmarks, although there are a few prominent ejector pin marks in the rear
armoured cockpit bulkhead and on the rear cockpit sidewalls. These will have to be removed
as they are quite visible in the otherwise spartan rear cockpit.
Below the false bottom of the box lie the
separately bagged clear parts, a 12 page instruction booklet and colourful decals for one
aircraft. The clear parts are completely free of distortion and admirably thin.
Getting Started
Accurate Miniatures’ Stormovik is a well
engineered kit which fits well, but does not "fall together" in the same way as
a Tamiya kit does. It is therefore essential for the modeller to thoroughly acquaint
himself with the instructions. This comprehensive document does a pretty good job, but I
had to depart from the manufacturer’s recommendations in a couple of key areas.
I approached this kit as a number of independent
sub-assemblies.
Cockpit and Rear Fuselage
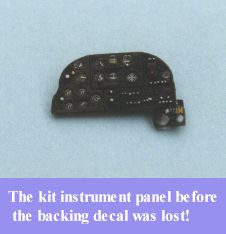 The first of these
sub-assemblies is the cockpit. I prepared the instrument panel first. Modellers familiar
with AM kits will recognise the clear styrene instrument panel. The panel must be pained
black except for the recessed instrument lenses, which are left clear. An instrument decal
is applied to the rear of the panel and - voila! - a three dimensional instrument
panel with clear lenses and minute detail. However, there is a trap. The decal adhesive is
on the back of the film but the front side is fixed to the instrument panel.
I recommend that a very thin wash of white glue is applied to the front of the decal to
ensure a permanent bond. My decal fell off and was lost before I installed the panel! I
then had to paint the instrument detail on the back of the panel - which I do not
recommend!
The first of these
sub-assemblies is the cockpit. I prepared the instrument panel first. Modellers familiar
with AM kits will recognise the clear styrene instrument panel. The panel must be pained
black except for the recessed instrument lenses, which are left clear. An instrument decal
is applied to the rear of the panel and - voila! - a three dimensional instrument
panel with clear lenses and minute detail. However, there is a trap. The decal adhesive is
on the back of the film but the front side is fixed to the instrument panel.
I recommend that a very thin wash of white glue is applied to the front of the decal to
ensure a permanent bond. My decal fell off and was lost before I installed the panel! I
then had to paint the instrument detail on the back of the panel - which I do not
recommend!
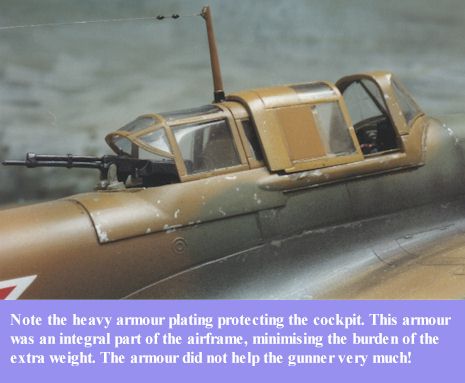
The pilot’s armoured rear bulkhead is
another clear plastic part. I masked off the triangular "windows" with Tamiya
tape cut to size (don’t forget to mask both the front and the back) and
assembled the main cockpit components. Before gluing the seat I added a Sutton Harness
from "Reheat Models" detail set RH073 - "RAF/FAA WWII". These
harnesses are appropriate for many Soviet wartime aircraft.
The level of cockpit detail is superb - no extra
detail was needed. The remainder of Steps 1 and 2 were completed according to the
instructions.
Engine Cowling
Assembly of the cowling during Step 3 is tricky.
Take your time and dry fit often! Assemble the left and right halves and set aside to dry.
Glue the air splitter assembly (parts 11, 12 and 181) to the cowling top (part 10) making
sure that the top of part 10 meets the edges of part 12 for its entire length. When both
these sub-assemblies are thoroughly dry (at least overnight) feed the cowl top assembly through
the cavity at the front of the engine cowl halves. Dry fit as many times as required
to work out what fits where. It may take a couple of runs - it is not completely obvious.
When satisfied, apply glue to underside of the cowl top assembly after feeding the
top assembly through the cowling halves (ie dry fit then apply glue when the part is
in-place). Tape this up and set aside to dry thoroughly.
I did not glue the machine gun mount and track
during Step 3 as suggested, but added these delicate parts when the model was nearly
complete. I also had trouble fitting the rear gunner’s strap/seat (part 111) which
was too long. It broke when I bent it to fit the width of the cockpit. I recommend
replacing this part with a strip of lead foil or thin plasticard.
I also recommend not adding the horizontal
tailplanes until after the wing assembly has been glued in place. In this kit it is far
easier to adjust the tailplanes than adjusting the wing dihedral!
Lower Centre Wing
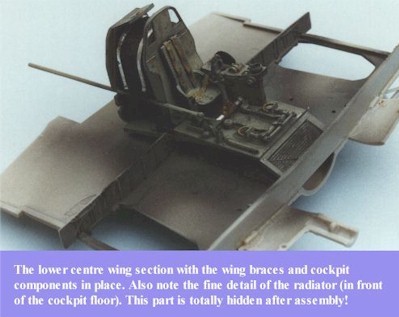 Step 4 requires great care.
The wing braces (parts 25 and 26) set the dihedral so make sure they are in the correct
position. I "tacked" both braces in the correct position on the lower wing with
super glue, then reinforced the bond by flowing liquid poly cement for the full length of
the join lines. When this is dry, the radiator and cockpit components are added to the
lower wing. This is a good point to take a break. All subassemblies must be thoroughly set
before final assembly.
Step 4 requires great care.
The wing braces (parts 25 and 26) set the dihedral so make sure they are in the correct
position. I "tacked" both braces in the correct position on the lower wing with
super glue, then reinforced the bond by flowing liquid poly cement for the full length of
the join lines. When this is dry, the radiator and cockpit components are added to the
lower wing. This is a good point to take a break. All subassemblies must be thoroughly set
before final assembly.
The Coming Together
I departed from the recommended assembly sequence
in Step 5. I first glued the nose to the rear fuselage, ensuring there were no steps or
gaps. I then carefully dry-fitted the lower centre wing section to ensure alignment at the
leading edge of the lower fuselage join. Take care when feeding the elevator push-rod
through the small holes in the cockpit interior. The cockpit will be a snug fit - mine
almost "snapped" in place - assisting the placement of the lower centre wing
section. Remove, glue and refit this assembly when you are sure the alignment is correct.
Next to the outer wing assemblies. I had to slice
off the locating pins on the leading edge of the upper wing to correctly locate the wing
root to the fuselage. Once this was done, the fit of this very complex assembly was
excellent.
Finishing-Off
The rest of the kit was assembled per
instructions. The only additions were a model-railway light in the landing light position;
machine gun barrels and exhausts were drilled out; the ammo feed was replaced with a
flexible resin item from Cavalier; and the kit pitot tube was replaced with brass tube and
rod (I broke the kit one!)
Accurate Miniatures’ engineering finesse is
further demonstrated in the final assembly with subtle details including the wheel wells,
cheek intakes and very fine "Flettner Rods" (trim actuators - you learn new
terminology all the time in the hobby, don’t you!). The only areas needing
improvement are the questionable disk fuses on the rockets.
One final word of warning - take care with the
rudder mass balance. I broke this part off about three times! In retrospect, I would
recommend cutting this part off as soon as the fuselage halves are joined and gluing it
back on during final assembly.
| P
a i n t i n g a n d D e c a l s |
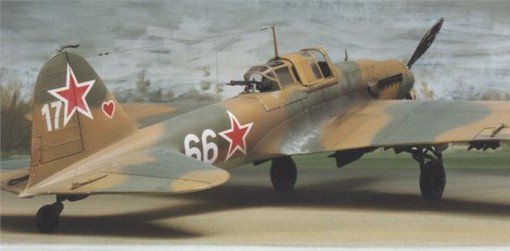
Camouflage
The aircraft was finished in a scheme illustrated
on page 24 of Squadron/Signal’s "Stormovik in Action". I also found a photograph of the actual
aircraft on the Internet.
Before applying camouflage colours, I sprayed all
panel lines black. I then sprayed the undersurfaces Tamiya Light Blue. For the Earth Brown
upper surface colour, I mixed Gunze Dark Earth and Middle Stone. Control surfaces were
then sprayed in straight Mid Stone, and selected panels picked out in Dark Earth. This
achieved a suitably weather-beaten appearance. The disruptive colour is Gunze dark Green.
The "chipped" effect was obtained by
painting very small dots of Tamiya Chrome Silver enamel over the completed camouflage.
Careful not to do this over the rear fuselage - which was wooden on the real aircraft.
Finally, surface detail was picked out by flowing thinned Tamiya Semi-Gloss Black acrylic
into the recessed panel lines.
The propellers were sprayed with Tamiya Silver
Enamel followed by Tamiya Flat Black acrylic. When dry, the black was selectively picked
off the front of the blades, and the back of the blades were lightly sanded.
Exhaust stacks were painted flat black followed
by a single, liberal application of "Rustall".
The exhaust staining was a two-step process.
First, I sprayed a very thin mix of light grey acrylic and Tamiya Flat Base over a large
area of the side of the fuselage. I then sprayed a thin mix of black, ensuring that I did
not entirely cover the light base coat.
Markings
Photographs of the subject aircraft indicated a
number of errors in the Squadron/Signal illustration including the size of the heart and
the style of the code numbers. I scrounged code numbers from my decal box, although they
look more like the illustration than the photographs. I hand painted the red heart onto
white decal film.

Murphy’s Law of Modelling struck again as
soon as I had finished this project. A new Aeromaster release provided accurate decals for
this particular aircraft. Too late for me of course!
This kit is undeniably complex to build. In its
favour, however, Accurate Miniatures’ Stormovik presents more and finer detail than
even the best of the new generation of Japanese releases. What is more remarkable is that
they have achieved this level of detail without resorting to etched metal and resin -
Accurate Miniatures are certainly getting the most out of injection moulded plastic! The
only areas where the limitations of this medium are obvious are the oversimplified disks
representing the rocket fuses. For the modeller who wants the best possible detail out of
the box from a mainstream manufacturer, it is tough to go past Accurate Miniatures. Their
Stormovik is another fine example of the consistently high standards set since the release
of their early P-51 kits only a few years ago.
Highly recommended for modellers who are not
afraid to build!
Il-2 Stormovik in Action by
Hans-Heiri Stapfer, Squadron Signal Publications, Carrolton Texas, 1995
ISBN 0-89747-341-8
Il-2 Type 3 and Il-10/Avia B-33 in Detail
by Frantisek Koran and Michal Ovcacik, WWP, 1997
ISSN 1211-671
Il-2, S.V. Ilyushin
"Bark" (this is a link to the Internet article) by Alexandre
Savine, 1996
Special Class
(this is a link to the Internet article) by A. Shishkov; translated by Alexandre Savine.
Don't ignore the power of your web browser as
a research tool. That's how I found a source photo for this subject. Both of the above
articles are well illustrated and researched. Well worth a visit.
Article and Construction photographs Copyright 1998 by Brett Green.
All other photographs Copyright 1998 by Peter Stroethoff.
Last updated 26 May, 2007.
Back to HyperScale Main Page
Back to Features Page
 Home
| What's New |
Features |
Gallery |
Reviews |
Reference |
Forum |
Search
Home
| What's New |
Features |
Gallery |
Reviews |
Reference |
Forum |
Search