Home
| What's New |
Features |
Gallery |
Reviews |
Reference |
Forum |
Search
Home
| What's New |
Features |
Gallery |
Reviews |
Reference |
Forum |
Search
|
|
Ilyushin Il-2M3 Building "The Flying Tank" by
Michel Poutnikov
Michel Poutnikov analyses Accurate Miniatures' 1/48 scale Il-2M3 "Shturmovik" kit and gives it the super-detailing treatment:
The Ilyushin IL-2 was one of the most famous Soviet aircraft during W.W.II. It was specifically designed as a heavily armored ground-attack aircraft by S. V. Ilyushin for close support and bomber missions. Its deadly effectiveness was assured due to its heavy ordnance capacity and unprecedented application of armor. All of the aircraft's vital elements were protected including the pilot's cockpit, engine, oil and cooling system. One of the main innovations applied to the Shturmovik was the use of pressed geterodenic aviation armor with an extremely hard external layer. In fact, this armor was central to the design of the aircraft, carrying a substantial part of its structural functions. The Il-2 was built in greater numbers than any other aircraft of the World War Two. More than 36,000 Il-2 aircraft left the production lines. It was the most legendary Soviet combat aircraft and Russian pilots who flew the Il-2 called them "Ilyusha" or "Flying Soldier"
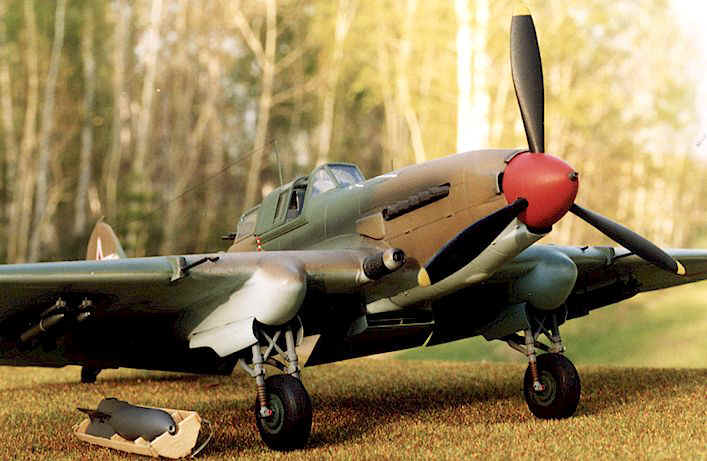
I was really pleased when Accurate Miniatures released their Il-2 models series. I decided to build the classic "Shturmovik" - the two seater. The model kit Il-2M3 (#3407) was the basis for my project. It is important note here that designations Il-2M and M3 are spurious, and were never used by Ilyushin Design Bureau or NII VVS. Accurate Miniatures' model represents a standard late war Il-2 Shturmovik with the swept metal wing (wings were swept back to 15 degrees on this variant) and wooden rear fuselage section. The kit is well detailed and cleverly engineered. I’ve checked the shape of all the main details with line drawings. Apart from a couple of minor mistakes the kit is very accurate. Molding quality is first rate and overall fit of the kit is excellent. I highly recommend this kit for all modelers.
I sanded off the ejector pin marks on cockpit parts and cut off most of the sidewall details. The cockpit area was assembled with the addition of some scratchbuilt elements and photo etched details from Eduard’s set. The etched parts replaced the instrument panel, ruder pedals, seat belts and gunner armor plate. Additions include new gun sight, throttle lever, deviation table and many other small details. Accurate Miniature’s instruction recommend painting the interior surfaces RLM 02 but I can’t agree with this statement. Yes, all Il-2 aircraft had their interior painted in gray primer to protect armored parts (which were made up as integral part of the aircraft structure) against rust but RLM02 colour looks rather dark. I have seen the real Il-2 aircraft at the Praha’s museum. The paint applied for the interior surfaces of this particular aircraft (I mean gear and bomb bay interiors because cockpit area was repainted during restoration, except the fuel tank) is close to RLM02 but Soviet Primer paint produced by Moscow "Aerolak" plant was a slightly different shade. Taking into account "scale effect" and information from different sources I have chosen a color close to FS26187 color and then dry brushed the cockpit surfaces with Metallic Gray paint. The fuselage halves were now glued together and cockpit unit was installed. Some putty was needed for the engine cowling and air scoop assembly. The nose piece was then filled and sanded. I rescribed the lost panel lines and attached small details to the rear fuselage section. Next comes the major components of wings and tail surfaces. Upper wings console details were glued to assembled fuselage. The fit of the parts was very good with no gaps or other problems. I assembled the bottom wing center section, opened bomb bays and cut out the moulded-on flaps. Photo etched details completed the flaps, bomb bays sections and main gear bay interiors. When the fuselage and top wing halves were fully assembled, the lower part of the wing sub-assembly was attached. (Note - I never follow instructions and usually try to find my own sequence of building a model. Just one hint in this instance though. If you are going to depart from Accurate Miniatures instruction order you will probably have some problems. Nothing serious, but you have to be prepared!) The position of the wing landing light mount isn’t correct. After checking my drawings and examining photos I decided to move the landing light 6mm toward the fuselage. The new light lens (thermo formed acetate) and lamp with reflector were installed. The wing tips (red/green) and tail (clear) lights were sanded off to replicate a bulb lamps covers. I made these from colored and clear plastic but didn't install them until painting and detailing was complete. One area that really needs improvement is the Fletner Rods (trim actuators). I replaced these seriously oversized parts with a scratch built items. Then I turned my attention to the tail area. Control surfaces were separated from the fin and tailplanes then repositioned. Don’t forget to reposition the trim tabs too.
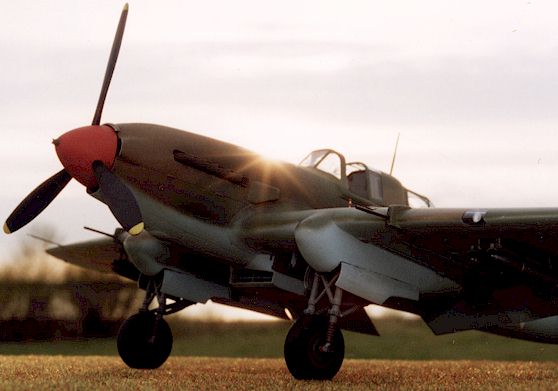
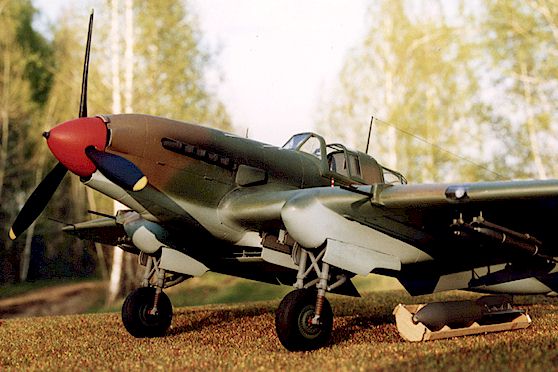
The oil cooler intake is molded on the wing center section and doesn't look great. On the genuine IL-2 aircraft it was etched from 4 millimeter armor plates. Therefore the 1mm thick kit part is way over scale. I understand there are injected plastic technology limitations but some corrections were necessary. I’ve cut off the top part of the intake and thinned the channel walls. Then I have installed new etched radiator panel and replicated tubing and shutter details. The new top part of the air scoop was fashioned from thin styrene sheet.
The one-piece kit tail wheel detail looks rather primitive but it wasn’t a big problem. I cut off the plastic wheel and installed the new one with rubber tire borrowed from EQUIPAGE wheels set. The mount details and fuselage bulkhead were replicated. The main wheel doors were cut off the undercarriage fairings and replaced. I vacformed new undercarriage bays from thin plastic sheet and used the Etched elements for replicating internal structure of the wheel doors. The wheel interior was completed with the installation of brake lines, hydraulic actuator arms and dozens of scratchbuilt details. The next challenge is the propeller assembly. It has serious profile problems. The blades are too narrow. On the real aircraft two propeller types - the VISh-2T and AV5L-158 - were installed but both were a slightly different shape from the kit parts. I therefore cut off the propeller blades and made new ones. After painting and finishing, the blades were glued to the completely assembled and painted spinner. The starter "dog" molded on the spinner detail looks good but I replaced it with a new one from steel tube. Tamiya’s poly cap was added. It makes the propeller assembly removable. Note - the stencil data and propeller logo were hardly ever used on Il-2 aircraft.
Many other small touches were added to the kit. Relatively simple but effective items included a Moskit metal exhaust, landing gear and flaps indicators and many other details. The machine gun and cannon barrels were hollowed out and the pitot tube was replaced with the metal tube. Grab handles were added to the port fuselage side under gunner cockpit. I installed new scratchbuilt RS-132 rockets and RO-132 launching rails with ignition wires. I found the rocket rail detail to be rather crude and replaced it with my own fabrication (it contains about ten parts). I’ve scanned the line drawings for anybody who wants to do this themselves. Finally, the new rudder mass balance and metal aerial mast were installed. One unusual addition - the bomb box was made of wood (veneer sheet). It didn’t take me a lot of time but looks nice on the dioramas photos.
During the Great Patriotic War a variety of camouflage schemes were applied to Il-2 aircraft. Black/Green was the typical finish for early production series Il-2; Black/Sand Brown, some three-color and Winter variants. During 1943, Brown/Green camouflage became the standard color combination for all Il-2 aircraft until the end of the war.
I found four photos of this subject and it would reasonable to state that the camouflage pattern on the upper wing surfaces presented in Aeromaster's instruction and some another sources is not correct. The Internet article "The Development of Camouflage and Finish of the Ilyushin Il-2, 1941-1945" was very useful in my research. I applied a camouflage scheme that was the standard for the Kuibyshev aircraft plant. The port side photo of this particular aircraft shows that my personal interpretation color scheme is quite correct. I used a mixture of Tamiya’s paints to complete this scheme. I found Tamiya's masking tape was the easiest way to mask the flat canopy glass surfaces and landing lamp unit before painting. The Il-2 aircraft were well worn so I was fairly free with the application weathering. Weathering was achieved by airbrushing subtle variations in tone and hue. Matt coating and lightened color paint were used for fabric control surface. The chipped effect was obtained by painting very small dots of Tamiya Metal-Gray enamel paint over completed camouflage. I don’t use silver paints for weathering because it looks very bright. The final effect was completed after adding exhaust stains, fluid leaks and replicate damage field repair.
This kit is another excellent addition to the fast-growing Accurate Miniatures range. Overall, this kit was a pleasure to build with some minor shortcomings that were easy to correct. The finished Shturmovik is an impressive looking model. Highly recommend to anybody.
I found the followings books and sources in building this model:
Accurate Miniature Il-2M3 kit no.3407 EDUARD #48227 Il-2 photo etched detail set EDUARD #48228 Il-2 bombbays and flaps, photo etched detail set Moskit metal exhaust pipes Il-2 #4828 EQUIPAGE wheels set for Il-2M3 Cavalier CV207 Flexible Ammo Belts Aeromaster Decal Sheet AMD #48200 Shturmoviks Pt.2
Model, Photographs and Article Text Copyright © 1999 by Michel Poutnikov
Back to HyperScale Main Page Back to Features Index |
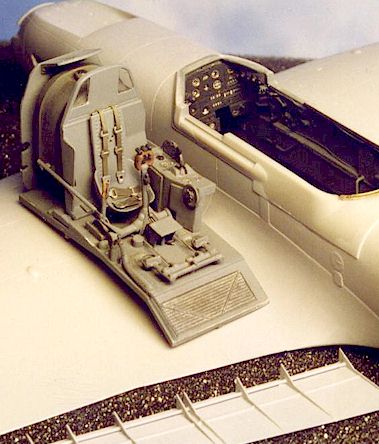 Construction starts
with the cockpit. The level of cockpit detail is impressive but some corrections were
necessary.
Construction starts
with the cockpit. The level of cockpit detail is impressive but some corrections were
necessary. 
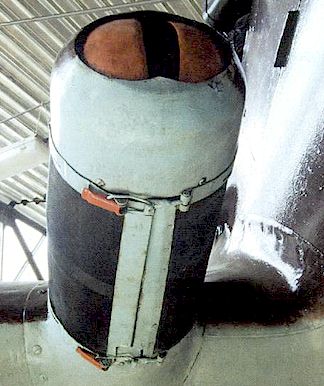 The next
improvement was the carburetor intake detail with dust filter. I built a replacement
starting with a thermo-formed front face with aluminum leafs and anti-dust filter that was
replicated using metal wire netting. This significant scratch building exercise took some
time but the finised product looks like the real thing. Important note - the front opening
of carburetor air intake is not circular (see reference photo).
The next
improvement was the carburetor intake detail with dust filter. I built a replacement
starting with a thermo-formed front face with aluminum leafs and anti-dust filter that was
replicated using metal wire netting. This significant scratch building exercise took some
time but the finised product looks like the real thing. Important note - the front opening
of carburetor air intake is not circular (see reference photo).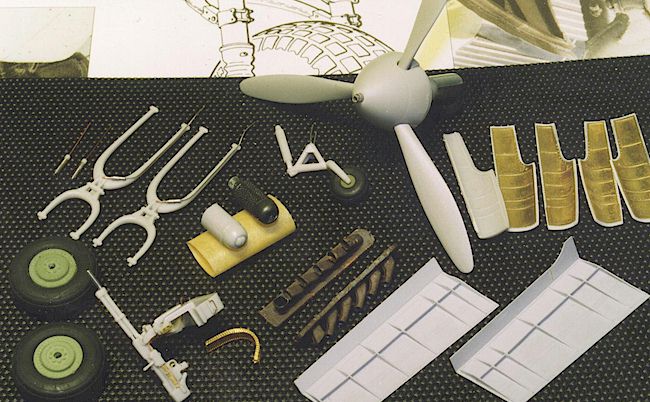
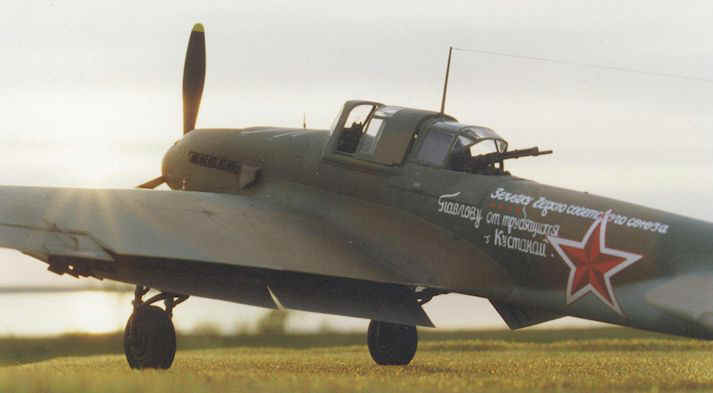
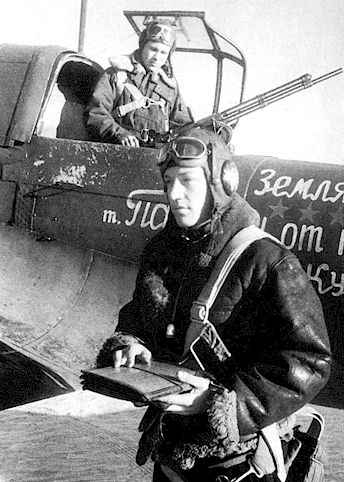 I decided to
paint my model as the aircraft of the twice "Hero of the Soviet Union" Capt.
Ivan Pauvlov, of the 6th Guards Assault Regiment. The aircraft had a personal
inscription to Pavlov: "To our fellow citizen, Hero of the Soviet Union Lt. I.
Pavlov, from the workers of Kustanai," which was Pauvlov's home town. The aircraft
also had "three-dimensional" (Kremlin style) red stars on the fuselage - a very
striking marking. His aircraft was finished in the standard color scheme with Earth Brown
(close to FS 30118 but should be more brown) and Dark Olive Green (close to FS 34097 but
should be a bit darker) on the upper wing surfaces and fuselage top, Light Blue was
applied to the lower surfaces.
I decided to
paint my model as the aircraft of the twice "Hero of the Soviet Union" Capt.
Ivan Pauvlov, of the 6th Guards Assault Regiment. The aircraft had a personal
inscription to Pavlov: "To our fellow citizen, Hero of the Soviet Union Lt. I.
Pavlov, from the workers of Kustanai," which was Pauvlov's home town. The aircraft
also had "three-dimensional" (Kremlin style) red stars on the fuselage - a very
striking marking. His aircraft was finished in the standard color scheme with Earth Brown
(close to FS 30118 but should be more brown) and Dark Olive Green (close to FS 34097 but
should be a bit darker) on the upper wing surfaces and fuselage top, Light Blue was
applied to the lower surfaces.