Home
| What's New |
Features |
Gallery |
Reviews |
Reference |
Forum |
Search
Home
| What's New |
Features |
Gallery |
Reviews |
Reference |
Forum |
Search
|
|
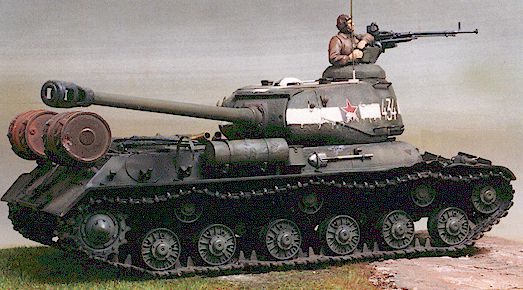
DML Iosef Stalin 2
By Brett T. Green
Dragon's IS2 was my third armour model since returning to modelling in adult life; and the first which I attempted anything other than out-of-the-box. I built this kit around 1994/95. I had mainly been building aircraft until that stage, but this chunky Soviet subject took my fancy. The surface detail on Dragon's IS2 was probably the best on on a styrene kit at the time of its release. Cast texture, weld beads, bolts and hinges are all beautifully done - although some weld beads may be a little overstated. There are no sink marks or ejector pin marks in obvious and/or difficult locations. When I saw the exquisite but expensive brass detail set from Show Modeling (with the peculiar slogan "For Your Good Hobby Life" on their header card), it was the only excuse I needed to get started.
PreparationThe Show Modeling set provides some lovely detail including replacement fender brackets and mesh covers for engine vents. Both of these features provide a much more "in-scale" and realistic appearance to these prominent features. Removing the moulded on kit fender brackets and cutting out the side engine vents proved to be the most difficult part of the project. After roughly cutting out the vents with my Dremel, I trimmed to size with a hobby knife and boxed off the vents with Plasticard.
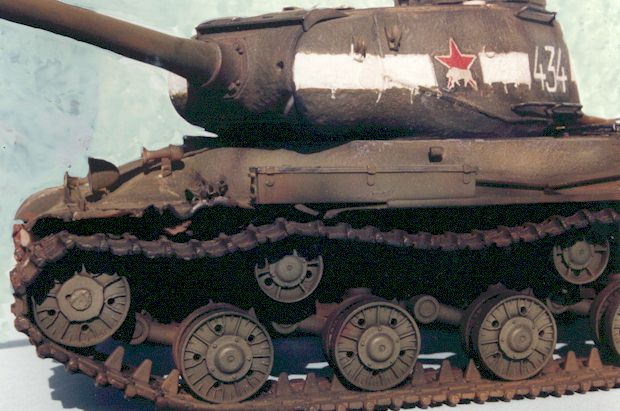
Lower Hull With this tricky bit out of the way, I commenced construction of the lower hull. Suspension arms are separate keyed pieces. The whole suspension and lower hull assembly was completed without problems. I assembled the individual track links at this stage. These, too, were trouble free -- the fit was so good that I had to decide whether to glue them at all. Even though the track links seemed to be a push-fit, my innate paranoia eventually led me to brush liquid glue on the four separately prepared sections of track per side.
I usually assemble a flat lower track run, a drive sprocket run, an idler wheel run and a sagging top run for each side. I apply the bottom track run last in case I have to tweak the number of track links, or stretch the spacing to make the track run fit. As my first attempt at individual track links, I was happy with the result. Finally I painted the entire lower hull and tracks flat black.
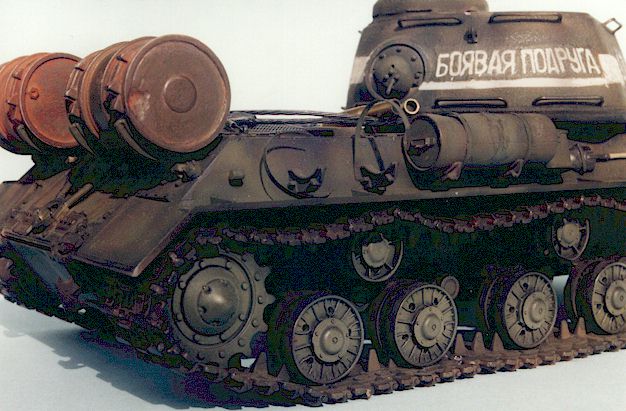
Upper HullReturning my attention to the upper hull, I boxed in the sponsons with Plasticard. The fuel tanks received some special treatment. Restraining straps and side handles were replaced with brass items. This gave me the opportunity to depict a missing fuel tank on one side (with a couple of orphaned straps), and to represent one strap loose on the other side. I also added two large 200 litre fuel drums to the rear of the vehicle. These drums were sometimes seen carried by vehicles behind the front line fighting. I "liberated" these drums from a Dragon T72 kit (but I just know I am going to need them one day!)
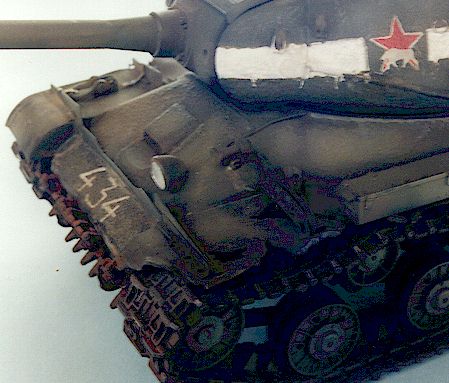
I decided to add some battle damage to the fenders and track guards. I thinned out the under surfaces of the fenders with a round headed burr in my Dremel, and carefully applied heat to the damaged areas to warp the plastic. This was done after the fender mounts had been glued in place. I then used the Dremel again to perforate the fenders in appropriate places. I also drilled out a number of holes in the port fender bracket to represent the spaces where bolts had popped out when this damage occurred. Extra details include drilling out the horn and adding an electrical cable; placing a coiled tow cable on the rear deck with scratch-built end connectors and a couple of spring-loaded tie downs from brass rod and strip; an antenna on the turret roof from brass strip with fine electrical wire wrapped around the base to represent a spring; and a clear headlight lens from a Japanese accessory set (sorry guys and gals, I lost the packaging and I can't remember the brand). I also added a Verlinden DshK 12.7mm machine gun to the commander's cupola. This is a small model in its own right. Although the overall effect of this machine gun is okay, its construction was a nightmare and it is highly inaccurate. But at that stage I didn't have too much choice. The rest of the kit was assembled as per instructions. This is the only Dragon kit I have built which has fitted perfectly - no filler was required anywhere!
Cookie Sewell and others have pointed out the various inaccuracies in this kit. The muzzle brake looks too small, the turret profile seems too flat, there is something not quite right about the relationship between the road wheels and the return rollers. These and other criticisms are valid, however this is still an ideal model for a novice modeller (or a veteran for that matter) due to its ease of assembly, quality of detail and all round good value. Even if you don't like individual track links, this one really is no chore. The model should look great out of the box, and with an excellent detail set now also available from Eduard, the modeller has more choice than ever.
The only wrinkle is that this kit no longer appears in Dragon's catalogue. No matter, it still should be widely available. It is also likely to pop up in the Dragon Shanghai catalogue at some stage in the near future.
Text and Images Copyright 1998 by Brett Green.
|
 Other nice touches by Show Modeling include a lovely saw cradle; a detailed
splash guard for the forward hull; various straps, tie downs and tool mounting points; and
a stack of brass hexagonal bolt heads.
Other nice touches by Show Modeling include a lovely saw cradle; a detailed
splash guard for the forward hull; various straps, tie downs and tool mounting points; and
a stack of brass hexagonal bolt heads. 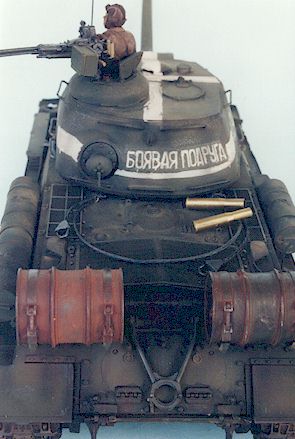 Before spraying the rest of the model black (for my usual
"pre-shading"), I painted the turret white then masked the theatre markings with
Tamiya 6mm tape. I sprayed black followed by successively lighter shades of green until I
was happy with the general effect. I then removed the masking tape from the turret to
reveal a very stark set of white markings.
Before spraying the rest of the model black (for my usual
"pre-shading"), I painted the turret white then masked the theatre markings with
Tamiya 6mm tape. I sprayed black followed by successively lighter shades of green until I
was happy with the general effect. I then removed the masking tape from the turret to
reveal a very stark set of white markings.