Home
| What's New |
Features |
Gallery |
Reviews |
Reference |
Forum |
Search
Home
| What's New |
Features |
Gallery |
Reviews |
Reference |
Forum |
Search
|
|
Modelling a Jagdpanzer IV Ausf. F
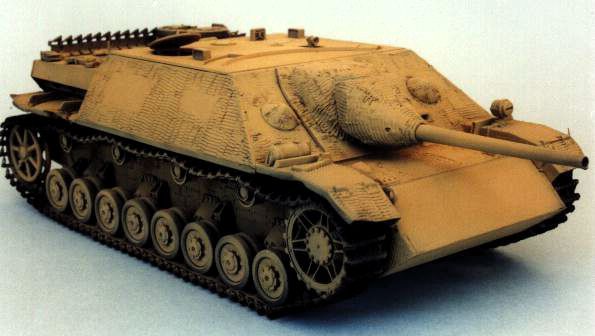
By Brett Green The Jagdpanzer IV L/48 represented the penultimate development of the Panzer IV chassis. The original pre-war design had been up-armoured, up-armed and reshaped to ensure that it remained a serious threat to contemporary Allied vehicles right up until the end of the Second World War. Its low profile shape and hard-hitting 75mm L/48 gun made for a perfect combination in a hit and run defensive war. The final version, although burdened by excessive weight and being somewhat front-heavy, packed the punch of the 75mm L/70 gun as used so successfully in the Panther tank. This sleek vehicle has been kitted three times before in 1/35th scale once each by Italeri, Nichimo and Tamiya, once by Monogram in 1/32nd scale and even in 1/30th scale by Nichimo again. There have also been several smaller scale kits too, a 1/48th scale kit by Bandia, and if 120mm (1/15th - 1/16th scale) is your thing, there is even a resin kit available! Now considering this new DML offering should you sell off those kits you have hanging around not built in your collection and update to the new Dragon offering? Absolutely. Anyone want to buy mine for five bucks each? In the BoxOne might reasonably assume that the new Dragon Jagdpanzer IV L/48 would be based on some of DML's recent Panzer IV based kits, fortunatly this is not the case. The only parts in common with previous Panzer IV releases are the track links, which represent the early style 40cm version with two vertical grooves (although the later style with ice cleats are illustrated on the box art). All other parts, including the lower hull, really nice wheels and suspension and a super-detailed rear hull plate, are new. Some of the better features include a separate muzzle brake which has allowed Dragon to mould a threaded screw on the end of the barrel, positionable engine hatch (but not the fan cover), and both commander's and loaders hatch moulded separately. The engraved detail is the best Dragon effort yet. Raised features such as hinges, non-skid surfaces and moulded-on tool brackets are spectacularly crisp and precise. Casting texture on the gun mantlet is every bit as nice as their Jagdtiger effort. Unfortunately this detail will always be hidden under zimmerit, as I can't find any photo references for this variant without the anti-magnetic coating. For the first time, Dragon has provided a decent set of tools. The highlight is a jack that boasts eight separate pieces. Gone are the woefully undersized, sinkmark-riddled excuses for on-vehicle equipment. Other details such as the binocular sights and Bosch light have been given the same attention. Construction breakdown features separate kit parts for the superstructure front and roof, so we can expect the later Jagdpanzer IV variants soon. This early model L/48 includes the dual circular armoured MG covers on the superstructure front (you know, the ones that look like Madonna's bra), and the correct type of early, sheet steel sight traverse opening for the roof. The exhaust configuration is also the early horizontal muffler common to the Panzer IV Ausf H. Although it wouldn't take a great deal of effort to convert this to a later L/48 or L/70(V) variant. I will probably let Dragon do the work for me and wait a few months for the next inevitable release, if they can squeeze three releases out of a Jagdtiger, imagine the possibilities with this -- Maybe even a retooled L/70(A), (Please!) The only nit-pick is the slightly heavy-handed treatment of the front mudguard hangers, and lack of sideskirt armour. It is a pleasure to see a company so obviously taking criticism on board and responding with a constantly improving product. The big question: is it as good as Tamiya's most recent releases? The proof is in the building. Construction
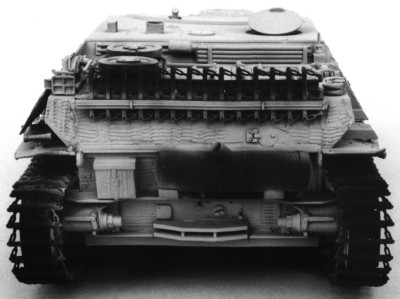
The front mudguards were softened with a candle and carefully bent with pliers. I also separated the starboard track guard from front hull with several scoring strokes from a sharp scalpel. The excellent reference book, Panzers at Saumur No. 1 contains a number of detail drawings of the Jagdpanzer IV L/48. These indicate the presence of a track guard mounting bracket on the inner surface of each front track guard. These were fabricated from aluminium shim. The starboard bracket was bent as per my reference photo. Turning attention to the back of the hull, damage was added to both rear track guards.The under surface was thinned with round headed bit in motor tool, then the guards were bent with application of candle heat and pliers. The surface of the guards was penetrated by my Dremel motor tool in several spots to represent combined battle and corrosion damage. The port track guard was separated from its mount by sharp scalpel. I left off the starboard side spaced armour plate as per photo reference. The finishing touch for the upper hull was to blank off the obvious cavity under the fan exhaust grill.
Detailing on the hull included hollowing out the driver's vision slots with the trusty Dremel. The gun mantlet was enhanced by drilling out three mounting holes and inserting brass tube in each hole. I then punched three holes in a triangular pattern in the upper surface of the mantlet base. The rather chunky moulded handles were carved from Commander's and Loader's hatches and replaced with bent brass rod. A cloth cover over gun cleaning rod was added using my "goo" mix of putty and liquid glue. This was then textured appropriately. A resin episcope, inexplicably missing from the kit, was added to the commander's hatch. I didn't fit the superstructure roof yet. Neither should you! See my notes on final assembly to see why. Getting into the real nitty-gritty detail, I though the shovel blade needed to look more pointy. This was reshaped with a hobby knife and sanding block. I also ground out the handle mount on shovel blade. Brass wire release handles were added to the fire extinguisher, bolt cutter, shovel and jack handle. The handle on track tensioning tool was shortened per references with a wing nut and a second fastening strap added from lead foil. The lower hull, including the rear panel, are a delight. The only
modifications I made to this area were to thin out the exhaust pipe and texture the with
the aforementioned "goo" compound. I also chose to replace the kit tracks with Dragon's "Super Detail" Panzer III/IV tracks. The main reason was to be consistent with the tracks shown in my reference photos. However, they are certainly the finest level of detailing yet seen in Dragon tracks, and are about a quarter of the price of a set of Fruilmodellismo tracks. Camouflage and Markings
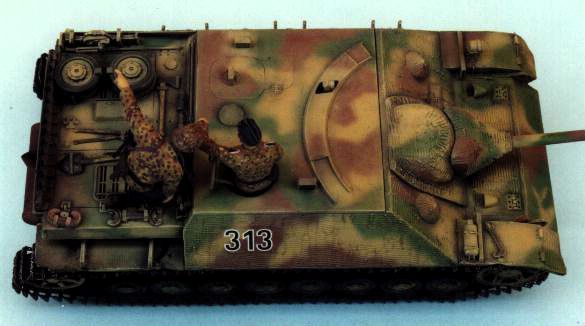
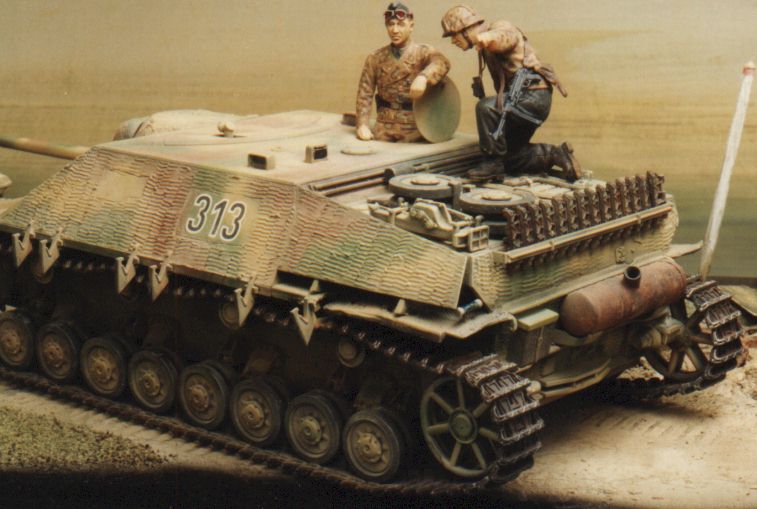
The kit was painted to represent vehicle "Black 313", captured by the British in Belgium during late 1944. Although there are photographs from almost every angle, the vehicle is incredibly dusty. This makes it difficult to establish the original camouflage scheme. The photos do give some clues, however, and I sketched what I could see then added what was likely. The first step was to spray a base coat of flat black. This was followed by a thinly sprayed coat of Dark Yellow over most of the kit. The tracks, tyres, muffler and recessed areas of the vehicle were left in black. The camouflage colours of Red Brown and Olive Green were sprayed over the top of the Dark Yellow. Markings are simple in the extreme. Kit decals for the vehicle
number were applied. I modified the "3"s by over painting a section of each
digit after the decals had set. The decal digits were not of the same style indicated by
the reference photos. WeatheringWeathering was achieved by over spraying the three-colour camouflage scheme with Dark Yellow. Some very subtle dry-brushing of corners and highlights was applied using the three camouflage colours lightened with white or dark yellow. For the Muffler, Rustall was applied in several layers to achieve the corroded effect. The liquid was applied directly over the acrylic paint with a large soft brush. The tracks recieved a light coat of Rustall which was brushed onto the black base coat. A fairly liberal dry-brushing of Humbrol Polished Steel MetalCote followed. This was buffed when dry and the effect was completed with a very light dry-brushing of Tamiya Chrome Silver Enamel. The teeth of the drive sprockets were painted Humbrol Polished Steel.
Figures and BaseBoth figures use Dragon bodies and Warriors heads. The base is a pine cutting board (available cheaply at many Supermarkets) which I prepared by priming and sanding. The groundwork is DAS, a synthetic clay product found in craft shops. Finely ground dirt has been sprinkled onto the wet DAS to create the texture, and static grass and debris were attached using a combination of white glue and spray adhesive. The overall base was then sprayed with Tamiya acrylics to achieve the dry, hard packed look of a dirt road. Finally, the area surrounding the groundwork and the sides of the base were sprayed using Tamiya semi-gloss black. ConclusionBy any standards, Dragon's Jagdpanzer IV L/48 is a great kit. How does it compare to Tamiya? Although the kit is highly accurate and the fit is better than previous Dragon offerings, it does not "fall together" in the same way as Tamiya's latest offerings. However, with its individual track links it certainly wins the value stakes. And as it unlikely that Tamiya will introduce a retooled Jagdpanzer IV, the Dragon kit is likely to remain the best available version of this attractive vehicle for years to come. ReferencesPanzers at Saumur No. 1 Dai Nippon Kaiga, Tokyo, 1993Ground Power No.007 Delta Publishing Co., Ltd. December, Tokyo, 1994 Die Leichte Jagdpanzer Walther Spielberger, Motorbooks Article and photographs by Brett
Green, January 1998.
|
 In common with many armour modellers I have the
"Detailing Disease", however despite the overwhelming urge to improve detail
which is already very good, I managed to build this kit with only minor modifications. The
upper hull received the most attention. Using my smallest square headed dental burr, I
hollowed out the inner surface of front track guard mounts. I then removed the over scale
pins moulded on to the front mudguards and drilled the hinges using a pin vice. New pins
were cut from brass wire. Riveted hinge mounts were represented by punch-marks.
In common with many armour modellers I have the
"Detailing Disease", however despite the overwhelming urge to improve detail
which is already very good, I managed to build this kit with only minor modifications. The
upper hull received the most attention. Using my smallest square headed dental burr, I
hollowed out the inner surface of front track guard mounts. I then removed the over scale
pins moulded on to the front mudguards and drilled the hinges using a pin vice. New pins
were cut from brass wire. Riveted hinge mounts were represented by punch-marks.