|
Junker
Ju 87D "Stuka" |
Junker Ju 87D "Stuka"
by
Floyd Werner
|
Junker
Ju 87D "Stuka" |
Three more images in the text
T h e T a l e o f a M o d e l l i n g P u r c h a s e . . . |
Let me tell you of a story about how I got to buy and build Hasegawa's new 1/48 scale Ju
87D Stuka.
All of us married modelers have tried to sneak a kit into the house without the wife knowing about it - well this one went awry. When the release of the new Stuka, I knew it was time to retire the old Monogram kit. I tried to convince my wife that I "needed" this kit. She was having none of it, even with Rudi exalting all the benefits of the new kit.
Well, I left without the kit. Two days later I had to go back to Austin and, of course, I have to stop at King’s hobby store. On the way I hatched a plan to get the kit. "Why don’t we build a kit together, me the new one and you the older, but still good, Monogram." Our kids were at their grandmothers for the month so we were alone to spend quality time together. What could be more quality than building a model together? (Isn’t love grand?) Well to make a long story eternal she said "Hey that sounds like fun". With those formalities out of the way I got the kit. Now I had to build it, something that only happens once in a while. Yvonne said you don’t need the extra decals (darn) or any interior sets (double darn). So why not build it out-of-the-box? I haven’t done that in quite a while.
I n t h e B o x |
Okay now on to the model. The kit is very nice looking in the box.
Hasegawa have reused the molds from the Ju 87B-model with a new fuselage and extended wings. Here is where I saw a problem. There is a noticeable step where the wings are extended. You get the choice of two aircraft that includes Rudel’s Stuka and a semi-winter camouflaged aircraft from I./SG5. Ever since the Winter Messerschmitt article in FSM I wanted to test this technique. I didn’t want to practice on a beautiful Bf 109 so the Stuka was a great substitute (I’ll bet you were wondering how I was going to work that Bf 109 angle in there!)
C o n s t r u c t i o n |
The cockpit is the usual starting place. It is very good out of the box with lots of
detail on the separate sidewalls. I really loved the back seat rack. When painted with RLM
66, dry brushed with RLM 02 and highlighted with silver it came alive. The instrument
panel was very nice and dry brushed great. Future clear wax for instrument lenses made it
look even better. Sandwiching the cockpit between the perfect fitting fuselage halves must
be done before the cementing as the cockpit can’t fit in from the top and the bottom
is closed. This doesn’t cause any big problems.
The nose section is added next. This includes the oil cooler with some nice detail built in. Leave off the exhaust stacks until the end.
This is a good time to give you an update on Yvonne’s Stuka. At this stage she had the fuselage, cockpit, and the wings together and waiting on me. I’m thinking, "I’m falling behind. MUST WORK FASTER".
To prepare the pilot's canopy for the open position you will need to widen the slot that slides around the antenna. Light sanding of the slot will fix the problem. Check fit against the antenna to be sure it opens. Now dip the canopies, Part T5 and the landing light cover in Future twice. Wow, this works wonders (thanks for the tips Milton). Hasegawa includes a correction sheet for steps 6 and 8 so don’t forget to read the supplementary sheet. The wings fit together very nicely. The only problem I saw experienced was the join at the wings' trailing edges. These joins are very difficult to fill because the flaps and ailerons are in the way.
Be careful on opening up the holes in the lower wings. There are a lot of them and the instructions are vague. I would suggest that you open up only the center hole for the dive brakes and sand the locating pins off the outer supports for the brakes. My holes didn’t line up real well even though I hit them right in the center.
Don’t forget to scribe the inside of the horizontal stabilizers part E7 with an ellipse to replicate elevator throw.
Attaching the wings is where I ran into the biggest problem. My wings didn’t match particularly well with the fuselage. I had to super glue one wing and let it dry before attaching the other wing with masking tape to hold it against the fuselage. This made the joint line up pretty nice.
Great news - the landing gear struts don’t exist. The wheels are sandwiched between spats. But here is what people will be unhappy about - the landing gear covers are attached in four parts with the seam running down the front and back!
Putting the bombs together was straightforward. I wanted the bombs to be correct and colorful. I painted the bombs the same colors as the bombs on the NASM FW-190. The center bomb is tire black and the outer SC50s were painted Model Master Wood. I know they aren’t very descriptive but they look convincing and correct. Whatever works. Attaching all the assorted stuff under the wings was easy. There is a huge gap between part N1, N2 and the wing. I decided that this would be too much trouble and if assembled properly it wouldn’t really matter in the functioning of the universe.
About this time Yvonne stopped building waiting for me to catch up.
P a i n t i n g |
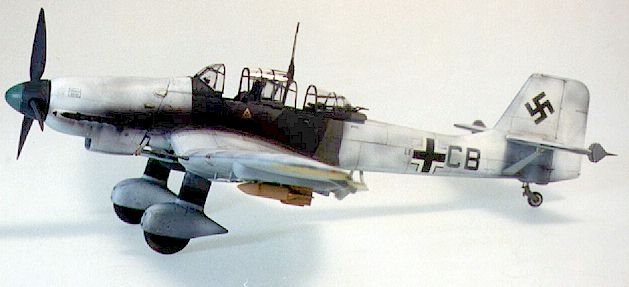
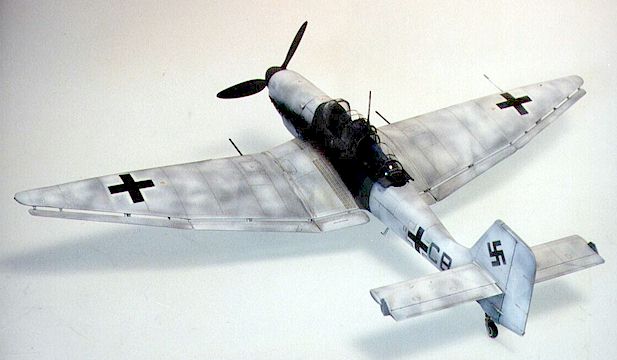
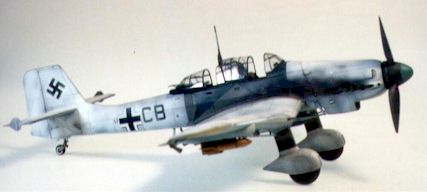 To execute the winter camouflage, I used Model Master's RLM 65, 70, and 71.
I had a big problem with the application of RLM 70. It pebbled really seriously. Now I was
cursing but I painted the RLM 71 anyway. I had to take a week off to get my Airframe and
Powerplant rating and when I returned I figured I could easily rub off the pebbles, I was
wrong. I got some off but most stayed on. Well maybe if I put the white over it and then
Future they will level it out. I was wrong, again. I applied the white unevenly letting
some of the greens show through. In the midst of all this chaos a solution came to me. I
took the sandpaper to the white and the hand of God touched the model. As I was sanding I
worked through the white paint at different rates. It started looking just like the look I
was after. Wow I couldn’t have planned it any better. I stopped following the article
because I liked my results better. The Future did smooth out most of the pebbles that were
left behind.
To execute the winter camouflage, I used Model Master's RLM 65, 70, and 71.
I had a big problem with the application of RLM 70. It pebbled really seriously. Now I was
cursing but I painted the RLM 71 anyway. I had to take a week off to get my Airframe and
Powerplant rating and when I returned I figured I could easily rub off the pebbles, I was
wrong. I got some off but most stayed on. Well maybe if I put the white over it and then
Future they will level it out. I was wrong, again. I applied the white unevenly letting
some of the greens show through. In the midst of all this chaos a solution came to me. I
took the sandpaper to the white and the hand of God touched the model. As I was sanding I
worked through the white paint at different rates. It started looking just like the look I
was after. Wow I couldn’t have planned it any better. I stopped following the article
because I liked my results better. The Future did smooth out most of the pebbles that were
left behind.
D e c a l s , W e a t h e r i n g a n d F i n i s h i n g |
Time to decal. I used the kit decals and found them to be great. After decaling I got to
think that the white wash would have been applied over most of the stencils so I hooked up
the airbrush and painted over the stencils and applied some overspray to the national
insignias and call signs. The results were much better than I expected. Another coat of
Future over the decals to seal them and waiting about 24 hours prior to weathering.
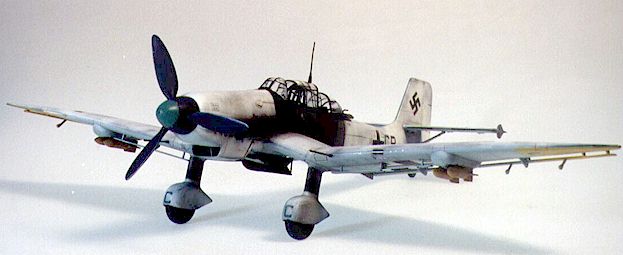
I tried to weather with light gray over the white but didn’t like the results. I went back and used Burnt Umber to highlight the panel lines. This effect was much better. I used flat black for the exhaust streaks, which are huge on winter camouflage. In the black area I used pastels to get the proper color that I wanted. It looked really dirty (and neat). Another happy result. Silver pencil around the prop blades leading edge weathered them. I know people will say that the props are made of wood, but I have a real one in my living room and it has a metal leading edge (called tipping, see I did learn something from my A&P testing). Be careful not to use the silver on anything but the leading edge.
A Polly S flat coat over the entire model brought the painting to a conclusion.
C o n c l u s i o n |
Attaching the canopies open reveals the inside. The model looks great on the shelf and
definitely looks the part of a late war winter camouflaged Stuka. No major problems were
encountered except for the wing tip extensions. I can’t wait for the G-2 and the D-8.
That is it. Finished. Yvonne’s isn’t yet but she assures me she will by the
show.
Floyd Werner
HORRIDO!
Remember modeling is fun!
Back to HyperScale Main Page
Back to Features Page