Home
| What's New |
Features |
Gallery |
Reviews |
Reference |
Forum |
Search
Home
| What's New |
Features |
Gallery |
Reviews |
Reference |
Forum |
Search
|
|
|
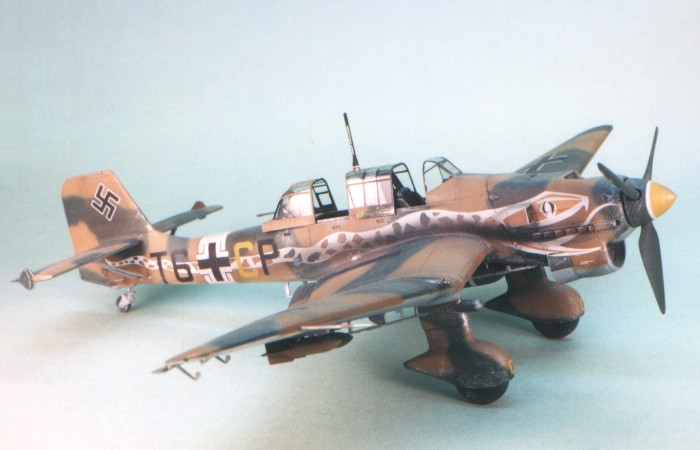
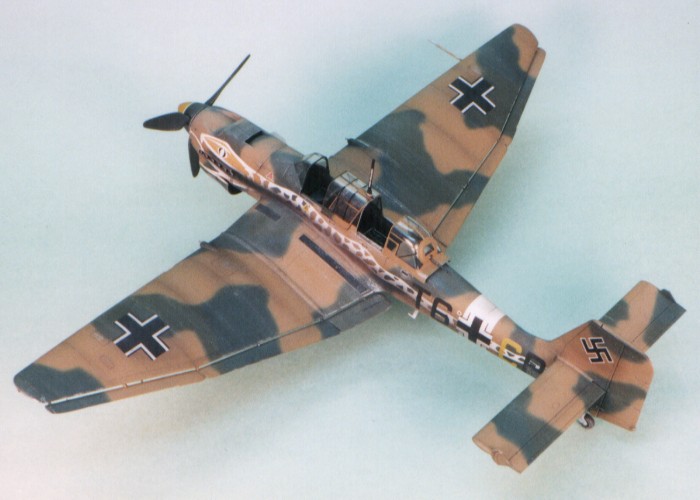
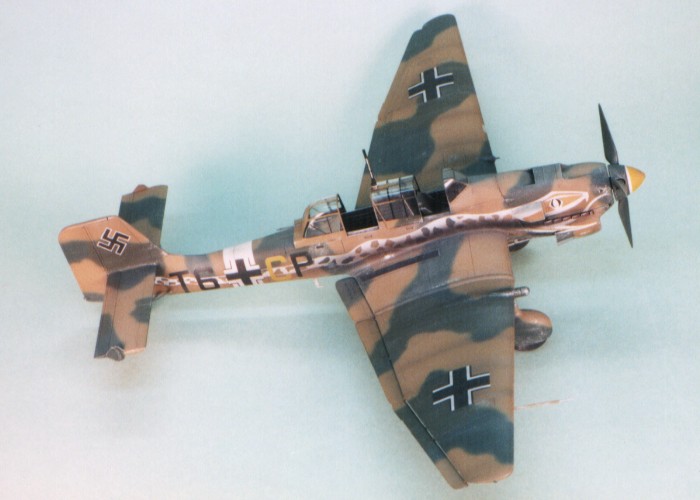
Junkers Ju 87B-2 "Stuka" by David W. Aungst
I'm not that fond of "trucks that fly" and the Stuka is no exception. However, when adorned in unique personal markings like those used by Lt. Hubert Polz from 6/StG 2, even I can be swayed into building a flying truck. I built the Hasegawa 1/48 scale Junkers Ju 87B-2 Stuka kit mostly out-of-the-box. The only change I made to the basic kit was to cut and replace the wing control surface actuators with styrene rod stock. Hasegawa molds these rather crudely as thick triangles (with the wing flight controls molded as part of the wing). Hasegawa would have done better to mold the flight control surfaces separately and then provide the proper rod details for the actuators. The only other problem I had with the kit involved the horizontal tails. Constructed with the braces in the locator holes that Hasegawa molds, the tails are forced to doop quite noticeably. I cut off the fuselage locators and mounted the bracing higher on the fuselage side to keep the tails level.
The camouflage on the model is applied using Floquil Military enamel paints. The camouflage is the "standard" Black-Green (RLM 70) and Dark Green (RLM 71) splinter over a Light Blue (RLM 65) bottom with Sand Yellow (RLM 79) applied in a random pattern over the top side splinter camouflage. I had no idea how difficult it would be to apply the RLM 70 and RLM71 splinter camouflage to the aircraft. It took longer to mask the model than it did to air brush the paint. I now know why most modelers select later war Luftwaffe topics for building where the camouflage is more free form. I came close to not applying the sand camouflage after all the work it took to create the green splinter scheme.
I chose to make the cockpit interior Black-Gray (RLM 66) as I was told this was more common. I used the Floquil Military enamel paint for this, but most of the rest of the detail items on the model are Testors Model Master enamel paints. The decals come from Three Guys Replicas (sheet #48005). The Hasagawa special release of a kit including these markings was not available, yet, when I built this model. The "snake" aircraft has always been my favorite Stuka, ever since I first saw the box art on the old 1/32nd scale Revell kit. The Three Guys instructions for these decals are very complete and actually give the camouflage for the entire aircraft (left, right, and top sides).
I used a combination of thinned down enamel paint washes and air brush shading to weather the airframe. This was completed by a final dry brushing of silver to pop out the surface details. I had been told from a couple sources that Stukas got really beat in the field with lots of exhaust staining. I hated covering half of the snake decals I worked so hard to get applied, but I decided to follow the advice and heavily weathered the airframe.
Click the thumbnails below to view images full-sized. Click the "Back" arrow on your browser to return to this page.
Models, Description and Images Copyright © 1999 by
David Aungst
| |||||||||||||||||||||