 Home
| What's New |
Features |
Gallery |
Reviews |
Reference |
Forum |
Search
Home
| What's New |
Features |
Gallery |
Reviews |
Reference |
Forum |
Search
|
|
|
Ki-84
Hayate "Frank"
by Dan Salamone
Axis Eagles is a SIG for those interested in the aircraft and pilots of the Axis powers in WWII. Dan's article will also appear in the Axis Eagles newsletter, "The Eagles Nest". The newsletter includes book and aftermarket reviews as well as a "want ad" section for those members looking for particular items. Contributors and members include such well known individuals as Tom Tullis and Claes Sundin. For information on joining Axis Eagles contact Martin Reid at: axiseagles@ozemail.com.au
In the fall of 1944 Allied forces began to engage a new Japanese fighter in the skies over the Pacific. While reports did state that this new aircraft, coded "Frank", was an improvement over the older Ki43 and Ki-44,the Allies did not know just how potent a weapon the Ki-84 was until trials were performed after the war where a well maintained Ki-84, fuelled with high quality aviation gas, outperformed both a P-51K and P-47N. Even though the average Hayate suffered from some poor materials used during construction, and shoddy workmanship due to the deteriorating war situation in Japan, in the hands of a competent pilot this was a fighter capable of doing more than holding it's own. The Ki-84 must be considered one of the best fighter aircraft used by any of the Axis airforces during WWII. This model portrays a "second batch supplementary prototype" of the 47th Hiko-Sentai based at Narimasu AB near Tokyo in 1945.
The vast majority of the 3,500 "Franks" built were of the "Ko" variant, with smaller numbers of "supplemental prototypes" and also "Otsu", "Hei", and two "Tei" aircraft. The main differences between these variants was armament, with the "Otsu" and "Hei" aircraft being heavily armed versions meant to take on the ever increasing waves of B-29s. The two batches of "supplemental prototypes" looked basically like a "Ko" series aircraft, however, some had differences such as exhaust stacks, cowl gun muzzle covers, main wheel hubs, as well as the profile of the rudder. Sadly, only one example of the Hayate (general translation, "gale") exists today and it is displayed at the Tokko Heiwa Kinen-kan located in Chiran, Kagoshima prefecture, Japan.
So, what does 2,000 yen buy you today? Quite possibly the finest plastic kit of an airplane to date. Upon opening the box you will find the typical Hasegawa single bag approach of packaging parts (clear parts in separate bag with decals) that includes 104 grey parts, 11 clear parts, 12 poly caps and a decal sheet for two different aircraft. The reason for 12 poly caps is Hasegawas' novel approach for attaching the landing gear legs, tail wheel, drop tank attachments and fuel cooler. Kit decal options are for two dark green over grey aircraft, one from the 22nd Hiko-Sentai and the other from the Hitachi Training Flight Division. It is apparent from the parts breakdown that Hasegawa plans on other variants of this aircraft. The kit does include the wheel hubs for very early aircraft, and with the inclusion of different rudder, exhaust stacks/cowl flaps, and cowl practically all variants can be easily derived from this single basic kit. Rather than speak about the actual assembly, I will go over both the positive, and negative aspects of the basic kit. The moldings are superb, as well as the engineering of this model. Detail, such as gun barrels, cockpit components, and the landing gear bay are simply wonderful. You even get a landing light bulb part for the leading edge of the left wing. Also, this kit fits so well that only one small area needed any putty at all (oil cooler/cowl seam). The proper dihedral is locked in once the wing is glued to the fuselage, and the tailplanes also have a positive lock feature that is hard to get wrong.
As far as "negatives", there are not many and certainly no major ones to report on. If you are going to change one thing on this kit, by all means do something about the fabric effect on the rudder. I changed this by filling and sanding smooth, then gluing on thin strips of Evergreen styrene. Once dry, I sanded these strips down until they were almost gone, this gives the effect of a raised, yet subtle, rib under the fabric. There are also a few concerns with the cockpit area in that the right side cockpit wall portrays items which were installed in the only surviving Frank (used as the pattern for the model) well after the end of the war. Aero Detail #24 also states that an item (part L12 in the kit) is an American radio panel installed after WWII but there seems to be a little debate over this point. My example had two holes needed to install the drop tank/bomb racks flashed over and I needed to open them up with a pin vise, the other six holes were molded perfectly open. Be careful in Step 8 as the directions will have you mount the fuel cooler under the right wing backwards, you need to assemble this device then install it rotated 180 degrees. Be careful when installing the cowl to the fuselage as on my copy the inside of the exhaust stubs, where they meet the inside of the cowl flaps, rubbed against the fuselage preventing a snug fit. A few seconds with a motor tool here will solve this easily. Finally, Step 5 shows two parts, L16 and L17 that attach to the main wheel hubs. I cannot find photographic evidence that these items were on most Franks, only a handful of images show these and I believe they may have been either only on early aircraft, or part of a system used to help secure the wheels while not in service. Above issues aside, the directions are easy to follow, and assembly is straightforward on this kit. A few more thoughts on the kit itself: You get beautifully molded "butterfly flaps" but these were rarely seen in the down position while the aircraft was at rest. They were also used for standard take offs and landings, but they look so unique that I did install them deployed on my example. Personally though, I would have rather seen the ailerons be separate parts, as well as the option of having the cowl flaps be open or closed rather than the closed ones supplied. Finally, be very, very careful with the tiny clear formation lights supplied in the kit. While a marvel of injection molding technology I replaced these with a small dab of 5 minute epoxy in the six areas needed, when dry they were painted with Tamiya clear paints over silver to replicate lenses. The following are areas that I changed or improved on the basic kit: · Brake lines added Overall in my opinion, this model was so much fun to both research and build that it is highly recommended even to those who do not build Japanese WWII aircraft. It is a perfect start to a super detailing project, yet built out of the box would still look stunning. Great job Hasegawa!
The Hayate was seen in a variety of different paint schemes, early aircraft were either bare metal, dark green over grey, or a dark green mottle over bare metal. As production progressed, aircraft were reportedly painted in a brown color over a different grey, and finally near the end of the conflict there are reports of dark green aircraft being finished. There were also variety of hinomaru styles observed, ranging from some having a white ring, on a white "bandage", to having no white surround at all. Also, tail markings seen on the Hayate, as well as other IJA fighters were actually sometimes a very stylized, artistic rendition of the Sentai number, and these were seen in different colors. It is felt that the cockpits were either painted in "aotake", a substance used to coat bare metal that took on differing shades of green and or blue depending on the thickness of application, and even late war aircraft having bare metal cockpits. Wheel wells were normally left bare metal, as well as the landing gear door interiors but some photos show a darker color which in all likelihood was "aotake". The above, and following color information has been collected from the various references and sources listed at the end of the article and is meant to be a general outline for modellers. By its very nature the interpretation of black and white photographs is difficult at best, and when it comes to WWII Japanese colors many beliefs held as true since the end of the war are now being disproved by dedicated researchers so please do not take this as gospel, or obsess over the subject but rather use it to make your own informed choices- and enjoy the model! Upper camouflage (green) FS *4079 Lower camouflage (with green upper) FS *6360 or *6559 Upper camouflage (brown) FS *0095 or *0118 or *3105 Lower camouflage (with brown upper) FS *6405 Prop and spinner FS *4128 As far as this model is concerned, here are the specifics. I used Aeromaster and Testors enamels, also some use of Tamiya clear acrylics in the cockpit area. The cockpit was first sprayed silver, given a black wash and then sprayed a mix of Tamiya clear blue and green. I then drybrushed with various browns, yellows and greys to bring out highlights and show dirt and wear. The seat itself was kept bare metal, and the cushion (parachute?) was painted a non descript brown. I decided to use silver as a primer on the model so I could utilize the liquid mask/tape ripping technique to replicate peeling paint. For the exterior camouflage colors I used Aeromaster RLM 71 for the green, and Aeromaster IJA Grey for the lower color. The prop was painted using Model Master RLM 82 Green, and the anti glare panel with Aeromaster Tire Black over a straight black undercoat. I decided to paint all the hinomaru rather than apply decals, I began by applying the wing and fuselage bands using a dirty white color, and once dry using frisket paper to mask the white. I made the patterns for the hinomaru using a template, and cut them out with a special X-acto knife designed for craft use, the blade is tiny and swivels so you can hug the edge of the template while cutting. Once applied, the masks were burnished down, and I then sprayed a coat of clear gloss to seal the edges from seeping paint. I mixed my own red paint from various Floquil red and brown colors, and when I removed the masks I was delighted to find perfect circles!
I masked the canopy parts with Scotch tape and a sharp #11 X-acto blade. Once the basic paint finish was dry I used oil paints for a subtle wash on the panel lines and landing gear bay, and used artists chalks for all the shading, weathering, and staining. I like this as it gives me maximum control over application and removal if needed, first apply with a small, pointed brush, and when satisfied with placement use a wide flat brush to blend these into the paint. After clear coating to seal the wash and chalks, I used some enamels for a careful drybrushing in the center of panels. Using different shades of browns, tans and greens this gives a very subtle and realisitic effect over the surface of the model. I realize that the above process for weathering sounds very involved, however I did all of it in a single afternoon and I think that it provides an alternative for the technique called "preshading".
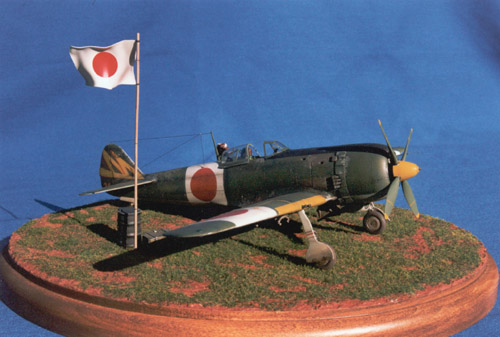
Using Model Art #329 as a guide I painted the figures using Ral Partha acrylic paints and sealed with Floquil Figure Flat to protect the paint. The flag is very thin styrene sheet, heated carefully to replicate a flag blowing in the wind. I actually made this flag a number of years ago on a rainy day and finally had somewhere to place it. The flag pole is metal tubing, bent slightly to replicate bamboo. I used acrylics here as well, including using greens and browns to drybrush on the effect I was hoping for. The groundwork is Celluclay painted to simulate the red soil found around Tokyo, and static grass was applied then drybrushed once dry using shades of yellow and pale green to bring out some different layers. The fuel drum and crate are from a Verlinden set.
To sum up, while not a perfect kit, this comes as close as possible to being one. The entire package of molding quality, engineering, fit and detail along with easy to read directions make this a model that every kit company should use as a measuring stick. Add to this the great subject matter and the wide variety of colors and markings you can use on the Frank and you have a kit that will make many people feel good about this hobby again. Do yourself a favor and save your money on any aftermarket detail sets that may be produced for this kit and invest it in one of the sure to follow variants of this basic kit. Hasegawa should be commended for producing such a well thought out kit, lets hope that their future releases will be as inspired.
All above books are available from online sources such as Hobby Link Japan http://www.hlj.com/ and Aviation Usk http://206.96.81.2:80/avusk/
Model, Article Text and Photographs Copyright ©
1999
by Dan Salamone
|
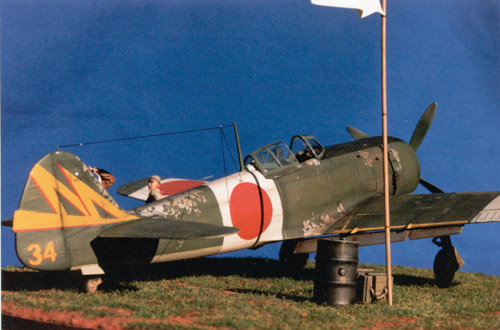
 The 47th
Hiko-Sentai was charged, along with the 244th Hiko-Sentai flying the Ki-61, with
the main defense of Tokyo and the surrounding areas. This particular aircraft
was almost impossible to identify from a "Ko" series aircraft, so it
is easily modelled using the basic Hasegawa kit (JT 67).
The 47th
Hiko-Sentai was charged, along with the 244th Hiko-Sentai flying the Ki-61, with
the main defense of Tokyo and the surrounding areas. This particular aircraft
was almost impossible to identify from a "Ko" series aircraft, so it
is easily modelled using the basic Hasegawa kit (JT 67). 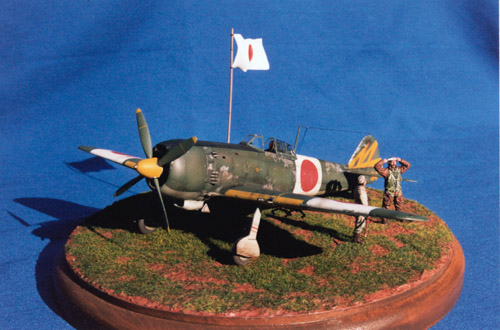 Comparing
the kit parts to the drawings by Shigeru Nohara in Aero Detail #24, I feel that
the kit is as close to perfect as you will ever find. However, I also feel that
in a few areas the line drawings are flawed, specifically in the areas of the
spinner shape and wing tips. That said, very minor areas to look for on the kit
include the wing tips, front of the cowl, and the "flange" on the
lower rail of the sliding portion of the canopy. I only mention these for the
most discriminating of modellers, as the average builder will not worry about
such minor "flaws".
Comparing
the kit parts to the drawings by Shigeru Nohara in Aero Detail #24, I feel that
the kit is as close to perfect as you will ever find. However, I also feel that
in a few areas the line drawings are flawed, specifically in the areas of the
spinner shape and wing tips. That said, very minor areas to look for on the kit
include the wing tips, front of the cowl, and the "flange" on the
lower rail of the sliding portion of the canopy. I only mention these for the
most discriminating of modellers, as the average builder will not worry about
such minor "flaws". 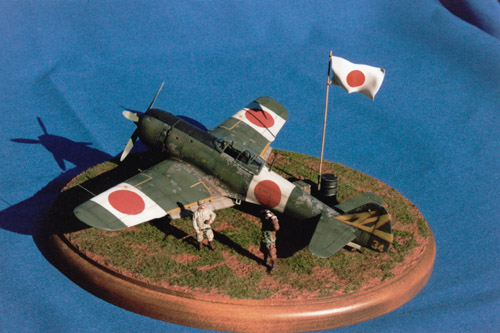 The only
decals used came from the kit (walkways, landing gear weight indicators) and the
tail markings came from Aeromaster 48-008 "IJA Fighters". I had to add
the red countershading on the numerals 34, a fine brush and patience were needed
here.
The only
decals used came from the kit (walkways, landing gear weight indicators) and the
tail markings came from Aeromaster 48-008 "IJA Fighters". I had to add
the red countershading on the numerals 34, a fine brush and patience were needed
here. 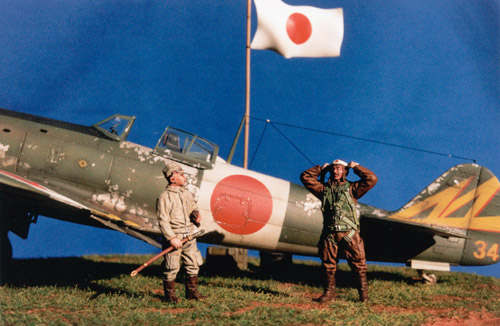 Although
basic, I was hoping to breathe a little life into my Hayate and decided to use
the wonderful figures sold by Jaguar and sculpted by Mike Good. These are the
most detailed 1/48 figures I have painted to date and offer nice features such
as keys on the arms to help with placement onto the torso. While labeled a
"mechanic" on the box and in the directions, the figure holding the
samurai sword is actually also wearing pilots' clothing.
Although
basic, I was hoping to breathe a little life into my Hayate and decided to use
the wonderful figures sold by Jaguar and sculpted by Mike Good. These are the
most detailed 1/48 figures I have painted to date and offer nice features such
as keys on the arms to help with placement onto the torso. While labeled a
"mechanic" on the box and in the directions, the figure holding the
samurai sword is actually also wearing pilots' clothing.