Home
| What's New |
Features |
Gallery |
Reviews |
Reference |
Forum |
Search
Home
| What's New |
Features |
Gallery |
Reviews |
Reference |
Forum |
Search
|
|
|
Evolution of a Kubelwagen
By Brett T. Green
KUBELWAGEN TYPE 82 Tamiya Plastic Model Co. When I heard that Tamiya was about to release a new Kubelwagen in 1/35 scale, my reaction was "….so what? Another example of the big guns of the modelling industry putting their money on a safe but predictable bet". When I briefly saw the new kit in the box soon after its Japanese release, I didn't get much more enthusiastic.It was only upon the official Australian release of this all new kit that I had a closer look. Five minutes of analysis was enough to make me understand what I had missed before. This was by far the best Kubelwagen on the market today - and another example of why I believe Tamiya are the best model kit manufacturer in the world today.
A Short Scale History of the Kubelwagen Tamiya's original Kubelwagen dates back to 1970. It was reasonably accurate in profile - perhaps a few contours are not quite right - but for its day it was a great kit. The main problems were the oversimplification of details such as wheels, clunky door handles, overscale including moveable machine gun mount and windscreen, and minimal moulded detail on the floor and inner surfaces of the corrugated doors. However it did feature excellent external surface detail. I can't comment on the other releases of the 1970s and 1980s but I would imagine that they share similar features. All of these early kits were superceded in 1993 by Hasegawa's effort. Hasegawa's rare venture into 1/35 scale military vehicles addressed many of the shortcomings of the earlier generation of Kubelwagen kits. The characteristic corrugation was carried through to the inner surfaces of doors. Wheels were subtly detailed on both sides. Floor detail was provided and many other fine points previously ignored or poorly represented were addressed. These including the fuel tank behind the instrument panel, the turn indicator apparatus on each side of the windscreen and full engine detail behind a positionable access lid. The removable windows were supplied as transparent parts but the hood could only be modelled in place (closed? up? With the roof on!). For small-scale refreshment, Hasegawa even supplied a couple of clear plastic wine bottles! The doors could be separated easily if the modeller wished to display them open. What more could anyone want? How about a couple of excellent Dragon figures, desert balloon tyres, various weapons and accessories and a photo etched steel fret including the option of a frame for the new folded hood part. Well, that's what Dragon included in their re-packaging of the Hasegawa kit. Dragon released two versions - one with Afrika Korps markings and the other in standard European garb. I honestly believed that things were as good as they could get. Wrong again.
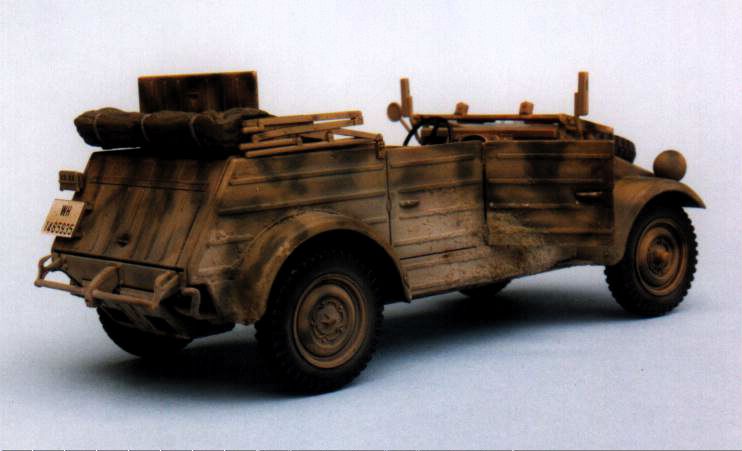
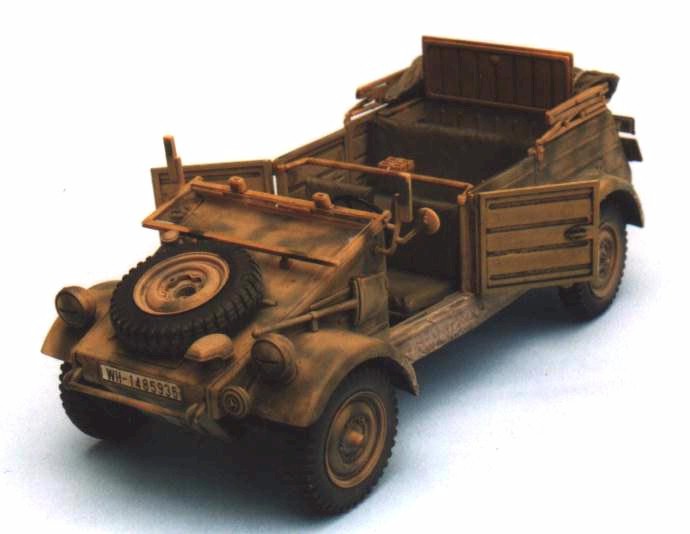
The New Tamiya Kit - In the Box Tamiya's new Kubelwagen comes packed in a small box containing two tan coloured sprues, one sheet of acetate containing the windscreen "glass" and markings for five vehicles. One seated figure is included, although weapons are not. The hood may only be modelled folded. The only option in the kit is a heater box (at least I assume it is some sort of heat recirculator) which sits over the top of the engine ventilator at the top rear of the car body. The only detail missing, somewhat inexplicably, is the engine. This is despite a detailed engine bay and a separate engine access panel! This kit boasts the same "state of the art" surface detail seen in all of Tamiya's recent releases. The ridges on the pressed metal panels, inside and out, are superb. Tamiya extends this detailing even to places where it remains mostly unseen such as the footwell of the cabin. There are a couple of nasty ejector pin marks but they are for the most part in places where they will not be seen when the kit has been assembled. The kit also features a fully detailed stowage compartment between the engine firewall and the back seat. I didn't even know the Kubel had such a cavity! The floor of the cabin includes the longitudinal wooden strips that were a feature of this little car - but a feature missed by all previous kits. The fabric representation of the seats is excellent and the folded hood is possibly the best portrayal of folded canvas I have seen. All of this is fabulous, but there is something intangible which makes the overall kit seem even better than the sum of its excellent parts.
Building the Tamiya Kubelwagen I decided to build this one pretty much straight from the box.
In Step Two, be sure to glue the engine firewall (part B31) to parts B19 and B20 before gluing the completed subassembly to the upper rear chassis. This will correctly position these parts during the later assembly of the body of the car. I assembled the body as per Step Three, but I skipped Step Four. When attaching the rear body (part A10 to the body sidewalls (parts A11 and A12) make sure that part A10 is the right way around - the vents should be facing the rear of the car and NOT the top. I didn't pay enough attention and glued it the wrong way around. Fortunately I realised my mistake before the glue had set! I assembled the rear bumper and carefully attached it to the chassis, at the same time dry-fitting the body to ensure that all the parts lined up correctly. As with the front towhooks, the gap for the bumper mounts (parts B35 and B36) should at the top. With the body still fitted, but not glued, I attached the engine lid (part A3). I glued the front seats to the floor, and cleaned up the back seat (part B32) but did not glue it yet. At this stage I painted all inner surfaces. As is my usual practice, I pre-shaded most of the interior black, then followed up with several thinly sprayed coats of my dark yellow mix. When dry (almost immediately) I mixed a very thin oil wash of brownish black in pure gum turpentine, and applied this mix to the various nooks and crannies with a soft brush. This was the first time I have attempted an oil wash and I was pleased with the result. It does not appear to affect the Tamiya acrylic paints, and remains workable for some time. If you don't like the effect, you can remove or reduce the wash with a clean brush and turpentine. Following the painting of the interior, I glued the body to the chassis. Make sure that you don't have any gaps between the mudguards and the walls of the body. A little effort at this stage will prevent the use of filler later. I now painted the instrument panel. The only additional detail was a lens for the speedometer from a large drop of two-part epoxy cement. I chose not to add optional part A6 - the heater hood. In Step 7, I did not glue part A2 as I was going to display the stowage compartment open. Step 8 is tricky. The assembled wheels are keyed for assembly to their respective axles. However, I had trouble squaring up the wheels using ordinary poly cement. I would suggest that the best method of assembly is to "tack" the wheels in place with superglue, then flow liquid poly cement to reinforce the join. Step 9 includes the assembly of the windscreen. The use of clear acetate is commendable for scale thickness and crystal clear transparency. However, Tamiya's punch stamp has slightly stressed the acetate at the join, which is just visible at the centre of the edges of the clear section. This part is also microscopically short. If you want to fill this gap it will be tricky. I would suggest a strip of fine stretched sprue - pre painted the appropriate colour - fixed over the gap with thinned white glue. But I didn't bother. Steps 10 through 13 complete the model with all those delightful detail parts. I found that when attaching the folded hood in Step 11, it sat high because I had not fitted the optional heater hood (part A6). I did not correct this, as I was not absolutely certain whether this was an error or a feature. I glued both back doors shut and both front doors open to allow figures to be added later. I started weathering the vehicle before painting the body. I applied "mud" to the lower chassis, the doors and selectively to the mudguards using Squadron White Putty. This was applied with a small spatula (actually a staple remover - one of my favourite tools) and stippled with a stiff brush. The first coat of paint was my black pre-shading to the entire lower chassis and the shadow areas of the body. I then sprayed progressively lighter coats of brown paint to various areas of the lower chassis. I blended this with a very light coloured mix of Tamiya Buff and Flat Base, which was sprayed over the "mud" texture previously applied to the body. After the mud was painted I applied the base coat of my Dark Yellow mix. I was not modelling a particular vehicle, so I chose a generic disruptive scheme of Dark Green mottles. When the camouflage was completed, I sprayed a very thin mix of Buff and Flat Base over the tyres and rear of the car to represent dust. License plate decals, a thin black oil wash to highlight recessed detail, and a final coat of Gunze flat varnish completed the Kubel. Conclusion This project was completed over four fairly short evenings. This is an unprecedentedly short timeframe for me. Even though the kit was built out of the box, it is difficult to imagine that much could be added to improve it. Perhaps the door handles could be separated and hollowed out, perhaps a Hasegawa or Dragon engine could be added. The body assembly and wheel to axle joins are the only factors needing special care, and the high riding folded hood when the heater is not fitted is the only possible error I can find. The overall impression is quality and the reaction is fun. Even the most anally retentive modeller will find instant gratification with this superbly simple kit. What's more, it comes in at $10 cheaper than the Dragon kit (in Australia anyway). Take a break from your current superdetailing project and build the new Tamiya Kubelwagen now! Thoroughly recommended to all. Long live Tamiya! References Another unusual aspect of this project is that I didn't have to do much research. However, there is a mass of material available on the Kubelwagen specifically (from Schiffer in soft cover and hard cover form) and generally (in oft-mentioned books including the Panzer Colours series). For general guidelines to camouflage and weathering, I used the following: "SS Armour - A Pictorial History of the Armored Formations of the Waffen-SS" by Robert C. Stern, Squdron Signal Publications, Carrolltown, Texas, 1978. Photo on page 68. This is another excellent softcover general reference in the style of the Panzer Colour books Article and photographs Copyright 1998 by Brett Green.
|
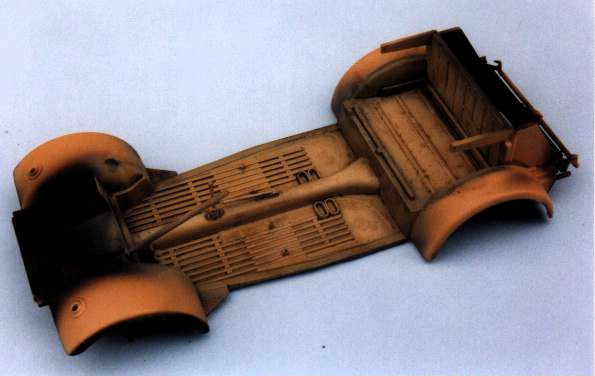 Step One involves the
assembly of the chassis undersurface and underside of the front hood. Take care to glue
the front towhooks with the gap at the top. The instructions are not clear on this point
but the boxartgives a good guide to the correct position. I ignored all painting callouts
as I intended to paint the entire undersurface in that universal
"car-underbody-brown-muck" colour.
Step One involves the
assembly of the chassis undersurface and underside of the front hood. Take care to glue
the front towhooks with the gap at the top. The instructions are not clear on this point
but the boxartgives a good guide to the correct position. I ignored all painting callouts
as I intended to paint the entire undersurface in that universal
"car-underbody-brown-muck" colour.