Home
| What's New |
Features |
Gallery |
Reviews |
Reference |
Forum |
Search
Home
| What's New |
Features |
Gallery |
Reviews |
Reference |
Forum |
Search
|
|
|
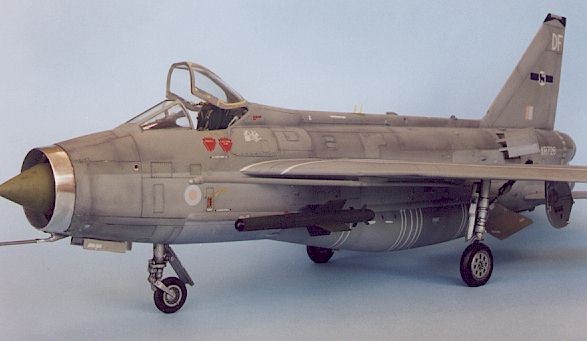
English Electric Lightning F6 by
Brett Green
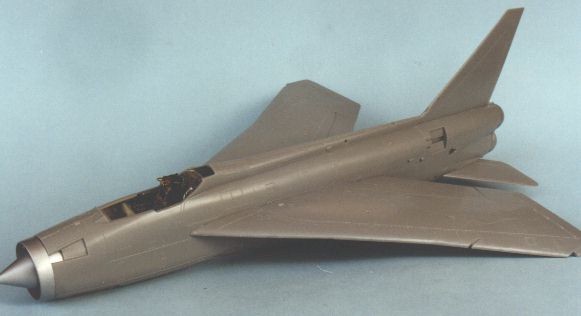
The English Electric Lightning was in many ways a remarkable and unique aircraft. In an era just emerging from propeller-driven technology and sub-mach speeds, the Lightning was a gigantic leap forward. The Lightning's design combined a novel, vertical arrangement for its two Rolls-Royce Avon turbojet engines. This powerful symmetrical configuration was aerodynamically efficient and permitted adequate performance if one engine failed. The 60 degree swept wing allowed a stunning top-speed of Mach 2.2, yet design subtleties such as the wing-tip ailerons also granted excellent dogfighting properties.
The original P.1 Lightning prototype took to the air in August 1954, and entered RAF Squadron service in 1960. In addition to front-line duties for the RAF in the United Kingdom, Cyprus, Singapore and Germany, the Lightning F. Mk53 was exported to the Royal Saudi and Kuwaiti Air Forces. The Saudi Air Force is the only operator of the Lightning to have used the aircraft in a live conflict. Australia also evaluated the Lightning when the RAAF was looking to replace its Sabre jets.
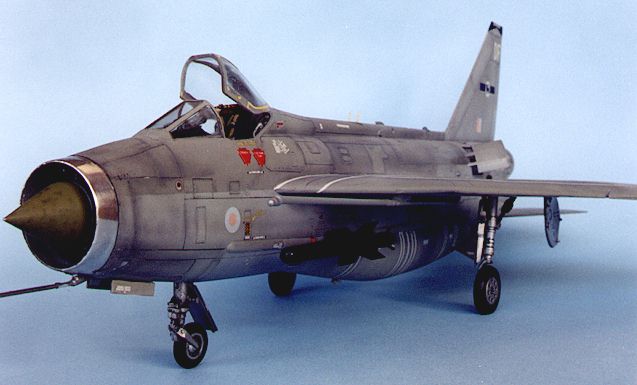
Airfix has defied the recent trend toward "safe" modelling subjects. Nobody could deny the marvellous quality of 1/48 scale aircraft releases from mainstream manufacturers over the last few years, but we should be grateful that Airfix have combined this state-of-the-art moulding with otherwise neglected modelling subjects. Airfix have seemingly adopted the challenge of producing every major post-war British fighter - they have already released the late marque Spitfire/Seafire, Buccaneer, Jaguar and Tornado. Enter the Lightning. Two boxings are available - the F-1/F-3; and the F-2a/F-6. The F-2A/F-6 kit is presented in a large, sturdy box. The size of the kit reflects the proportions of the packaging. The kit comprises around 130 parts moulded in slightly soft, light-grey coloured styrene; plus a sprue of clear parts and a huge decal sheet. The model is admirably free of sinkmarks and visible ejector pins. Surface detail is crisply engraved. This excellent package is marred only by a warped starboard wing. The instructions include detailed painting directions and a range of reference photographs. However, the diagram-only instruction steps left a few unanswered questions about the exact location or angle of some parts.
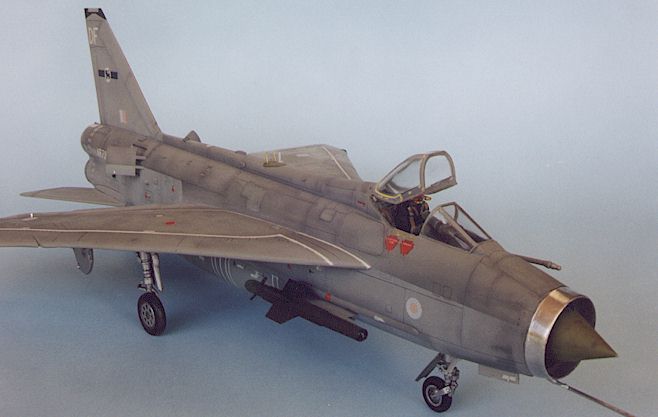
Cockpit Construction of the Airfix Lightning starts in the cockpit.
A couple of items need particular attention. The cockpit tub is cast on a resin block that must be removed in order for the tub to fit on top of the intake trunk. Be careful when removing the tub from its casting block or you will break through the cockpit floor. I made this error and had to add a styrene replacement floor. The resin bang seat is a little tall (the canopy won’t close over it) and looks tilted slightly too far forward. To compensate, I sliced a wedge off the back of the seat base. This had the dual benefits of leaning the seat back further, and lowering it sufficiently to fit under the closed canopy. The radar visor also looks to intrude too far into the pilot’s space - when deployed it is very close to the headrest of the ejector seat. The surgery to the seat base largely addresses this problem. Take care to note the correct orientation of the upper cockpit sidewalls. It is easy to install them upside down or on the wrong fuselage side. I did! Ejector loops are not supplied. Fusewire is the simplest medium to use for these small but very noticeable pieces. With a little vigilance, the Cutting Edge cockpit is a worthy accessory for the Lightning kit. The detail looks great painted up - the ejection seat in particular.
Fuselage Assembly
The instruction’s assembly sequence suggests that the ventral tank should be installed after the fuselage halves are joined. In retrospect, I would suggest that the ventral tank halves might fit better if first joined to their respective fuselage half. This resulting join line along the lower ventral tank will also be easier to clean up. The rest of the fuselage was very straightforward. In particular, the tail was almost a snap-fit. A little filler was needed behind the intake ring. Small details such as vents, antennae and other dangly-bits should be left off until the model is ready to paint, otherwise you will be left with a growing pile of tiny styrene parts broken off during the remainder of the assembly! The correct angle for the all-flying horizontal tail surfaces is not entirely clear in the instructions. They should be attached with a very slight anhedral (ie angled slightly downwards).
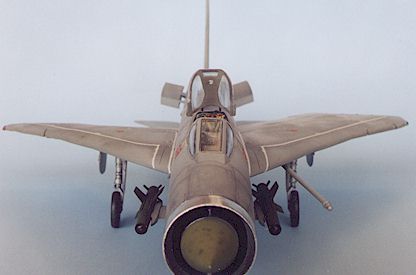
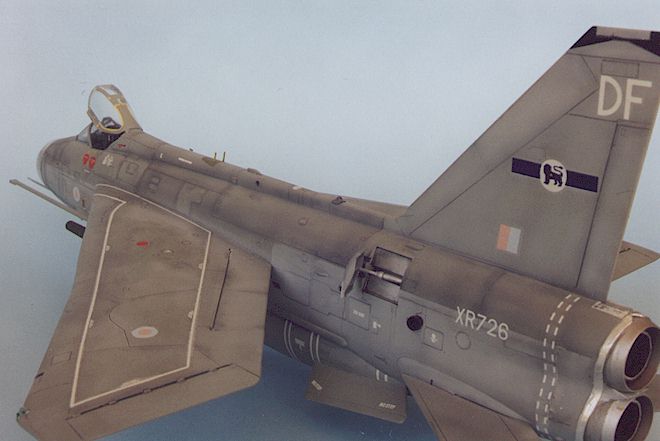
Wings The wing of the Lightning F-2a/F-6 is a complex design with a compound sweep, notches and a very slight anhedral kink. Airfix should be commended for making a serious effort to reproduce such a complex shaped wing. However, the leading edge of the kit’s starboard wing is warped. This warping is an almost inevitable consequence of Airfix's attempt at total authenticity.
I originally decided to ignore the problem, but when the wings were attached the aircraft had a slightly lop-sided appearance viewed from the front. Heat from a hairdryer was applied to the leading edge of both wings, which were then bent and clamped. Cool water was run over the wings to stabilise the new profile. This corrected the leading edge but compounded the problem in two new areas: the trailing edge of the starboard wing dropped significantly, and the top surface bulged slightly. I believe that these new problems would not have occurred if I’d fixed the warp before assembling the wing. The trailing-edge flaps were only other fit problem. When closed, the assembled flaps leave a step between the trailing edge of the wing and the top of the flap. This problem can be avoided by first gluing the top flap half to the top wing half, and the bottom wing half to the bottom flap (this would also be the ideal time to eliminate the warp with hot water or a hairdryer). When these subassemblies are dry, the wings can be assembled. You can ignore this suggestion if the flaps are depicted dropped - the fit when deployed is perfect. However, photos of parked Lightnings with dropped flaps are quite rare. Notwithstanding the warp and flap issues, the fit of the wings to the fuselage is superb.
Final Assembly The undercarriage components are simple but very effective. Location of the undercarriage parts to the fuselage is positive and strong. This is just as well, as the resulting weight of the big model and added noseweight puts some strain on the undercarriage parts. The bulge and kink in the starboard wing splayed out the starboard main gear leg slightly. Detail parts are excellent. This is the appropriate time to add all those little scoops, antennae, pitot tube, refuelling probe, speed brakes and clear lenses. The modeller also has the choice of whether to install the big over-wing fuel tanks, and/or Firestreak or Red Top missiles. I was originally intending to install the over-wing tanks, but the kink in the starboard wing spoiled the alignment of these parts. Faced with the choice of either modifying the mount on the starboard tank or simply leaving them off, I chose the latter. Self-adhesive bare-metal foil was applied to the intake ring and the rear of the fuselage to represent polished chrome.
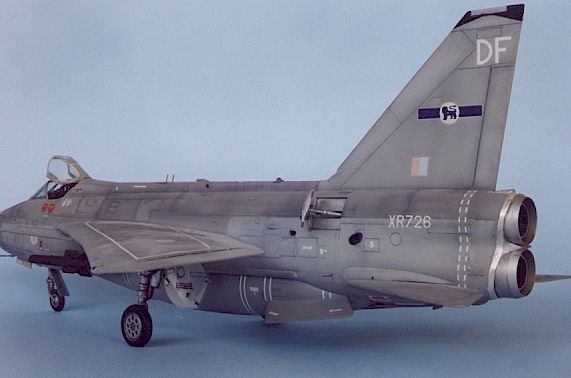
Painting I decided to finish my Lightning in one of the all-grey schemes. Due to the size of the finished model, I first applied an overall coat of Medium Sea Grey from a Tamiya Spray Can to get fast, total coverage. The Tamiya Spray is enamel paint, and sprays evenly with good results. Next I sprayed all panel lines with Tamiya XF-54 Dark Sea Grey. This colour was also used to add a darker misted coat over selected panels. The fuselage was masked and the two lighter greys were sprayed. I took advantage of the enamel base coat by using a Q-Tip dipped in alcohol to "clean off" sections of the acrylic Dark Sea Grey overspray on the upper surface and fuselage sides, exposing the lighter base coat beneath. Individual panels were also picked out in different shades of grey. The shock cone was sprayed a mix of Gunze H-80 Green and Dark Yellow to represent the faded olive colour seen on some Lightnings. A sharp 2B pencil was then run along all panel lines. This resulted in an understated highlighting of the lines on the grey camouflage.
Decals The decal sheet for the Lightning is enormous. Although the markings on later Lightnings appear sparse at first glance, closer examination reveals copious small, stencil details and walkway lines. Airfix’s decals were thin and trouble free, but patience is required due to the magnitude of the task. The decals responded well to Super Set and Super Sol. They were applied over two sittings of a couple of hours each.
The Airfix Lightning is a big project in more ways than one. The final product is impressively large; while the construction, painting and decalling is suited to the moderately experienced modeller. It was also a very enjoyable project, the results being well worth the effort. Airfix deserve a big pat on the back for having the courage to continue their journey down the path of post-war British aircraft. Let’s hope that the rumours of a 1/48 scale Airfix Canberra are true!
"Thunderbolt and Lightning" is an excellent website covering modern British military aviation. There are a large number of excellent images of Lightnings and other aircraft here. The URL is http://www.totavia.com/jetman/lightning/pictures.html
Click on the thumbnail to view the image at full size. Click the back arrow on your browser to return to this page
"Wings of Fame" Volume 7, ISBN 1-874023-97-2 "Warplane" Volume 2, No. 20
Text and Photographs Copyright © 1998 by Brett Green
|
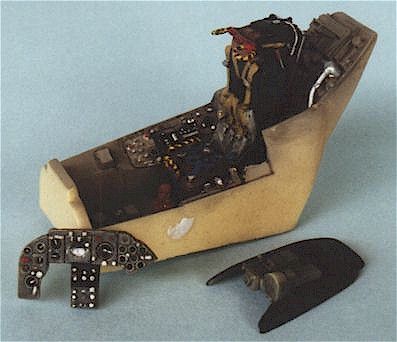 Although the kit
cockpit is not bad, I chose to use the Cutting Edge offering instead. This is a 12 part
detail set cast in a lovely, crisp butterscotch coloured resin. It includes a new tub,
upper-sidewalls, Martin-Baker Mk. 4BSC Ejector Seat with moulded-on harnesses, instrument
panel, coaming and optional position radar visor.
Although the kit
cockpit is not bad, I chose to use the Cutting Edge offering instead. This is a 12 part
detail set cast in a lovely, crisp butterscotch coloured resin. It includes a new tub,
upper-sidewalls, Martin-Baker Mk. 4BSC Ejector Seat with moulded-on harnesses, instrument
panel, coaming and optional position radar visor. 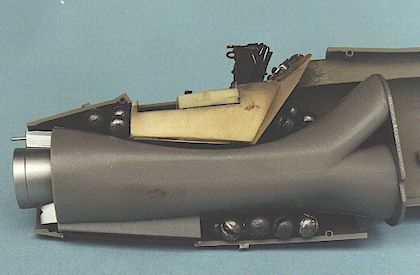 A fair amount of
weight is required in the nose to prevent this model becoming a tail-sitter.
Unfortunately, there is not much space to place weights. I used small lead sinkers secured
with Super Glue Gel.
A fair amount of
weight is required in the nose to prevent this model becoming a tail-sitter.
Unfortunately, there is not much space to place weights. I used small lead sinkers secured
with Super Glue Gel.